What Is Design Space and How Does It Work?
Learn everything you need to know about what is Cricut Design Space and how it works to help you get started making projects
You just got a Cricut machine! YAY!
But you may be a little bit stumped with the Cricut Design Space™.
There are so many options and buttons!
It can be overwhelming.
You could spend hours clicking around and making mistakes.
Or throw your hands up and leave it for another day.
Or give up on your machine and carry on with life.
Don’t worry. I have you covered.
You don’t have to be a design software pro to use and create in the Design Space.
Let me give you a quick overview of the Design Space and what each tool does to begin designing and creating your amazing projects!
***This post is sponsored by Cricut. All opinions are my own. Thank you for supporting the brands that make it possible to bring you new projects. ***
***This post contains referral or affiliate links. It is a way for this site to earn advertising fees by advertising or linking to certain products and/or services. Please read my full disclosure here ***
What Is Cricut Design Space?
Cricut Design Space is the software interface between you and your Cricut Machine.
You can design your projects in the Cricut Design Space™ and communicate with your Cricut Machine and send data to help you make your project.
It is a cloud-based app that can be used and synced across various desktop, phone, or tablet devices.
Cricut Design Space™ includes a suite of tools to create, modify and personalize any Cricut project. It also has an extensive library of images, fonts, and pre-designed projects.
You can choose from thousands of available designs or make your own in Design Space and complete your project.
Do You Have to Pay to Use Cricut Design Space?
Cricut Design Space is free for anyone to download and use.
You get access to a LOT of free images and fonts. However, there are many images and fonts that are available for a nominal fee.
You do have the option to sign up for the Cricut Access membership, which gives you access to over 100,000 images and 400 fonts!
If you regularly create designs and projects, it would be well worth it to sign up for the paid membership.
How Does Cricut Design Space Work?
Design Space allows you to layout and modifies designs to create your projects with a Cricut machine.
What Can You Do with Design Space?
- Create new projects
- Combine exsitsing shapes, fonts, etc to make new designs
- Modify pre-made designs
- Upload your own designs
- Save your designs for access anytime.
- Share projects with the Design Space community
- Work with projects shared by the community.
When you opened your machine, the enclosed instructions probably already guided you through installing Cricut Design Space and connecting your machine.
Getting started:
- Download the Cricut Design Space App – depending on the device you are using.
- Sign up for a Cricut ID
- Pair your machine.
Note: You do not need a machine to create an account, install your software and start playing with it!
Here, I will be going over the desktop version of the app. The tablet and phone versions are very similar and can perform the same functions but the controls look and work slightly differently.
Let’s dive into it!
The Cricut Design Space has three screens
- The Home Page – to find new and saved projects
- The Canvas – create or design your project
- The Make it page – This is where the final settings and material selection happen before communicating with the Cricut cutting machine.
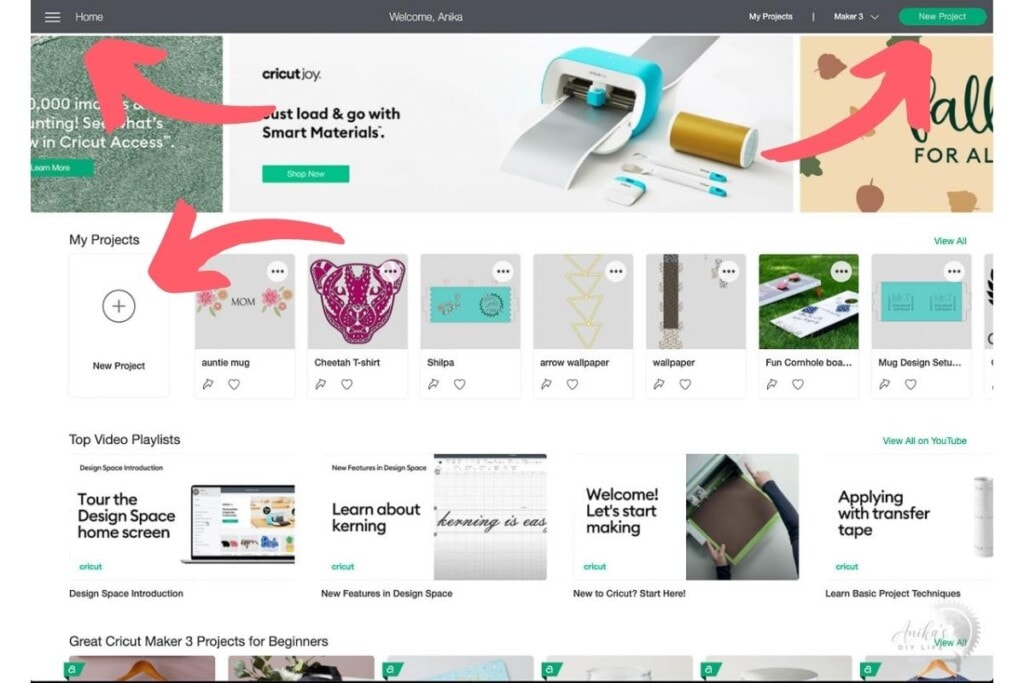
The Home Page
When you open Design Space, it will start at the Home Page. This page is divided into 5 main parts –
- The header – Contains the Menu, A quick link to all your saved projects, machine selection, and “new project” button which opens the canvas.
- The banner – Automatic carousal with new features, special offers and other new information.
- My projects – all your projects.
- Video tutorials – video tutorials for various features of the Design Space and Cricut projects.
- Ready to make projects – ready-made projects that you can”plug and play” – either created by Cricut or by community members.
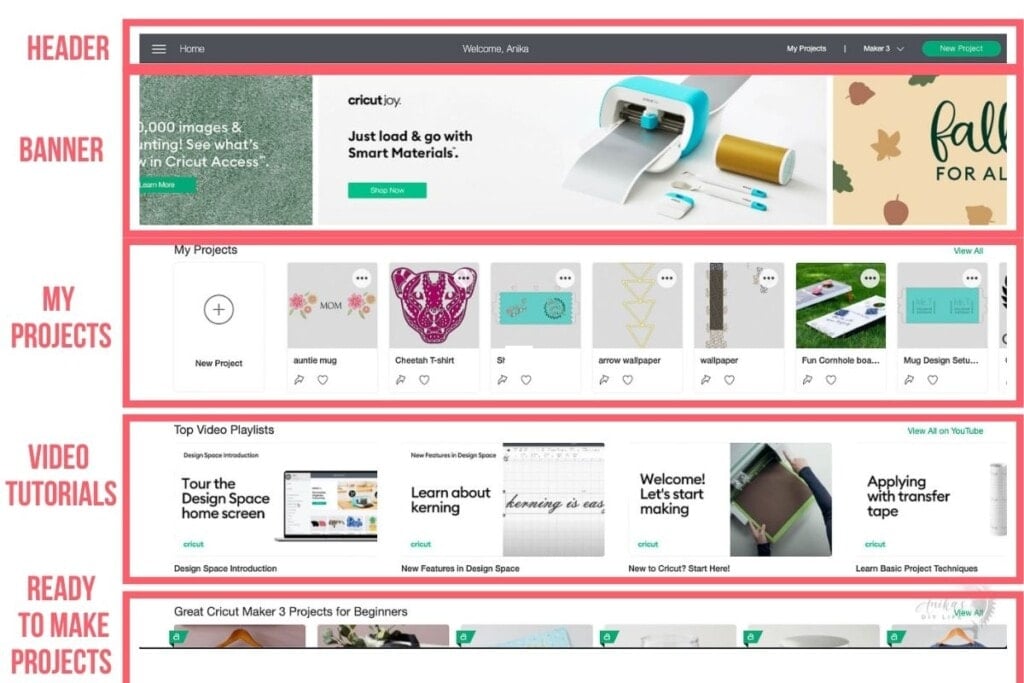
As you keep scrolling past the ready-to-make projects, it will continue to load more project ideas for various categories.
The Menu
The menu in the header of the homepage can be opened by clicking the three lines (or hamburger) on the left.
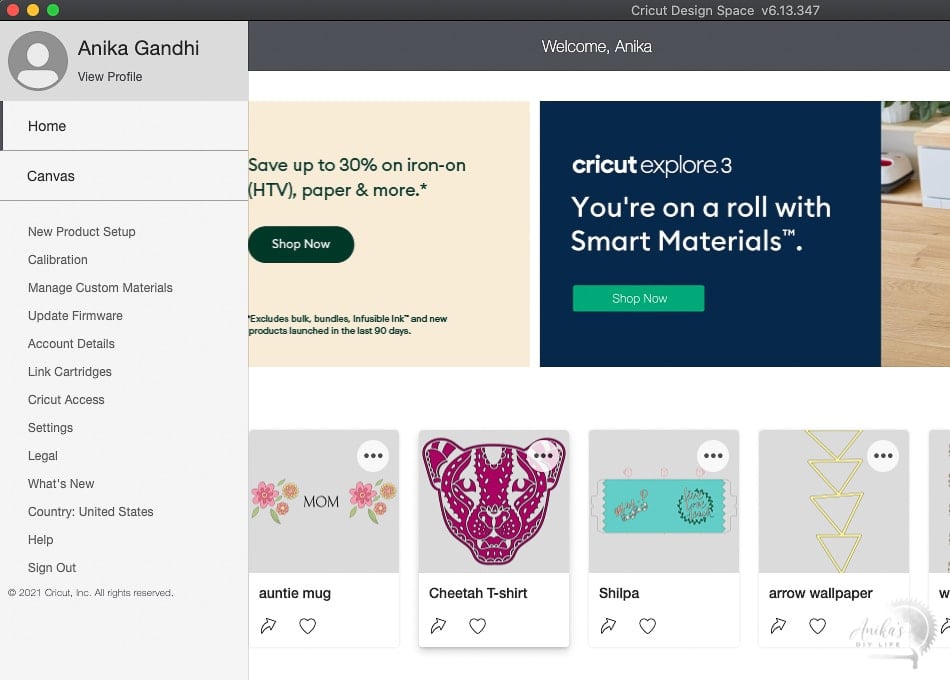
It contains a link to the canvas and a bunch of settings including new machine setup, calibration, firmware updates, etc.
The Canvas
The canvas is where you create and edit the project you want to make.
It can be accessed from the Home Page from three different locations:
- The hamburger menu on the top left corner
- The “New Project” button on the top right corner
- The “New Project” option in the My Projects section.
At the very top of the canvas is the header. Next to the green “Make It” button on the right corner, is the machine selection.
It is important to pick the exact machine you will be using for the project. Not all machines allow for all tools and operations. Selecting the correct machine will populate the canvas with the available tools.
Tools available on the canvas:
- The design panel (on the left)
- The tool bar (on the top)
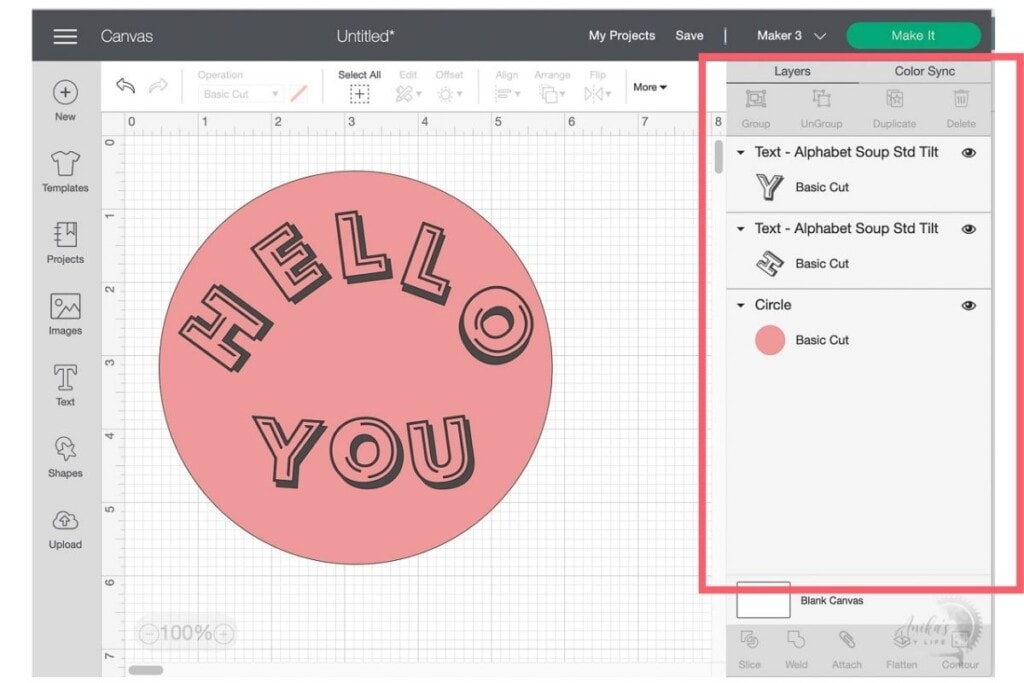
- The layers (on the right)
- The design tools (right click menu)
The Design Panel
The Design Panel on the left has a lot of important buttons. Below is a rundown of what each tool looks like. Descriptions for each follow below.

NEW
To open a new blank canvas page for your project.
TEMPLATES
These are templates of the most commonly created projects using a Cricut machine-like t-shirts, totes, banners, etc.
They give you a reference of the size and shape of the item to help with the placement of the designs.
Note – These images will not cut when you run the project. They are merely there for reference.
PROJECTS
These are pre-made project ideas for various occasions, styles, and categories.
You can easily search and filter by category to find a project that might work for your needs. You can even use one of these projects and modify them to fit your need using the toolbar on top of the canvas (more on that below)
IMAGES
This is the library of thousands of images. You can search by keyword or browse the available categories to find something that works for your project.
Many of these may be available via Cricut Access and are clearly marked.
TEXT
This is where you can add words and phrases to the canvas.
When you are adding text, the text edit toolbar will also appear in the top toolbar to help you customize the text like:
- Change fonts – you can access System and Cricut fonts
- Letter spacing
- Alignment
- Curvature
- And a lot more!

SHAPES
These are a collection of basic shapes – like circle, square, triangle, star, etc. Shapes can be combined and edited to create custom projects.
UPLOADS
If you would like to use your own image, you can upload a .jpg, gif, .png, .bmp, .svg, or .dxf image files and create your project.
The Tool Bar
The toolbar on top is where a lot of the magic happens.
It has lots of design controls that are very intuitively labeled. They turn on and off depending on the machine, design type, and operation you choose.
For example, if you choose “draw” for the operation – you will get the choice for picking the pen to be used in the project.
If you are editing text, you will get the text edit menu where you can change the font and size.

Other popular tools include the align and arrange which help with the placement of designs.
The Layers
The layers panel shows each item on its own layer of your designs.
The color choice of each layer is VERY important. The software will group the layers with the same color onto the same material and hence the cutting mat.
You can change the order, turn on and turn off layers from this panel.
The Design Tools (Right-Click Menu)
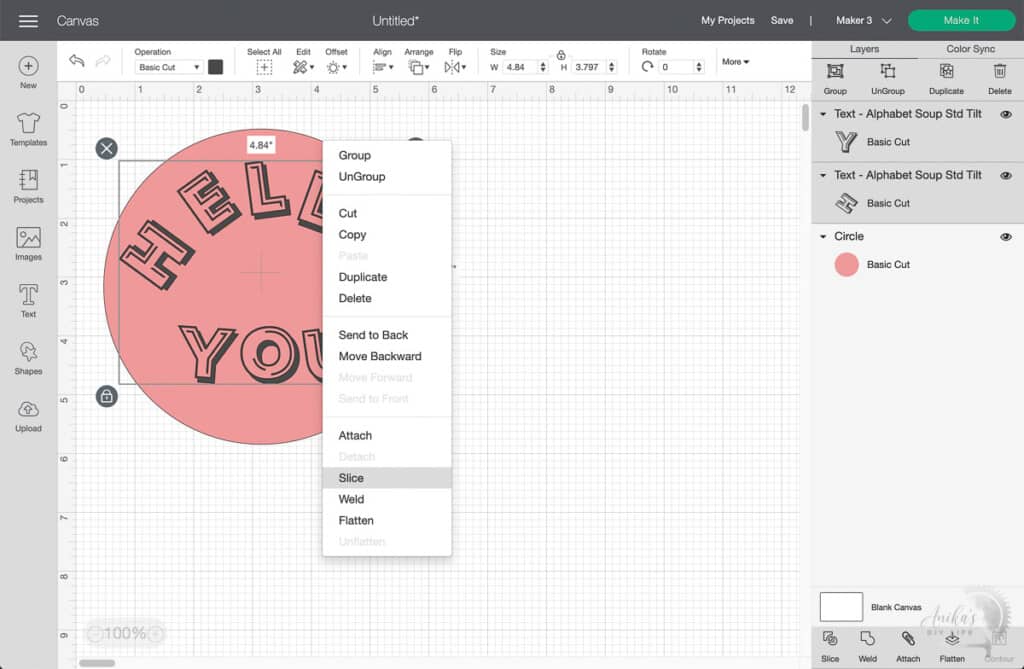
This is activated by the right-click of the mouse.
Apart from the usual right-click options, there are a few very useful and important functions-
- Attach – it keeps the selected layers together – in their location or the cutting mat
- Detach – opposite of attach.
- Slice – it splits overlapping images into different parts. It’s like taking a cut out of the image.
- Weld – Joins shapes by removing any lines
- Flatten/Unflatten – it converts an image from a Cut image to a Print image, leaving just an exterior cut line around the outside edge.
The “Make It” Page
Once you are happy with your design, you can send it to the machine for cutting by hitting the “Make it” button.
This brings us to the screen where each layer is placed on its own virtual mat for cutting.
Here you can:
- move the images to change placement on the mat if needed.
- change the size of the mat you are using
- mirror the image if needed.
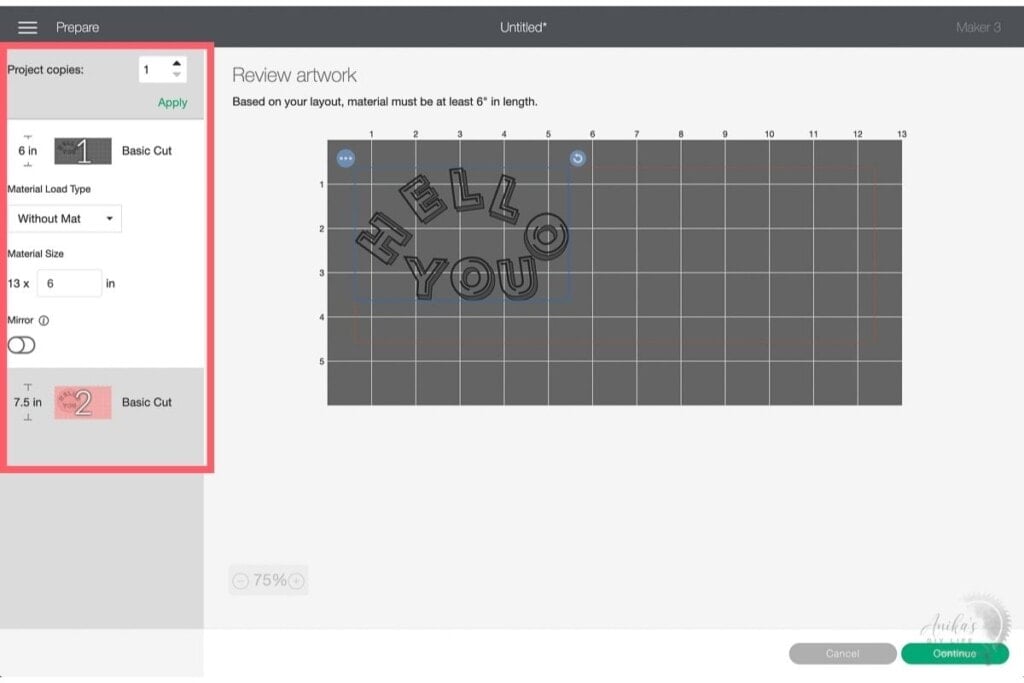
Once you are satisfied, you can hit continue to be taken to a material selection screen which will then guide you through loading the appropriate tool and mat and the process of making your project on the Cricut machine.
This was a very preliminary overview to get you familiar with Cricut Design Space. My best advice to get comfortable with it is to simply play around and have fun –
- Pick a small pre-made project and make it.
- Pick a pre-made project, customize it to your liking and make it
- Use an available graphic or design and make something.
- Create your own design using available elements in Design Space.
As you get comfortable with the software, you will be able to do a lot more every time!
Supplies to Complete Your Project
Cricut Design Space is the software, but you’ll also need something to cut. The basic items you will need are –
- A Cricut machine. Cricut Joy is a great starting point but the Maker 3 is my favorite.
- The material you want to cut. Paper crafts, vinyl and iron-on projects are great starter projects
- Compatible cutting mats if your machine needs it.
- Weeding tools
More about Cricut
Anika's goal is to inspire and empower beginners with woodworking, DIY, home improvement, and home decor ideas.
She wants everyone to unlock their creative potential and experience the feeling that comes with making something. Nothing feels better better than seeing something and saying "I can make that!"


