DIY Device Charging Station
Build a simple DIY device charging station to get the wire clutter under control with a family charging station, including a built-in wireless charger.

Every year, another family member gets a new phone or tablet, and a new device gets added to the charging pile. So many cords!
If your charging cord situation looks like a rat’s nest, you’re in the right place to create a custom solution with your woodworking skills to charge your:
- Mobile phones
- Laptops
- Smart watches
- Tablets
- And more …
The Problem With Cords
It’s been six months since I remodeled my kitchen.
It is my dream kitchen – the tile, the countertops, the colors… everything!
It’s the hub of our home, where we all gather.
And all of our electronic devices gather too, in one central area to charge. My beautiful kitchen is now marred by …
Cord clutter
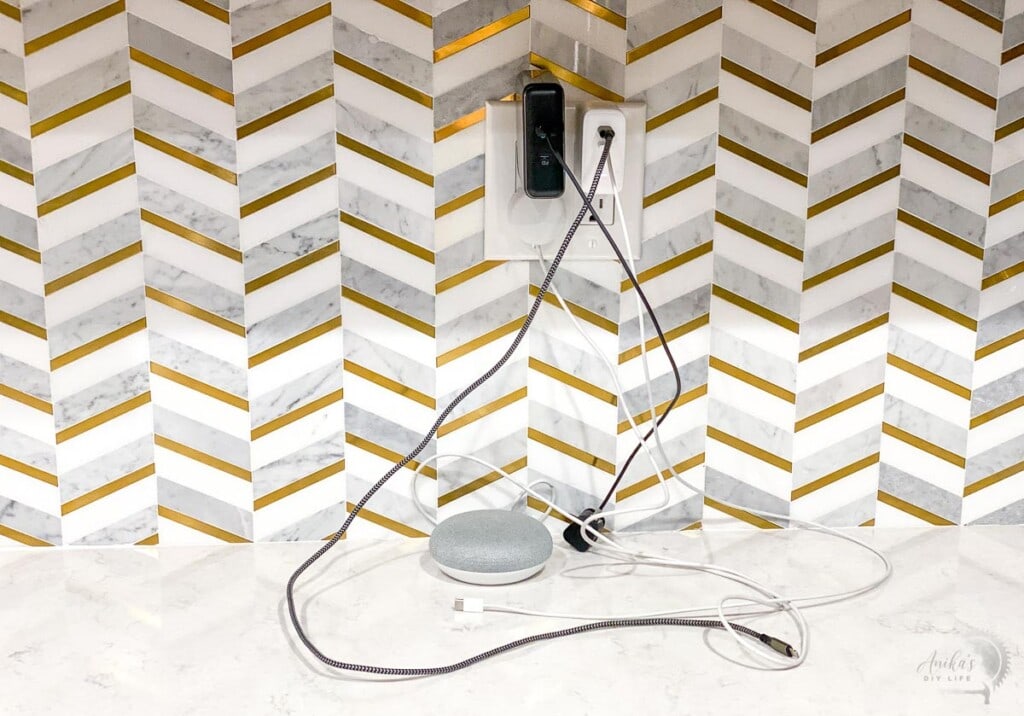
We need all those wires. We need to charge all types of devices.
Tangled cords in a multitude of colors look ugly.
Let’s get a handle on this mess.
That’s why I created this quick & easy project to organize all of the wires and cords (oh my!) into a family charging station.
With this one solution, you can hide all the power cords you may need for your vast array of electronic devices that need daily charging.
What Does a Charging Station Need?
Ask these three questions to plan the charging station:
- How many devices do you need to charge at a time?
- What type of ports do they need?
- What type of devices are they?
This will define the design of the charging station to make sure that there’s:
- Enough space for all the devices you would need to charge at the same time
- Enough ports to plug in all the cords.
If you’re unsure of the answers to these questions above, watch your family’s charging behaviors over a week to see their charging needs.
Designing Your Charging Station
The custom design of your charging station must be based on the needs you discovered above. If you buy an off-the-shelf charging station, I guarantee at least one of your devices (if not a BUNCH) won’t fit.
Based on observing my family’s charging habits, we need a charging station with:
- 3 slots for phones/tablets – 1 for a tablet and 2 for phones.
- USB A and USB C ports
And because I wanted to make it a little more fun –
I decided to add a wireless charger too.

Why a wireless charger is a smart choice for a home charging station
- No cords needed
- Drop and go charging
- Skip replacing cords with a wireless charger. Don’t have to worry about the kids ripping out the devices and breaking the ports.
Let’s get building!
***This project is sponsored by Arrow Fastener. All opinions are my own. Thank you for supporting the brands that make it possible to bring you new projects. ***
***This post contains referral or affiliate links. It is a way for this site to earn advertising fees by advertising or linking to certain products and/or services. Please read my full disclosure here ***
Material Needed
- Lumber per the plans
- Miter Saw or circular saw
- Palm router and straight bit(optional)
- GT300 glue gun
- ET200BN electric nailer
- 3/4″ Forstener bit
- Power Strip with USB ports
- Wireless charger (optional)
- Edge banding to match your plywood
How to Build
Follow the step-by-step plans using the simple tools outlined below. Even a beginner can have success with this super easy project.
STEP 1 – FINALIZE DESIGN
Super important:
Before you start building, you MUST think about what you need most from your charging station.
How you can make this charging station project your own:
- Leave out the wireless charger if you aren’t comfortable with using a router.
- Make the finished size larger or smaller based on your needs
- Add more slots for more devices.
STEP 2 – PREPARE BOARDS
- Make the cuts from the boards following the plans.
I decided to use oak for my project – I already had oak plywood scraps from building the kitchen shelves. I could have a matching charging station.

I picked up 1/2″ oak hobby boards from the store to complete the project.
Making the cuts should be pretty straightforward with a miter saw or circular saw.
- Edge band the top plywood board to cover the raw plywood edges for a finished look (I forgot about this and did it at the end but it’s a lot easier to take care of it at this point).
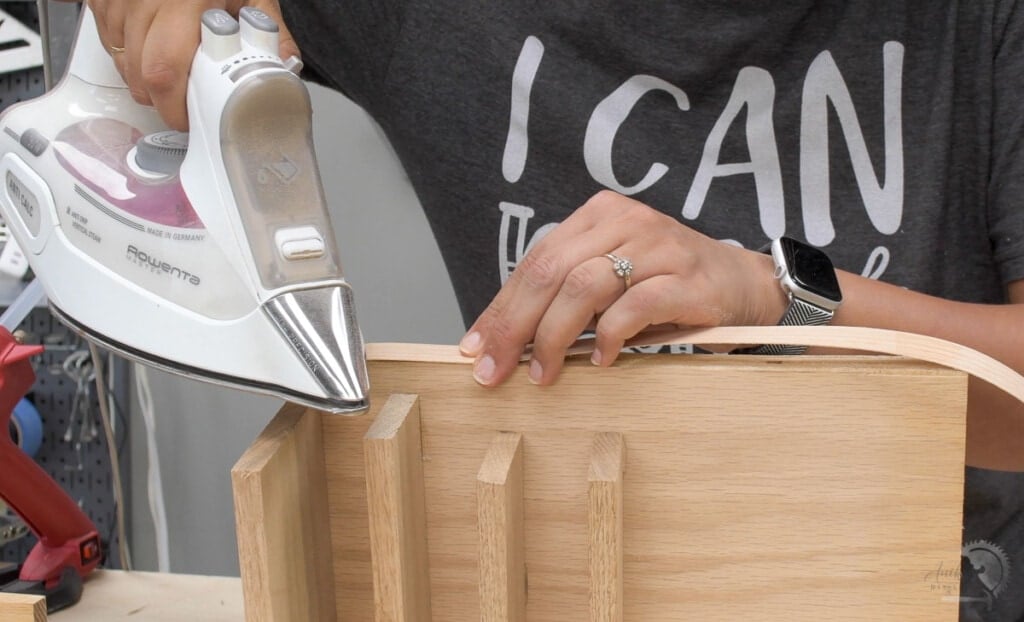
- Sand down all the boards and prepare them for assembly.
STEP 3 – BUILD THE BOX
- Attach the 3 sides to the bottom plywood piece.
Hot glue dries almost instantaneously, holding things in place while you add nails to reinforce the joint.

I used the GT300 glue gun to hold the pieces in place and then used the ET200BN electric nailer to attach.

Note – If you find that the nails don’t sit under the surface, use a few taps of a hammer to push them in.
The box is essentially the bottom and the three sides. The back is open.

STEP 4 – ADD LID SUPPORTS
- Attach the square dowels to each of the four corners using hot glue.

These will help hold up the lid when the box is closed. The opening in the back will help grab and open the cover when needed.
STEP 5 – ROUTE FOR WIRELESS CHARGER
This step is if you want to install a wireless charger.
- Measure and mark the exact location for the wireless charger on the back.
- Make a starter hole with a Forstener bit.
Be carefull not to go all the way through.

- Set up the straight router bit such that it is at least 1/8″ less than the thickness of the plywood and route out the circle for the wireless charge to sit in.

You want the plywood between the wireless charger and the phone to be as thin as possible to allow for it to work efficiently. Go as thin as possible without compromising the integrity of the plywood.
You might need to go in steps for the depth to not over-work the router bit.
- Once I had made the space for the wireless charger, I also routed out a little groove on the side to accommodate the connector.
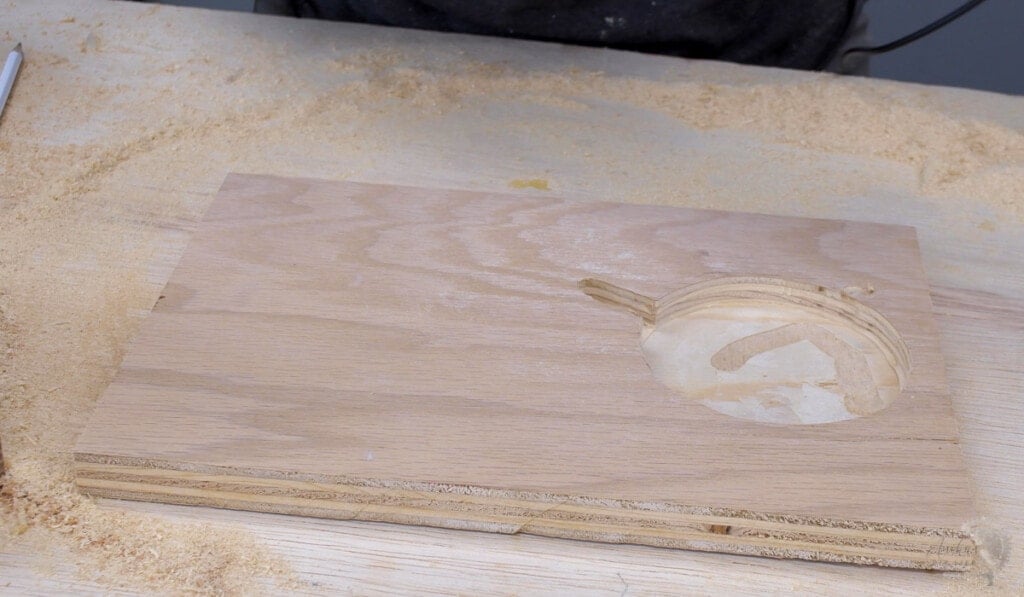
At this point, I tried the charger through the plywood, and it worked!
STEP 6 – ATTACH DEVICE SUPPORTS
I had decided to add enough space for three devices, so I added four supports – the back support is a 1×4 to support larger tablets, and the others are 1x2s for the smaller devices.
- Attach the supports using the GT300 hot glue gun to the top making sure they are centered and straight.

I was going to turn over the top and attach with nails from the underside, but they were already pretty strong and I didn’t think it was needed.
STEP 7 – ADD HOLES FOR WIRES
Once the device supports are in place, you get a good idea of where the wires will need to come from.
- Using a Forstener bit, make holes on the side of the box for the connectors. I added 3 holes for our devices.

It is essential to use a Forstner bit because it prevents splintering of the boards and gives a clean hole.
STEP 8 – FINISH
Now that everything is assembled, you can paint or stain in the color of your choice.
Here’s what I did –
- Stained with a mixture of Early American and Classic Gray stains to match my shelves in the kitchen.
- Applied a durable topcoat.
I attached a decal that I made with my Cricut on the top to identify where the wireless charger is located so we can easily place the phone on the charger.

Now we don’t have to spend time figuring out the placement of the phone every time.
STEP 9 – ADD THE POWER
Finally, install the cords and wireless charger inside of the wood charging station base.
- Add the power strip inside of the box using hot glue.

- Add the wireless charger in place with hot glue.

Use as little hot glue as possible but enough to hold it in place. If there is too much hot glue, it adds more insulating material and will reduce the charger’s efficiency.
For the Power Ports
I found this power strip with plug points and USB A ports. However, a lot of the newer devices need fast charging compatible ports.
Plus, we have a bunch of USB C cables.

Increase the number of devices by using a fast-charging plug with multiple USB C ports, like this one –
- The wireless charger needs a fast charging plug
- Newer devices charge faster with a fast charging plug
- Increase the number of devices by adding more of these plugs
This is it!
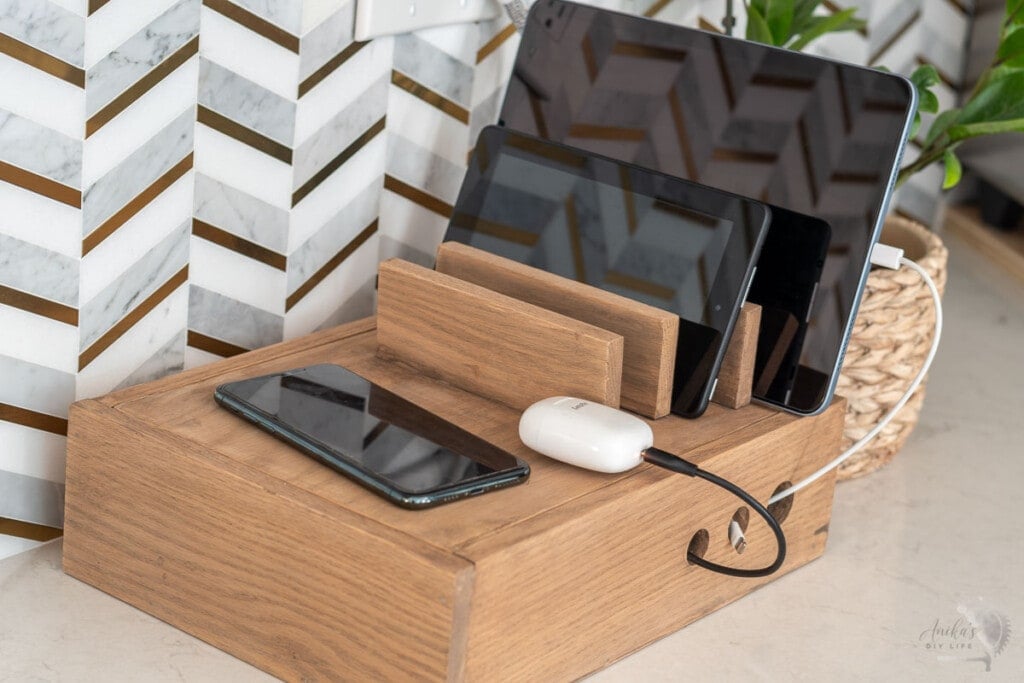
Now that jumble of cords on the counter is under control.
When not in use, you can push in the connector to store it.
With this ONE project, in a couple of hours:
- All your devices and wires are stored neatly in one place
- You can find your devices quickly
- You finally used that scrap wood you’ve been saving for 3 years
- The cord clutter monster is GONE.

Small project. HUGE impact on clutter.
BONUS TIP: Store extra unused cords hidden in the box, so they’re handy when we need to plug them in but not taking up ports when not in use.
Printable Plans
Get the printable plans to make your own charging station NOW:
You Might Also Like
Anika's goal is to inspire and empower beginners with woodworking, DIY, home improvement, and home decor ideas.
She wants everyone to unlock their creative potential and experience the feeling that comes with making something. Nothing feels better better than seeing something and saying "I can make that!"


You might want to add some venting for the heat buildup from all those chargers in a small, enclosed space.
As well as provide a barrier between the chargers and the counter surface. Chargers can get hot and can discolor or even melt laminate countertops.
Hi Jack, Thanks for the suggestion.
The box is open at the back for this reason. Also, there is a pretty thick layer of insulating wood between the chargers and the counter. They are not in contact with the counter. The chargers will have to catch on fire before the heat will go through the 3/4″ thick wood – in which case a melted counter would probably be the least of the worries 🙂