How to Paint a Shed the Right Way in Two Days – A Full Tutorial
Learn how to paint a shed from start to finish in TWO days. This step-by-step tutorial shows how to paint a wooden garden shed the right way, so it lasts for years.

I gave my outdoor shed a new, completely different look.
It is one of those projects I have dreamed of for a while but seemed way too intimidating to tackle.
The shed in our backyard is one such project.
I guess I could actually call it a she-shed because it does store all my scrap wood and paint, a few original packaging boxes of tools like my miter saw and table saw because I refuse to throw them away, plus a whole bunch of random crap.
The inside is a big hot mess, and the shed itself is bare to the studs.
But we are not talking about the inside of the shed today…
We are talking about the outside!
Painting a Shed – The Before
There was nothing really wrong with the paint on the shed… it was in great condition.
There were, however, a few other little things that needed fixing…

But the one MAJOR issue I had with the shed was…
it was boring and nondescript, AND I hated the color!
It matches the color of our home…
So, yes, I hate the color of our home too, but that is going to be a HUGE project!!
But to start off with, I decided to tackle painting this outdoor shed and pool equipment enclosure in the backyard.
I have been slowly updating and adding things to the backyard to make it fun, functional and colorful, and organic like I did with the patio makeover.
For the shed, I decided to go with deep teal and dark brown trim.
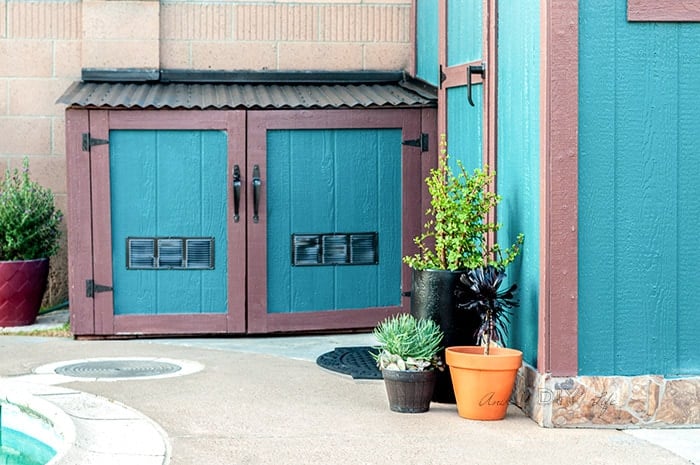
Nope, I am not going to be painting my house in this color… but who says the shed should always match the color of the house. Yes, I am a rebel 🙂
****This post is sponsored by Wagner. All opinions are my own. Thank you for supporting the brands that help me bring more projects to you.****
***This post contains affiliate or referral links. It is a way for this site to earn advertising fees by advertising or linking to certain products and/or services. Please read my full disclosure here ***
How to Paint a Wooden Shed
The process of painting a wooden shed is honestly not all that different from painting anything else – walls or furniture.
You clean, you prep, you paint, and you’re done.
Guess how long it took me to do all of that?
A total of 5 hours across 2 days!
Here is a breakdown of the time –
- Cleaning – 30 minutes
- Sanding – 30 minutes
- One coat of primer – 30 minutes
- Three coats of Paint – 1 hour
- Painting the trim – 1.5 hours
- Painting hardware – 1 hour
It is easily doable over a weekend without breaking a sweat (that is assuming its nice weather outside – unlike the 85-90°F weather I faced)
My weapon to make this happen so quick – The Wagner FLEXiO 3000.
Supplies Needed to Paint a Shed
Ideally, you could do this with a paintbrush and some basic painting supplies, but here is what you need to get the job done quickly.
- Pressure washer
- Painters tape
- Plastic tarp or pre-taped painters plastic – The pre-taped plastic is SO awesome!
- Sanding block and 180 grit sandpaper
- Paint Sprayer – the Wagner FLEXiO 3000 is perfect for this job. You will see below why.
- Primer meant for outdoors. I used this gray primer because I was planning to paint a deep dark color. You can use a white primer if you plan on painting a light color.
- Exterior grade paint. Be sure to get good quality paint that will last and be durable through all the seasons. I definitely don’t want the deep teal fading because that would not look good!
- I used Behr Marquee “Walk Me Home” for the main color
- I used Behr Marquee “Briarwood” for the trim
- Good quality paintbrush. This is my go-to paintbrush for any job – the flexible handle is comfortable to hold for long periods of time. The high-quality bristles work well for a long time! I have had mine for almost 2 years now.
- A paint pail. This is my absolute favorite to use when I need to hold paint and climb up and down ladders and paint trim for a long time.
- Outdoor metallic spray paint (optional). I used it to update all of my hardware. If you are not planning to update hardware, you don’t have to worry about it.
Painting your shed – get all the supplies delivered to your doorstep
GET THE PRINTABLE VERSION OF HOW TO PAINT A SHED THE INSTRUCTIONS HERE.
How to (Re-)Paint a Shed Quickly
Step 1 – Cleaning and Preparation
As they always say, the most important step in any painting project is preparation. No matter how boring it is, the preparation determines how well your final project turns out. Here is what I recommend to prepare for painting. You might need more or fewer items to be prepared, depending on your shed situation.
- Remove any exterior electric fixtures and tape to protect all the exposed wires. Be sure to turn off the main power first! I had two old lights on the sides of the shed that needed to be replaced. Both of them did not work anymore anyway.
- Remove any old hardware. In my case, it was the remnants of an old broken lock, various screws, and a random piece of metal attached to the pool equipment enclosure.
- Clean the entire structure with a pressure washer and let it dry. The weather plays a very important role. I was doing this in the middle of summer and had to only wait a few hours for everything to be dry.
- Tape off any parts of the shed you do not want to paint, including windows, hardware, lights, or trim. I taped off the window and the bottom platform of the shed. I didn’t bother taping the trim or hardware because I was planning to paint it all anyway.
Taking the time to prepare everything makes for much better project quality and saves time in the long run!
TIP – Use pre-taped painter’s plastic to make it easy to tape. However, be prepared to use a separate roll of tape to make sure everything stays in place.
Step 2 – Sand the Shed
- Use 180 grit sandpaper on a sanding block and sand down the entire structure.
This is one task I was dreading the most but honestly didn’t turn out to be that bad except that it was equivalent to a few hundred squats.
I researched a lot if I needed to sand before painting. I didn’t find any specific tutorials to paint outdoor structures that mentioned sanding the structure before painting.
Since the shed was previously painted and the finish seemed glossy, I decided to go ahead and do it the right way and sand to give the primer and paint something to grip to.
- Finish with another power wash to get rid of all the dust from sanding.
Step 3 – Apply the Primer
This is where the magic starts to happen.
Once again, I don’t see a lot of tutorials using primer, but I thought it needs to be done right, and primer is just like adding one more coat of paint.
I loaded up my Wagner FLEXiO with grey primer.
How to use a paint sprayer for primer
To use my Wagner FLEXiO paint sprayer to prime the shed, I followed the below steps.
- Add primer to the material cup and fasten the cap.
- Set the spray width control to high
- The material flow should be 9-10 for a primer since it is a thick material. It can be adjusted down or up depending on the primer you use.
- X-boost power dial was set to high, which gives faster coverage with a smoother finish for thick materials.
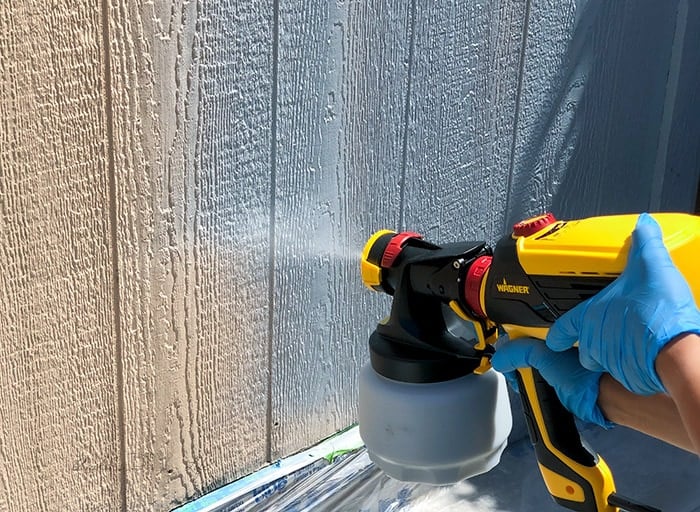
As soon as I started applying the primer, I knew it was going to be a quick job!
I was surprised at the amazing coverage in such a small time.
It took me about 30 minutes to paint the entire shed in primer… well, actually only 2 walls because the other two can’t be accessed.
TIP – Use continuous up and down motion with overlapping coats to get the best coverage without any drips.
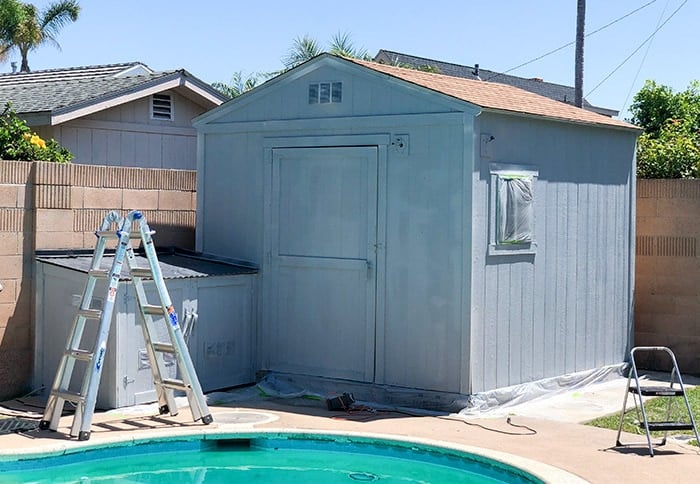
Here is the garden shed in all its grey glory…
Honestly, I was kind of digging the grey. It was the absolute perfect grey primer!
But I also couldn’t wait to add paint.
I let the structure dry overnight and started painting the next day.
Step 4 – Paint the Shed
Finally, it was time to paint the shed.
I had a dilemma –
- should I tape the trim before painting, or
- should I just paint and then cover the overspray on the trim since it was going to be a darker color.
I decided to go with the latter. I did, however, tape the air vents.
How to paint a shed with a sprayer
This is how I went about painting the shed with my Wagner FLEXiO paint sprayer.
- Load up the Wagner FLEXiO with paint.
- Set the spray width control to low to achieve the lowest possible overspray.
- Set the material flow to 6-7.
- “Cut-in” around the trim area.
- After “cutting-in,” set the spray width control to high and paint the rest of the wall.
With the lower spray width, there was very little overspray on the trim, and I was happy I went with that decision.
I added 3 coats of paint. Because it was a hot day, by the time I went from one end of the shed to the other, paint for dry to touch, and I could easily start the next coat right away.
A note about cleaning the paint sprayer
One of the most common questions I get from readers is the sprayer using more paint and the clean-up involved with paint sprayers.
The time that the sprayer saves during the actual painting more than makes up for using slightly more paint. It took me about 5-7 minutes to clean up my paint sprayer after each use – not bad at all! Just think about how long it would have taken me to paint the shed using a paintbrush and roller.
Step 5 – Paint Trim.
I decided to paint the trim a dark brown color.
If it were a large structure like a house, you could also spray the trim, but I decided to go with a brush for the little structure.
- I used my favorite little brush to simply cut in around the trim and paint it.
- If you are not comfortable with cutting in with a brush, you can tape it. Since it is fresh paint, I recommend using this painter’s tape.
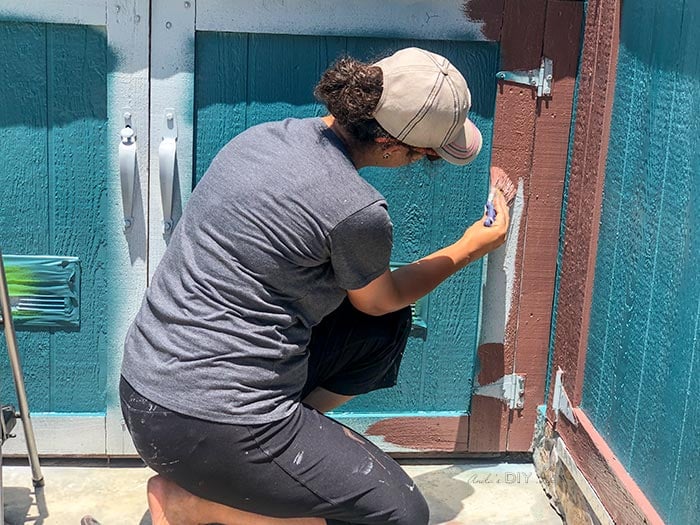
This ended up being the part that felt like it took forever because it was almost mid-day, and it was pretty hot. But overall, it took only about 90 minutes which is not bad at all!
Step 6 – Paint Hardware
This is an optional step depending on your situation.
I wanted to paint my hardware dark, so I decided to go with oil-rubbed bronze.
Also, you might want to take off all the hardware and paint it if you are up for it. But then, this post wouldn’t be called how to paint your shed in 2 days.
So, here is the lazy girl’s way –
- Remove any easily removable hardware and spray paint. In my case, it was the air vents.
- Tape around the hardware in place. I found that 3 widths of the 2″ painter’s tape were good enough protection. I used Rustoleum Universal spray paint, which had minimal overspray.

The metal roof on the pool equipment enclosure also needed new life, so I taped around it and spray painted that in oil rubbed bronze as well.
Step 7 – Add finishing touches
I added a couple of motion detector lights on the shed – one that is a pretty lantern and the other a basic motion detector LED floodlight.
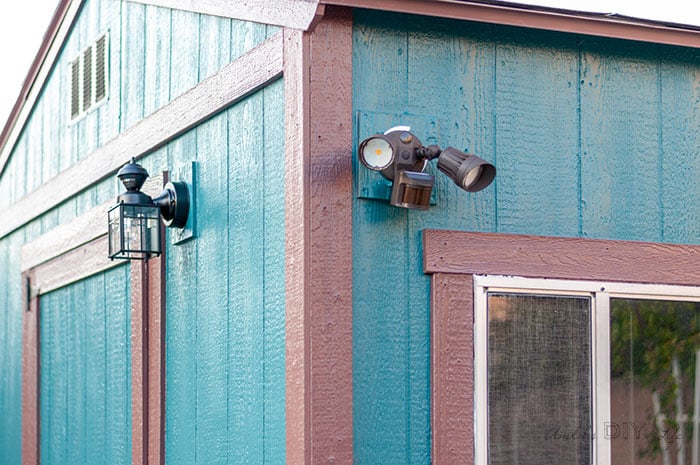
A couple of new planters complete the look.
GET THE PRINTABLE VERSION OF HOW TO PAINT A SHED THE INSTRUCTIONS HERE.
Before and After Shed Makeover
And before we go, Who doesn’t love a good before and after!
This is how we started-
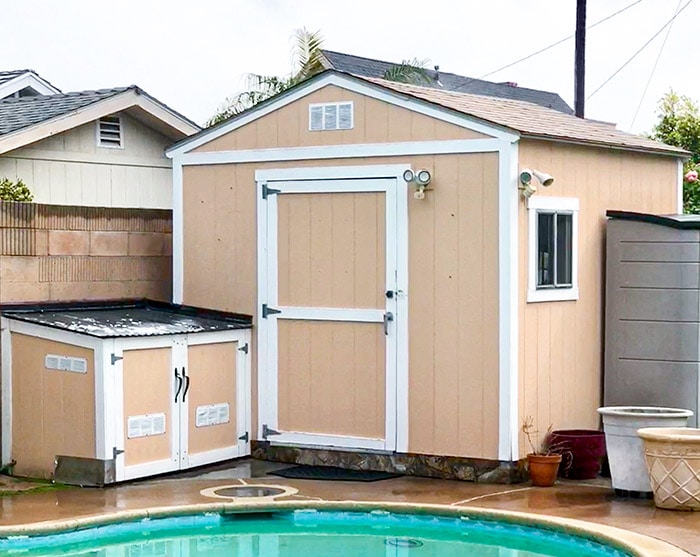
Here is the after –
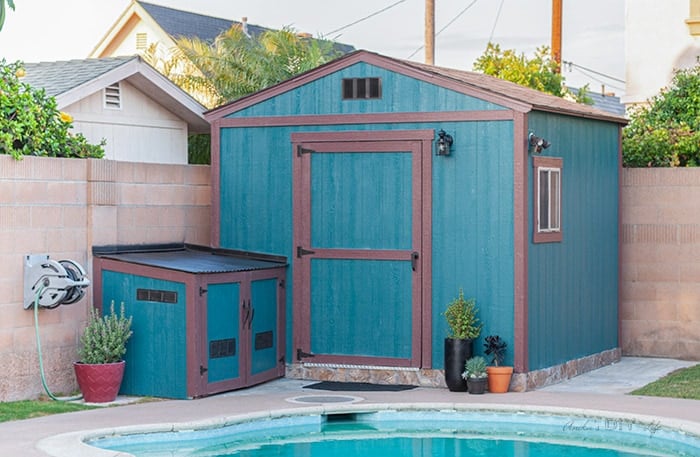
Related: See more ideas on how to use the Wagner FLEXiO 3000
Supplies Needed for Painting a Shed
- Pressure washer
- Painters tape
- Plastic tarp or pre-taped painters plastic
- Sanding block and 180 grit sandpaper
- Paint Sprayer
- Exterior Primer
- Exterior grade paint.
- Good quality paintbrush.
- A paint pail.
- Outdoor metallic spray paint (optional)
Frequently Asked Questions About Painting a Wooden Shed
What Type of Paint Should I Use on My Exterior Wooden Shed
You typically need paint that is fade resistant plus mold and mildew resistant. Most exterior grade paints offer these characteristics.
Even if you choose to apply primer as I did, you might still want to go with a paint and primer in one. This helps with coverage and makes sure that the paint sticks to the structure.
In terms of sheen – there are a couple of options – flat and satin. Satin is a little shinier but is a lot easier to clean which is why I picked a satin for my shed.
How Much Paint Is Needed for a Shed
It really will depend on the size of your shed and the quality of your paint.
My shed is 10’x10′, and the pool equipment enclosure is 5′ x 4′.
I used Behr Marquee and painted 3 coats on 2 sides of the shed plus the pool equipment enclosure, and I almost used up a whole gallon. I have a little bit left for future touch-ups if needed.
Should I Use Primer on My Outdoor Shed
This is a huge question. I couldn’t really find any shed painting tutorials that mentioned this.
But think about the basics of re-painting anything or painting new wood for the first time – you always need a primer. The primer helps seal the surface enabling the paint to grip better.
I always recommend priming the shed. It will take a couple of extra hours but will be totally worth it.
Have you ever painted an outdoor shed or an outdoor building? If you are thinking about painting one, I highly recommend you check out the FLEXiO 3000 for it. It also comes with a detailed finish sprayer for smaller projects. I will be trying it out soon and will let you know how I like it.
Have fun!
You might also like these projects –
[mv_create title=”How To Paint A Shed The Right Way in TWO days ” type=”diy” key=”46″]
Anika's goal is to inspire and empower beginners with woodworking, DIY, home improvement, and home decor ideas.
She wants everyone to unlock their creative potential and experience the feeling that comes with making something. Nothing feels better better than seeing something and saying "I can make that!"




Hi Anika! Thank you for sharing your ideas and work with the world. What a beautiful job you did with your shed! Love the bold color. I just started woodworking and just trying to figure out how to use a planet and jointer and mitre saw et al has been overwhelming. But I’m looking forward to the day when I can cut, drill, sand & paint projects in a few days rather than many many days!😂 Thanks again for the great ideas and your wonderful creativity.
Maureen
Hi Maureen,
I am really happy I went with an out of the box bold color 🙂
I know all too well that all the tools can be overwhelming but trust me practice will make it all so much faster! Have a great time building! Anika
**Obviously that was supposed to be planer and not planet!🤦🏼♀️ Sometimes spellcheck makes me crazy!