How to Paint a Front Door – Without Removing It! (The Lazy Way)
A step-by-step tutorial and supplies list to show you how to paint a front door the quick and easy way without removing it from the hinges.
I strongly think that the front door is a true representation of the people inside.
After all, it is the door into your home and the first impression when someone comes to your doorstep. The color and feel of the door set the tone for the rest of the house.
When we first decided to buy this house, the very first project that came to my mind was: “I need to paint that front door!”
It’s something I was really excited about after having lived under strict HOA rules followed by rentals.
Plus, the door really needed some love…

But life can be funny because it only took me about 18 months to finally get to it. But I am so in love with it now!
And most importantly, everyone in the family loves it too! (and you will see what I mean by this sentence in a bit)
*** This post is sponsored by HANDy Paint Products. All opinions are my own. ***
***This post contains referral or affiliate links. It is a way for this site to earn advertising fees by advertising or linking to certain products and/or services. Please read my full disclosure here ***
How to Paint a Door
I decided to paint the front door without taking it off the hinges or even removing the hardware because that is the fastest and easiest way.
Also, if I did, the title wouldn’t say “the lazy way.”
***This post contains referral or affiliate links. It is a way for this site to earn advertising fees by advertising or linking to certain products and/or services. Please read my full disclosure here ***
Supplies to paint a front door:
My front door has a glass insert, which I painted, so this list of supplies includes materials to makeover that too.
- Cleaning wipes
- High grit sanding block
- Paint stripper (if needed)
- Wood putty (if needed)
- Painter’s Tape
- Exterior door paint. I tried the blue first and ended up using this.
- HANDy Paint Pail
- Paintbrush
- Frosted glass spray paint
- Rub n Buff in Ebony
How to Paint a Front Door
Step 1: Clean and Prep the Door
Wipe down the door to remove all the girt and grime.
Give a light sanding to the entire door to give the paint a rough surface to grip.
Depending on the condition of any old paint, you might need to strip it down too. Fill any old holes with wood putty.

We had an indent and holes from when the hardware had been changed in the past. Yeah, the door was in pretty sad shape.
Step 2: Pick Out the Front Door Color
How to pick the front door paint color
There are a lot of ways to do this – you could base it on your home exterior, home interior or just what you think will work.
But always test. Even then, you might fail… just paint again!
I decided to go with a navy blue because the exterior of the house is a peach-pink (which I am NOT a fan of by the way).

I tested it out in a corner of the door and thought it looked great. I went through the entire process of painting the door but when I was done, it seemed too “blah”.
And the family, including my 5-year old, agreed. It just didn’t feel like us. So well, I painted it all over again!
Step 3: Tape Hardware, Hinges and Any Glass Inserts
Since I was painting the door without taking it off the hinges, I taped the hinges, all of the hardware and also the glass insert.
Step 4: Paint the front door!
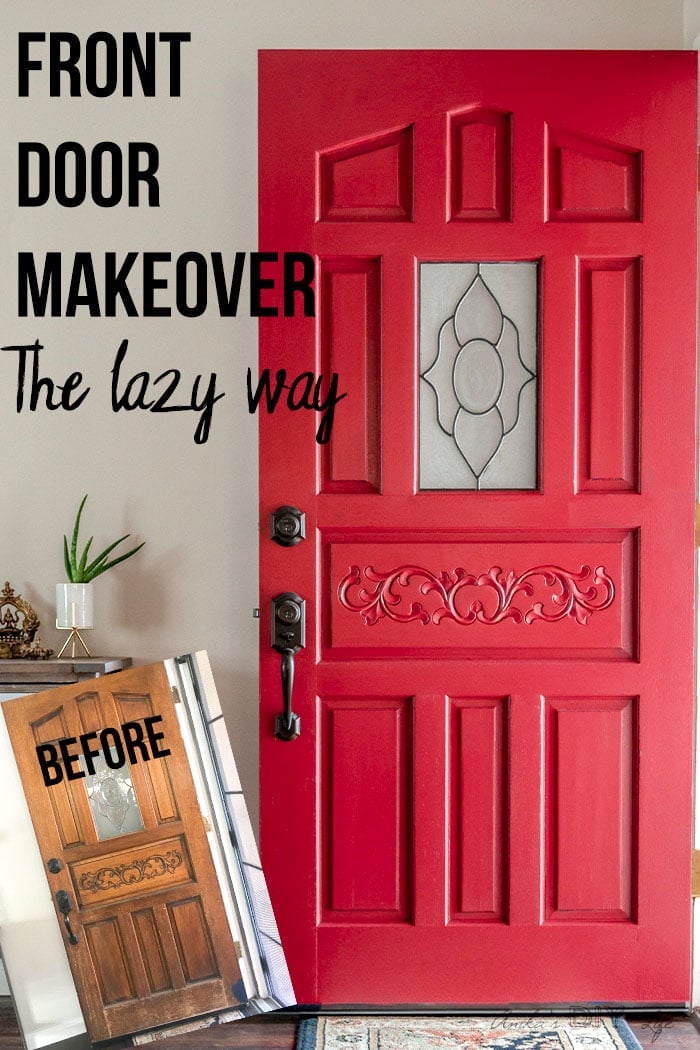
After testing out a few colors, we decided to go with a red and everyone loved it!

It ties in perfectly with our home decor and vibe.
One of the staples in my painting arsenal is the HANDy Paint Pail.
I love how you can hold it comfortably with the adjustable strap without the fear of making a mess. Plus, the disposable liners make clean up super easy.
But the genius part is the magnetic brush holder! No cans or trays laying around to accidentally trip on or the dilemma of where to keep the paint brush.

I was really excited to finally start painting the door!
I used a paintbrush to paint the entire door because there are a lot of details on this door.

The door did need 2 coats to get full coverage and I was able to complete one coat on each side in about 30 minutes.
Step 5: (Optional) Glass Insert Makeover
If you have a glass insert like mine and want to hide the design in it, tape around it to protect the door and spray paint with a Frosted glass spray paint.

I like that it gave the entire glass a matte finish and hid the designs really well.
The decorative metal in the insert looked really old and worn. To give it new life and stand out, I used rub n buff in ebony.

That’s it! An easy, quick and lazy way to give the door a makeover.

Did I tell you already how much we love it?

And because who doesn’t love a good before and after comparison, here it is –

We were planning on the painting being a temporary solution before we actually change it, but the door practically looks new now so it’s a keeper!
And before you go, if you haven’t tried out the magic of HANDy Paint Products, I would totally recommend you check them out! They have an amazing line of products that make painting so much easier! You can get them at all major retailers.
Now, if I may, I have to go stare at my front door. 🙂
If you liked how to paint a front door, youWillalso like –
- 7 High-Impact DIY Home Projects That Are Surprisingly Easy
- How to add trim to bullnose windows
- How to paint veneer cabinets
- How to reface kitchen cabinets
- How to install vinyl plank flooring
[mv_create type=”diy” title=”How to Paint a Front Door” key=”35″]
Anika's goal is to inspire and empower beginners with woodworking, DIY, home improvement, and home decor ideas.
She wants everyone to unlock their creative potential and experience the feeling that comes with making something. Nothing feels better better than seeing something and saying "I can make that!"


That is a Be-A-UUUUU-ti-ful Door! and I don’t even like red : ). But the insert, and the detail— it is a gorgeous door. : )
I LOVE the color you ended up with! So perfect!
It’s a shame you don’t have a donate button! I’d definitely donate
to this fantastic blog! I suppose for now i’ll settle for book-marking and adding your RSS feed
to my Google account. I look forward to brand new updates and will share
this website with my Facebook group. Chat soon!