How to Choose Lumber for Woodworking Project (Beginner’s Guide)
Learn how to choose lumber for your DIY projects. This beginner-friendly guide covers how to find straight lumber, avoid common defects, and pick the right grain pattern for strong, beautiful builds.

Choosing the right lumber can make or break your DIY project. You might have the perfect design and the right tools, but if the board you’re using is warped or full of defects, it can throw everything off.
Once you have figured out the size and type of wood you need, the next step is knowing how to pick the best boards from the pile.
Whether you’re buying construction lumber or hardwood, I will walk you through exactly what to look for when selecting lumber so you can avoid surprises and get the best results.
Quick Summary: What to Look for When Buying Boards
- Check for warping: Look for bowing, twisting, and cupping by sighting down the board’s length.
- Avoid major imperfections: Skip boards with large loose knots, deep cracks, or bark inclusions.
- Inspect end grain: Look at the grain pattern – flat-sawn, quarter-sawn, or rift-sawn – to match stability and look to your project.
- Choose kiln-dried wood: When possible, pick kiln-dried lumber to avoid future warping.
- Accept small flaws: Boards rarely come perfect. If you can trim off minor defects without wasting material, it’s still a good pick.
Printable Wood Shopping Guide
Download my free Wood Shopping Guide below. This includes easy to read guide for the types of wood, wood sizing as well as the defects to look for.
Why Board Selection Matters
A single warped or cracked board can throw off your measurements, weaken your joints, or leave you frustrated during assembly. Taking just a few extra minutes to choose the right board will save you hours of sanding, planing, and troubleshooting later.
How to Choose the Right Board
Every board requires a quick inspection for a few key issues. It might seem like a long list, but the more you do it, the faster and easier it gets.
Step 1: Check for Warping
Warping refers to any unwanted bending or twisting in a board. It’s one of the most common issues you’ll come across.
Here’s how to check for a straight board:
- Hold the board like a bow and arrow. Place one end of the board near your eye and look down its length.
- Check both sides. Turn it 90° and check again. Repeat for all four edges.

You’re looking for:
- Bowing: A curve along the length of the board, like a banana.
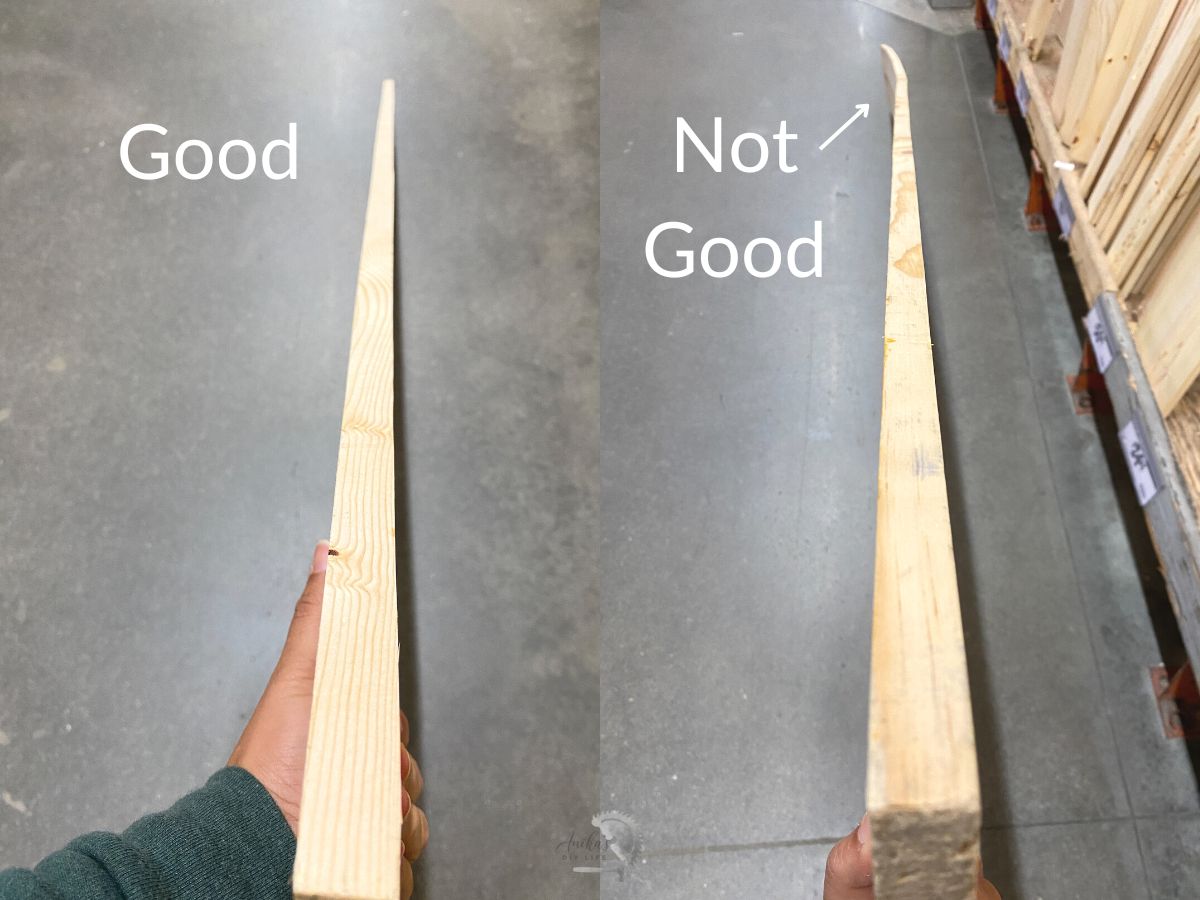
- Twisting (or winding): One corner twists in a different direction than the others, like a wrung-out towel.
- Cupping: The face of the board forms a shallow “U” shape, with the edges higher or lower than the center.

A board with any of these issues can be difficult to work with and may not sit flat or join well with others. Avoid these.
Step 2: Look for Visible Imperfections
Next, give the board a good inspection on all sides for imperfections.
The more imperfections, the more time you will have to spend prepping the boards. Some imperfections, like ingrown bark and splits, can also cause your projects to not be as strong, so you want to steer away from that as well.

Keep an eye out for:
- Knots: These are the dark circular spots where branches once grew. Some knots are stable, but large or loose knots can fall out or weaken the board.
- Cracks or Splits: These are especially common at the ends of boards. Small splits can often be trimmed off, but long cracks may affect strength.
- In-grown Bark: This looks like rough, flaky patches where the bark is embedded in the board. These spots are structurally weak.
- Dents, Gouges, or Damage: These are signs the board has been mishandled or dropped.
- Surface checking: Small hairline cracks across the face, usually from drying too fast. These are cosmetic in some cases, but deep ones can be a problem.
Tip: If you’re shopping for construction or “common” boards (like 2x4s), know that some minor imperfections are very common. Your job is to find the best ones in the stack.
Step 3: Consider the Grain Pattern
Not all wood grain is created equal. The way a board is cut from the log determines its grain orientation, which affects not only the appearance but also the strength, movement, and stability of the board.
Look at the end grain of the board (the short edge). This reveals how the wood was cut.
There are 3 main ways of cutting the board.

Flat-sawn (Plain-sawn)
Flat sawn boards are cut tangentially to the growth rings by slicing straight across the log, producing wide, arched grain patterns.
- Grain looks like: A “U” or wavy pattern.
- Tight lines on the edge, cathedral grain on the face
- Most common and budget-friendly.
- Movement: Prone to cupping and expansion across the width.
- Best for: General construction, framing, and visible surfaces where budget is a concern.
Quarter-sawn
For quarter-sawn boards, the log is first cut into quarters, then boards are sliced perpendicular to the growth rings from each quarter, resulting in straight, vertical grain lines.
- Grain looks like: Straight lines, often vertical.
- Tight lines on the edge and face
- More stable than flat-sawn.
- Best for: Furniture, cabinet making, and anything where minimal warping and beautiful grain are required.
- Bonus: It shows dramatic ray flecks in woods like oak.
Rift-sawn
Rift-sawn boards are cut at a consistent angle (typically 30–60 degrees) to the growth rings around the log’s center, creating tight, uniform, straight grain with minimal ray flecks.
- Grain looks like: Tight, uniform straight lines without ray flecks.
- Most stable and most expensive.
- Best for: High-end furniture, legs, and structural pieces where strength and consistent grain are important.
Tip: Even in big-box stores, you can sometimes spot quarter-sawn or rift-sawn boards if you look closely at the end grain. It’s worth checking for.
Avoid boards with pith. The pith is the very center of the tree trunk – the oldest, innermost wood. Boards cut near or containing the pith often have growth rings that curve sharply, which makes them more likely to warp, crack, or split.
Step 4: Think About the Project Requirements
Once you’ve inspected the board, ask yourself:
- Can I cut around the defects?
- Will this board sit flat on a surface or join with another piece?
- Am I painting or staining? (If staining, the grain and knots will be more visible.)
If you can trim away a warped end or avoid a cracked edge while still getting what you need, the board might still work for you.
And remember: no board is perfect. You’re looking for the best available option, not perfection. In most cases, a tiny split or small knot in the corner is fine—especially if it won’t affect your final cut list.
Bonus Tip: Look for Kiln-Dried Lumber
When possible, choose kiln-dried (KD) lumber over green (wet) lumber. Kiln-dried wood has had its moisture removed in a controlled environment, making it less likely to warp or shrink after you bring it home.
Most indoor-use lumber and hardwood boards are kiln-dried. Construction lumber is sometimes wet (especially pressure-treated), so always double-check.
You may not find the perfect board, but you can find a great one.
Learning to spot these small details will save you from surprises when you’re building. The better the board, the smoother your project will go, and the more confident you’ll feel.
So next time you’re at the store, take a minute to really look at the board before putting it on your cart. Your future self (and your finished project) will thank you!
Don’t forget to download my free Wood Shopping Guide below. This includes an easy-to-read guide for the types of wood, wood sizing, and the defects to look for.
Further reading


Anika's goal is to inspire and empower beginners with woodworking, DIY, home improvement, and home decor ideas.
She wants everyone to unlock their creative potential and experience the feeling that comes with making something. Nothing feels better better than seeing something and saying "I can make that!"