Renter-Friendly DIY Wood Valance (No-Drill & Fully Removable!)
Share this post:
Build this easy DIY wood window valance in under an hour! This beginner woodworking project creates a custom look to hide dated blinds and is 100% temporary and renter-friendly.
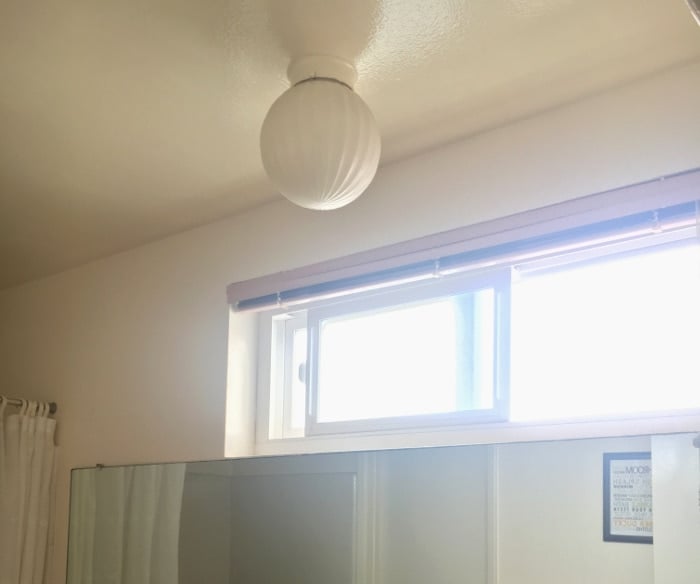
Let’s be honest: we’ve all lived with them. Those generic, slightly yellowed, “builder-grade” plastic mini-blinds. In my case, they were a lovely shade of 80s pink.
I wanted a custom look for my bathroom as part of the rental bathroom makeover, but I didn’t want a permanent project that required heavy drilling or a massive budget. I needed a solution that was stylish, cheap, and, most importantly, 100% temporary.
Enter the DIY Wood Window Valance (also known as a window cornice). This project is perfect for renters or anyone who wants to hide “ugly” blinds without losing their security deposit. It took me less than an hour to build and cost less than $20!
If you would like to see the lovely pink blind that is being covered up in its full glory, here is the before picture :
Why This Wood Valance is Perfect for Renters
Before we dive into the sawdust, here is why I love this specific design:
- Unlike fabric valances, this wood version won’t get “musty” in a humid bathroom.
- It’s designed to be removable, making it the ultimate renter-friendly hack.
- You only need a few basic boards and tools.
***This post contains referral or affiliate links. It is a way for this site to earn advertising fees by advertising or linking to certain products and/or services. Please read my full disclosure here ***
Materials Needed
- 2″ x 2″ – 2 pieces 15″ long
- 1″ x 4″ – 2 pieces at 50″ long (the window was 48″ long). Of course, this will depend on how lond your window is.
- Wood glue
- D-ring hangers
- picture hanging hooks
- Your Choice of Finish: Paint, stain, or even contact paper!
Tools needed
- Miter saw or a simple miter box
- Brad nailer and 1-1/4″ brad nails or hammer or nails
How to Build
Step 1: Measure Your “Ugly” Blinds
Measure the width of your existing blinds. You want your new wood window cornice to sit just outside the brackets.
Pro Tip: Add about 1/2″ to 1″ to your total width measurement so the valance slides on easily without scratching the walls.
Step 2: Make Your Cuts
You will need three main pieces:
- The Front: The long board that covers the blinds. I used 1×4 boards for these.
- The Sides (Returns): Two shorter pieces that head back toward the wall. I used 2×2 boards for these so they wouldn’t stick out too far into the room.

Step 3: Assembly
This is the easiest part!
- Lay the 2×2 on the worksurface spaced out per the dimensions you want the valance to be.
- Attach the 1×4 to the front of the 2×2 using wood glue and finish nails. You can also use trim head screws and sountersink them so you can fill the holes later if you like.
- I used a scrap 1×4 board to get 3/4″ spacing between the boards.

Step 4: Apply Finish
- You can fill the nail holes and stain or paint in the color of your choice.
Since this was for my bathroom, I went with a clean white to match the trim and doors. If you’re a renter, this is a great place to add a pop of color that you can take with you when you move!
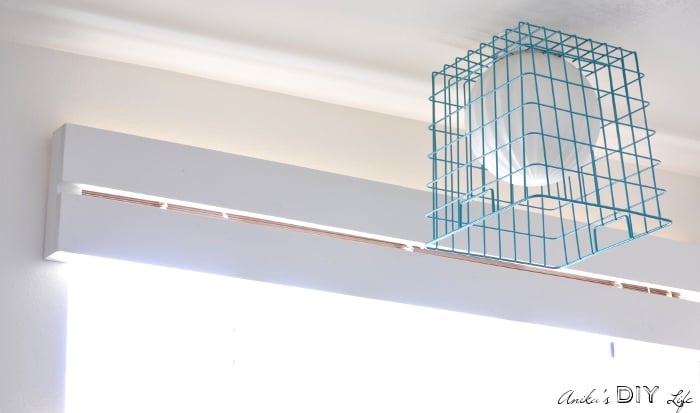
Step 5: Install the valance
To keep this temporary, I essentially hung it like a picture.
- I attached a D-ring to the back.
- I used picture hanging hooks to hang the valence up. The hooks are each rated for 50Lbs. I am quite sure the wood valence weighs much less than that!

When you have to leave, you can simply remove the hooks which will leave a tiny hole to fill at the end.
It’s amazing how a simple 1×4 and some 2x2s can completely transform a room. No one would ever guess this is a temporary, “no-holes” project!

Anika's goal is to inspire and empower beginners with woodworking, DIY, home improvement, and home decor ideas.
She wants everyone to unlock their creative potential and experience the feeling that comes with making something. Nothing feels better better than seeing something and saying "I can make that!"
- Anika Gandhi
- Anika Gandhi
- Anika Gandhi
- Anika Gandhi
- Anika Gandhi
- Anika Gandhi
- Anika Gandhi
- Anika Gandhi
- Anika Gandhi
- Anika Gandhi
- Anika Gandhi
- Anika Gandhi
- Anika Gandhi
- Anika Gandhi
- Anika Gandhi
- Anika Gandhi
- Anika Gandhi
- Anika Gandhi
- Anika Gandhi
- Anika Gandhi
- Anika Gandhi
- Anika Gandhi
- Anika Gandhi
- Anika Gandhi
- Anika Gandhi
- Anika Gandhi
- Anika Gandhi
- Anika Gandhi
- Anika Gandhi
- Anika Gandhi
- Anika Gandhi
- Anika Gandhi
- Anika Gandhi
- Anika Gandhi
- Anika Gandhi
- Anika Gandhi
- Anika Gandhi
- Anika Gandhi
- Anika Gandhi
- Anika Gandhi
- Anika Gandhi
- Anika Gandhi
- Anika Gandhi
- Anika Gandhi
- Anika Gandhi
- Anika Gandhi
- Anika Gandhi
- Anika Gandhi
- Anika Gandhi
- Anika Gandhi
- Anika Gandhi
- Anika Gandhi
- Anika Gandhi
- Anika Gandhi
- Anika Gandhi
- Anika Gandhi
- Anika Gandhi
- Anika Gandhi
- Anika Gandhi
- Anika Gandhi
- Anika Gandhi
- Anika Gandhi
- Anika Gandhi
- Anika Gandhi
- Anika Gandhi
- Anika Gandhi
- Anika Gandhi
- Anika Gandhi
- Anika Gandhi
- Anika Gandhi
- Anika Gandhi
- Anika Gandhi
- Anika Gandhi
- Anika Gandhi
- Anika Gandhi
- Anika Gandhi
- Anika Gandhi
- Anika Gandhi
- Anika Gandhi
- Anika Gandhi
- Anika Gandhi
- Anika Gandhi
- Anika Gandhi
- Anika Gandhi
- Anika Gandhi
- Anika Gandhi
- Anika Gandhi
- Anika Gandhi
- Anika Gandhi
- Anika Gandhi
- Anika Gandhi
- Anika Gandhi
- Anika Gandhi
- Anika Gandhi
- Anika Gandhi
- Anika Gandhi
- Anika Gandhi
- Anika Gandhi
- Anika Gandhi
- Anika Gandhi
- Anika Gandhi
- Anika Gandhi
- Anika Gandhi
- Anika Gandhi
- Anika Gandhi
- Anika Gandhi
- Anika Gandhi
- Anika Gandhi
- Anika Gandhi
- Anika Gandhi
- Anika Gandhi
- Anika Gandhi
- Anika Gandhi
- Anika Gandhi
- Anika Gandhi
- Anika Gandhi
- Anika Gandhi
- Anika Gandhi
- Anika Gandhi
- Anika Gandhi
- Anika Gandhi
- Anika Gandhi
- Anika Gandhi
- Anika Gandhi
- Anika Gandhi
- Anika Gandhi
- Anika Gandhi
- Anika Gandhi
- Anika Gandhi
- Anika Gandhi
- Anika Gandhi
- Anika Gandhi
- Anika Gandhi
- Anika Gandhi
- Anika Gandhi
- Anika Gandhi
- Anika Gandhi
- Anika Gandhi
- Anika Gandhi
- Anika Gandhi
- Anika Gandhi
- Anika Gandhi
- Anika Gandhi
- Anika Gandhi
- Anika Gandhi
- Anika Gandhi
- Anika Gandhi
- Anika Gandhi
- Anika Gandhi
- Anika Gandhi
- Anika Gandhi
- Anika Gandhi
- Anika Gandhi
- Anika Gandhi
- Anika Gandhi
- Anika Gandhi
- Anika Gandhi
- Anika Gandhi
- Anika Gandhi
- Anika Gandhi
- Anika Gandhi
- Anika Gandhi
- Anika Gandhi
- Anika Gandhi
- Anika Gandhi
- Anika Gandhi
- Anika Gandhi
- Anika Gandhi
- Anika Gandhi
- Anika Gandhi
- Anika Gandhi
- Anika Gandhi
- Anika Gandhi
- Anika Gandhi
- Anika Gandhi
- Anika Gandhi
- Anika Gandhi
- Anika Gandhi
- Anika Gandhi
- Anika Gandhi
- Anika Gandhi
- Anika Gandhi
- Anika Gandhi
- Anika Gandhi
- Anika Gandhi
- Anika Gandhi
- Anika Gandhi
- Anika Gandhi
- Anika Gandhi
- Anika Gandhi
- Anika Gandhi
- Anika Gandhi
- Anika Gandhi
- Anika Gandhi
- Anika Gandhi
- Anika Gandhi
- Anika Gandhi
- Anika Gandhi
- Anika Gandhi
- Anika Gandhi
- Anika Gandhi
- Anika Gandhi
- Anika Gandhi
- Anika Gandhi
- Anika Gandhi
- Anika Gandhi
- Anika Gandhi
- Anika Gandhi
- Anika Gandhi
- Anika Gandhi
- Anika Gandhi
- Anika Gandhi
- Anika Gandhi
- Anika Gandhi
- Anika Gandhi
- Anika Gandhi
- Anika Gandhi
- Anika Gandhi
- Anika Gandhi
- Anika Gandhi
- Anika Gandhi
- Anika Gandhi
- Anika Gandhi
- Anika Gandhi
- Anika Gandhi
- Anika Gandhi
- Anika Gandhi
- Anika Gandhi
- Anika Gandhi
- Anika Gandhi
- Anika Gandhi
- Anika Gandhi
- Anika Gandhi
- Anika Gandhi
- Anika Gandhi
- Anika Gandhi
- Anika Gandhi
- Anika Gandhi
- Anika Gandhi
- Anika Gandhi
- Anika Gandhi
- Anika Gandhi
- Anika Gandhi
- Anika Gandhi
- Anika Gandhi
- Anika Gandhi
- Anika Gandhi
- Anika Gandhi
- Anika Gandhi
- Anika Gandhi
- Anika Gandhi
- Anika Gandhi
- Anika Gandhi
- Anika Gandhi
- Anika Gandhi
- Anika Gandhi
- Anika Gandhi
- Anika Gandhi
- Anika Gandhi
- Anika Gandhi
- Anika Gandhi
- Anika Gandhi
- Anika Gandhi
- Anika Gandhi
- Anika Gandhi
- Anika Gandhi
- Anika Gandhi
- Anika Gandhi
- Anika Gandhi
- Anika Gandhi
- Anika Gandhi
- Anika Gandhi
- Anika Gandhi
- Anika Gandhi
- Anika Gandhi
- Anika Gandhi
- Anika Gandhi
- Anika Gandhi
- Anika Gandhi
- Anika Gandhi
- Anika Gandhi
- Anika Gandhi
- Anika Gandhi
- Anika Gandhi
- Anika Gandhi
- Anika Gandhi
- Anika Gandhi
- Anika Gandhi
- Anika Gandhi
- Anika Gandhi
- Anika Gandhi
- Anika Gandhi
- Anika Gandhi
- Anika Gandhi
- Anika Gandhi
- Anika Gandhi
- Anika Gandhi
- Anika Gandhi
- Anika Gandhi
- Anika Gandhi
- Anika Gandhi
- Anika Gandhi
- Anika Gandhi
- Anika Gandhi
- Anika Gandhi
- Anika Gandhi
- Anika Gandhi
- Anika Gandhi
- Anika Gandhi
- Anika Gandhi
- Anika Gandhi
- Anika Gandhi
- Anika Gandhi
- Anika Gandhi
- Anika Gandhi
- Anika Gandhi
- Anika Gandhi
- Anika Gandhi
- Anika Gandhi
- Anika Gandhi
- Anika Gandhi
- Anika Gandhi
- Anika Gandhi
- Anika Gandhi
- Anika Gandhi
- Anika Gandhi
- Anika Gandhi
- Anika Gandhi
- Anika Gandhi
- Anika Gandhi
- Anika Gandhi
- Anika Gandhi
- Anika Gandhi
- Anika Gandhi
- Anika Gandhi
- Anika Gandhi
- Anika Gandhi
- Anika Gandhi
- Anika Gandhi
- Anika Gandhi
- Anika Gandhi
- Anika Gandhi
- Anika Gandhi
- Anika Gandhi
- Anika Gandhi
- Anika Gandhi
- Anika Gandhi
- Anika Gandhi
- Anika Gandhi
- Anika Gandhi


This wooden valance is great. I was thinking it would also work to cover those ugly Hollywood strip lights sometimes in older bathrooms!
That is a great idea Wendy!
Wow, this makes a huge difference. I also like the little basket over the bathroom globe fixture.
Thanks Leanna!
Genius… Stumbling and pinning.. Susie from Chelsea Project
Thanks Susie 🙂
After your bathroom remodel all the renters are going to follow you for the crazy brilliant ideas you came up with to hide the outdated features you can’t change. I love how smart you were to use picture hooks, seriously I wouldn’t have thought of that!
Anika this is so easy to do and it looks so great! Very clever thinking on your part to use hooks to hang it up.