How to build a DIY Lattice Planter Box
Looking for a fun and easy way to add texture and charm to your patio, porch, or even inside your home? This DIY lattice planter box is a great weekend project that makes a big impact—and you don’t need a ton of materials or tools to pull it off!

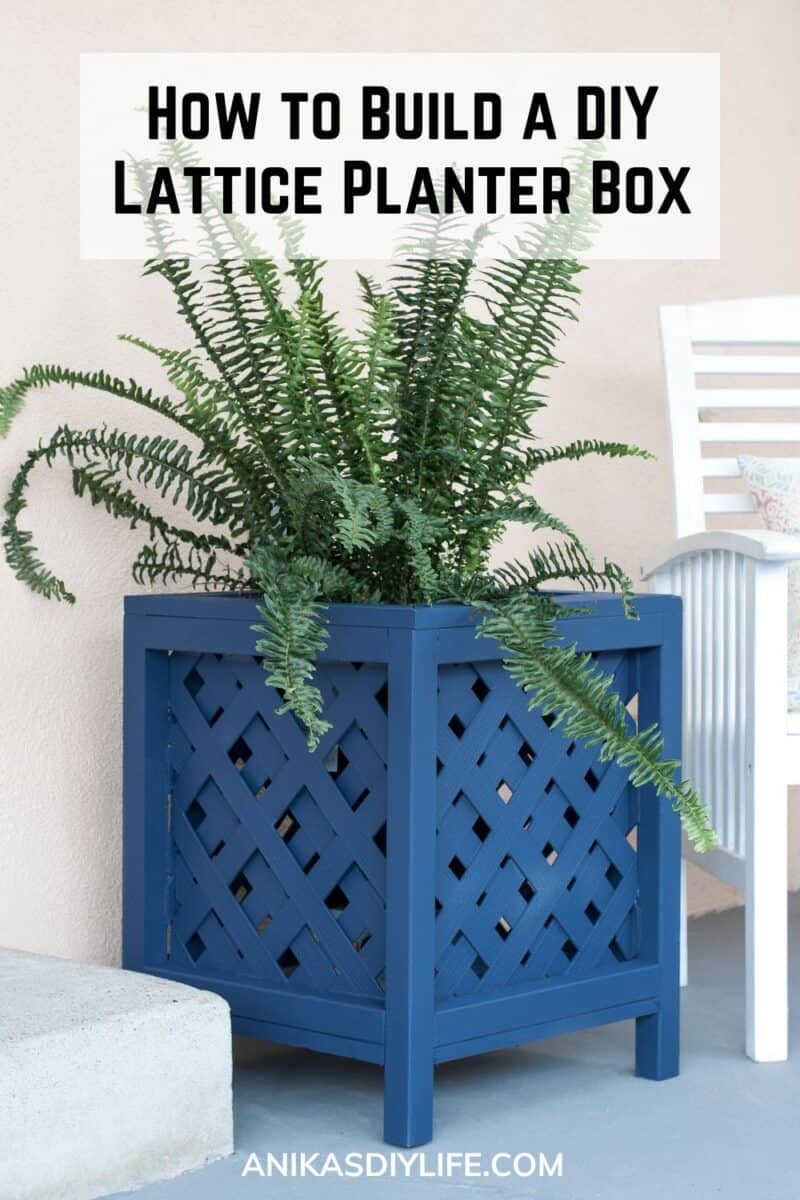
I built this beauty for our newly stained concrete patio, and let me tell you… the space instantly felt brighter and more put together. I went with ferns for now (because, let’s be honest, I don’t exactly have the greenest thumb 😅), but you could use any plant you love!
I originally planned to create the lattice pattern by cutting thin strips of wood and arranging them in a crisscross design—but then I realized vinyl lattice panels already do all that work for you. That discovery made this project even easier and faster!

But then I realized there was a simple way to do this! And so, in about 2 hours, I built this planter box for my patio. What is the secret? Read on!
Actually, there was a bit of a debate on the color… and I will come to that, but first, let me show you how you can build your own lattice planter box.
RELATED: How to make an easy 3-tiered planter box for $10
***This post is sponsored by HomeRight. All opinions are my own. Thank you for supporting the brands that make it possible to bring you new projects***
***This post contains referral or affiliate links. It is a way for this site to earn advertising fees by advertising or linking to certain products and/or services. Please read my full disclosure here ***
Supplies and Tools
Here’s everything you need to build and paint your lattice planter box:
Materials
- Lumber per the plans (2×2, 1×2 and 1×3 boards)
- Vinyl diamond lattice
- Wood glue
- 2 ½” Pocket hole screws (Blue-Kote for outdoor use)
- 1¼” finish nails
- Strong glue ( I used this one)
For Painting
- Latex primer (I used grey primer because I was going with a dark and bright color)
- Outdoor latex paint in the color of your choice. I used Tried and True Blue from Dunn-Edwards.
- Outdoor water-based polyurethane
- HomeRight Super FinishMax Extra Paint Sprayer
- Large Spray Shelter
- Drop Cloth
Tools needed
- Miter Saw
- Power Drill
- Pocket hole jig. I used this one. See which one is right for you.
- brad nailer
- Jigsaw or reciprocating saw
Lattice Planter Box Plans
You can download the printable plans for this lattice planter box below. You can also follow the step-by-step tutorial with pictures below.
How to Build
Step 1: Prepare the boards
- Make the cuts per the cut list in the plans. I used a miter saw to make accurate cuts but you can use a circular saw or jigsaw as well.
- Sand the boards to make sure they are smooth, and you remove any imperfections. See how to sand wood for the perfect finish.
- Make pocket holes in the boards as shown in the plans. The pocket holes are made with the jig and drill bit collar setting at 1½”.
If you’re new to pocket holes, don’t worry—they’re super beginner-friendly and give your projects a clean, strong joint. Learn more about pocket holes here.
Step 2: Build the planter box frame
- Assemble the frame using the 2×2 boards. These will form the skeleton of your planter. Use wood glue at the joints and secure everything with 2 ½” pocket hole screws.
Tip: Double-check that your frame is square before moving on. See how to check and correct for square.

Step 3: Cut the lattice
- Measure each panel opening and cut your vinyl lattice pieces to size using a jigsaw or reciprocating saw. The lattice should fit exactly widthwise and slightly overlap vertically for a snug fit.

- Attach each panel using a few dabs of strong glue and a finish nailer. This combo holds it in place securely while giving you a clean finish.
After adding the first layer of lattice, I noticed it felt a little too open—you could clearly see the pot inside. So…

Step 4: Add a second layer of lattice
To give it a fuller, more polished look, I added a second layer of lattice, slightly offset from the first. This instantly made the design feel more dimensional and helped obscure the planter inside.
Repeat the same process—cut to size, then attach with glue and finish nails.

This extra step made a huge difference! The planter instantly looked more polished and high-end.

Step 5: Add the trim
- Cut 1×3 boards to size and attach them around the top and bottom edges of the planter to finish it off. This adds structure and gives the planter a clean, modern look.

Use wood glue and a brad nailer to secure the trim. Once done, let the glue dry completely before moving on to the next step.

Time to paint!
Step 6: Prime and paint the planter
Now for the fun part—paint!
Since this planter is full of angles, crevices, and lattice, a paint sprayer is your best friend here. I used the HomeRight Super FinishMax Extra, and it made the whole process quick and easy.
Start by setting up your spray shelter and drop cloth to keep the mess contained.
- Fill your sprayer with outdoor latex primer (I used grey to prep for a dark navy topcoat). Spray inside and underneath the planter first, then move to the outer surfaces. Let the first coat dry for about 2 hours, then apply a second coat.
- Spray 3 light coats of your chosen paint color.
I went back and forth between white, grey, and navy—Instagram voted for the navy (twice!), and I’m so glad I listened. It pops beautifully against the concrete patio and the color of the house.
Let each coat dry fully before applying the next one.

- To protect your planter from the elements, add 2 coats of outdoor water-based polyurethane, spraying just like you did with the primer and paint. This will help it hold up beautifully outside.
Step 6: Add a bottom and insert your planter
Once everything is dry, cut and attach a few cedar planks inside the bottom of the frame to support your plant pot. I just rested mine in place since it’ll stay covered by the plant.

Pop in your plant of choice—ferns, flowers, even herbs—and admire your gorgeous new planter box!
And that’s it!
In just a couple of hours (plus some dry time), you’ve got a custom, stylish planter box that looks high-end but is totally DIY.

I love how the navy color turned out—bold but classic. My patio feels one step closer to the cozy, welcoming space I’ve been dreaming of.
So tell me—what color would you have chosen? Were you team white, grey, or navy?
Lattice Planter Box Plans
You can download the printable plans for this lattice planter box below. You can also follow the step-by-step tutorial with pictures below.
See what I did with the remaining lattice.
More DIY Planter projects


See all 45 amazing DIY wooden planters here.
Anika's goal is to inspire and empower beginners with woodworking, DIY, home improvement, and home decor ideas.
She wants everyone to unlock their creative potential and experience the feeling that comes with making something. Nothing feels better better than seeing something and saying "I can make that!"


Love the lattice look and your color choice! Just lovely.
Anoka: I DO like the blue! But my first thought was to leave the lattice white or cream and only paint the wood blue…or teal..or choice.☺Thank you. Diana
Hi Diana,
That would look wonderful too!