How to Build a Easy Beginner-Friendly DIY Planter Bench
Learn how to build a simple, beginner-friendly DIY planter bench with a trellis using basic tools. Step-by-step tutorial and easy-to-follow plans included.

When we bought our house, there was this little planter bench in the backyard. It looked ok… had a few flowering plants in it. But over time, the plants had all died, the bench was falling apart, and the planter had become a happy home for weeds.
I briefly thought about refinishing it, but honestly… why not just build a brand-new one?
So I did!
***This project is sponsored by Mendocino Redwood. Thank you for supporting the brands that make it possible to bring you new projects***
This planter bench is a simple build using 1×6 and 2×2 boards for the planter box and 2x4s for the bench itself. I added a trellis in the back for a little extra height and visual interest (plus a great spot for some climbing plants!).

To top it off, I built it all using Mendocino Redwood, which not only looks beautiful with its rich color and grain but is also sustainably harvested and naturally resistant to decay—making it perfect for outdoor projects like this one. I’ve built quite a few outdoor pieces with redwood before, and it’s easily one of my favorites to work with.
***This post contains referral or affiliate links. It is a way for this site to earn advertising fees by advertising or linking to certain products and/or services. Please read my full disclosure here ***
Material Needed
- Lumber per the plans. I got Mendocino Redwood from The Home Depot.
- 1 1/4″ outdoor pocket screws
- 2″ outdoor wood screws
- 2 ½″ outdoor wood screws
- Exterior wood glue
- tape measure
- Sanding sheets in various grits. These are my new favorites.
- Weatherproofing stain. I used a weatherproofing transparent stain in the color “redwood.”
- Spar urethane
- Landscape fabric
- Potting soil and plants
- ISOtunes Bluetooth Hearing Protection. Use code ANIKA10 for $10 off
Tools Needed
- Miter saw
- Pocket hole Jig. I used the Kreg Jig 720 but any model will work. See which KregJig is right for you
- Drill/Driver
- Random orbital sander
- Tape measure
DIY Planter Bench Plans
Download the detailed plans, including the cut list, schematics, and step-by-step instructions, by clicking the button below.
Video Tutorial
I have a full step-by-step video showing you exactly how to build the planter bench. See below. The full written tutorial follows as well.

Step-By-Step Tutorial
Planters made from 1×6 boards or wood fence pickets are really popular! They are usually quick to build using just glue and nails. The most common method involves ripping one of the boards on a table saw to create an L-shaped corner leg, then attaching the other boards to form the sides.
But I wanted a cleaner, more minimal look for this project. Not the traditional wrap-around style. I also wanted to keep things simple and beginner-friendly, using tools that most people already have. That meant no table saw.
Instead, I used 2×2 boards for the legs and joined everything together with pocket holes. It worked beautifully and gave the planter a sturdy and modern look.
Step 1: Prepare the Boards
- Make all the cuts in the 1×6, 2×2, and 2×4 per the plans.
You need 24 identical pieces of 1×6, and to make that easy, I used a stop block on my miter saw to make sure that every cut was exactly the same.

Did you know that you can easily screw a piece of scrap wood to the fence of your miter saw to extend the fence or attach a stop block? It makes repeat cuts super quick and accurate!
Learn more about how to use a miter saw here.
- Sand all the boards in stages down to 220 grit in steps. See more about how to sand the boards.
Step 2: Make the Pocket Holes
With all the boards cut and sanded, it’s time to add pocket holes to the 1×6 boards.
It is important to note that 1×6 boards aren’t actually ¾” thick. They are closer to ⅝”. To account for this, adjust your drill bit collar to between the ½” and ¾” setting.

- Review the plans and make pocket holes shown in the diagrams.
I used the Kreg 720, but you can use any pocket hole jig. If you are using Kreg 720 for pocket holes, it has a remarked setting for 5/8″.
Related tutorial: How to make pocket holes.
As you’re making the pocket holes, it’s important not to place them in the exact same spot on every board. Try to move the boards so the pocket holes end up in slightly different locations each time.
Why? Because when it’s time to put everything together, having all the screws lined up in the same spot can cause them to hit each other like a traffic jam for screws! Varying the placement gives the screws more room and helps everything come together more smoothly.
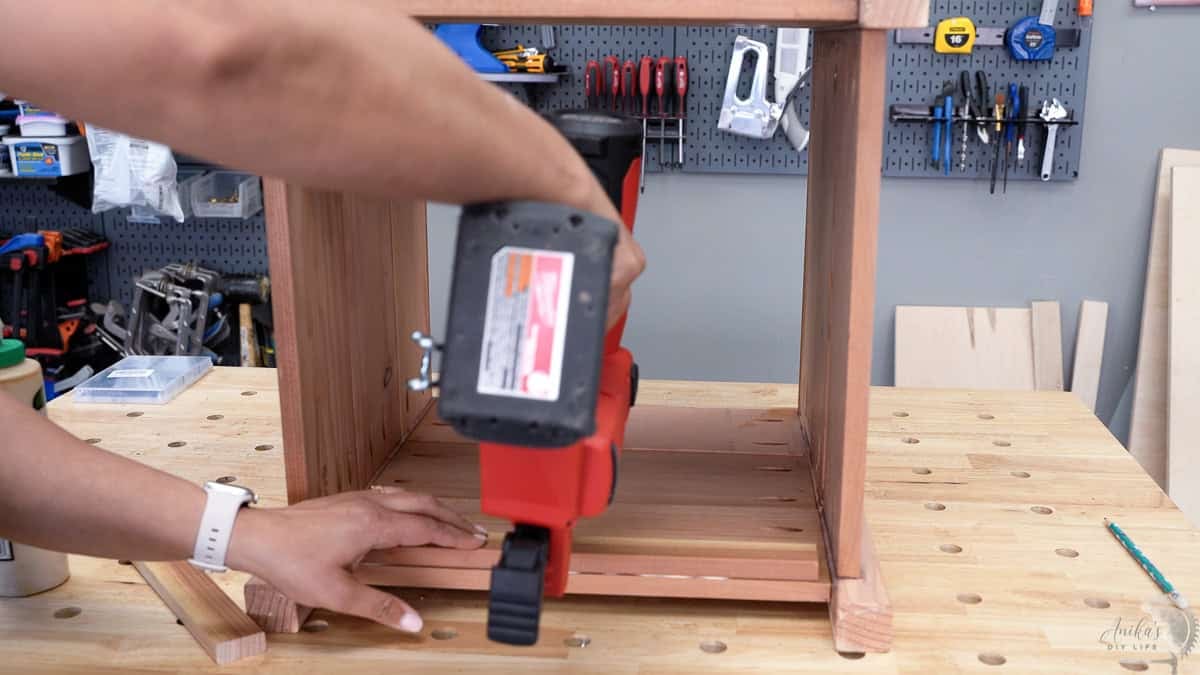
Step 3: Build the Box
- Align three boards with their pocket holes facing in and attach them to two 2×2 legs using outdoor wood glue and 1¼” pocket hole screws. A right-angle clamp makes this step much easier!
- Repeat for the second side.

- Attach the remaining boards to one of the two sides.
- Attach this to the other side to make the box.

You may need clamps and a mallet to help get everything perfectly aligned.
Step 4: Add Trim and Bottom Supports
- To trim the top edge, cut 1×2 boards at 45-degree angles and attach them using wood glue and finish nails for a clean, polished look.

- For the bottom, attach 1×2 ledges to two opposite sides inside the planter.
- Lay down two boards for the base. You can leave a gap for drainage or rip a third board to size for a tight fit.

This completes one planter. Build two of these.
Step 5: Stain the Planters and Bench Slats
- This is a good time to stain the planters,trellis, and the bench.
I used a redwood-colored outdoor stain to enhance the natural tones of the Mendocino Redwood.

I also cut down a pre-made trellis to 4′ length and gave it a very thorough (and very fiddly!) staining.
- Once dry, apply spar urethane to protect all the pieces from the weather.
Step 6: Set up the Planter
- Drill drainage holes in the bottom slats.
- Add landscape fabric inside the planter boxes if you plan on planting directly inside the box. Alternatively, you can fit 12″ pots inside the planter as well.

Step 7: Attach the Trellis
- Attach the trellis to the planter using 2″ outdoor wood screws.

This can be a little tricky. Here is the process I followed:
I placed the trellis inside one of the planters and centered it. Then I pre-started a few screws, held it in place (a bit of a balancing act), and drove the screws in to hold it securely.
Honestly, as is, it makes a great stand-alone planter as well!
Step 8: Build the Bench
- Layout the 2×4 boards with equal spacing between them.
- Attach 2×2 supports on both ends using countersunk 2 1/2″ outdoor wood screws. These keep the bench from sliding off the planters.

- Add a 2×4 crosspiece in the middle for extra support.

And finally, it is time to set it all up!
I placed the planters in their spots and added the bench in the middle.

Optional: Secure the Bench
You can leave the bench as a floating piece between the planters (it is pretty sturdy and stable as is) or attach it by driving screws through the outside of the planters into the 2×2 cleats.
I filled it with soil and plants. I’m especially excited to see how the climbing plants grow up the trellis and transform the space over time.

DIY Planter Bench Plans
Download the detailed plans, including the cut list, schematics, and step-by-step instructions, by clicking the button below.
I love how this planter bench turned out!
It’s a simple build with beginner-friendly techniques, but it really adds a wow factor to any space.
You might also like:


Anika's goal is to inspire and empower beginners with woodworking, DIY, home improvement, and home decor ideas.
She wants everyone to unlock their creative potential and experience the feeling that comes with making something. Nothing feels better better than seeing something and saying "I can make that!"