How to Make an Easy DIY Nightstand With Drawers
Learn how to make an easy DIY nightstand with drawers. A simple design perfect for beginners and looks like designer furniture! I have you covered with the full tutorial, plans, and video!

You guys! I am really excited to finally reveal this nightstand!
I had this little idea in my mind for a while about building a simple nightstand but also adding a little bit of a personality to it.
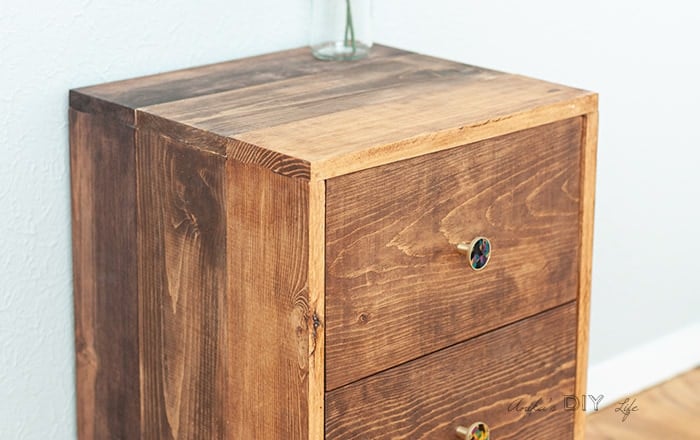
As I built it, I decided to add a few features like the “ombre” stained panels and slightly angled legs.
I have to admit I am really excited about how it turned out! Doesn’t it look like it is made of pallet wood?!
But obviously, it’s not! 🙂
How to Make a Nightstand With Drawers
The key to making any piece of furniture is being able to make boxes.
The frame is a box.
And the drawer is a box.
If you build perfect boxes with the right dimensions, they will work perfectly.

Building furniture with drawers can be intimidating to beginners, or for that matter even experienced woodworkers. In fact, I have a full tutorial on how to make a drawer.
Which is why this tutorial is all about building boxes!
And I am sharing a few tricks to make it easy peasy…

DIY Nightstand With Drawers
*** I am partnering with BuildSomething.com to bring you free plans for this nightstand! Thank you for supporting the brands that make this blog possible. ***
Materials Needed for DIY Nightstand
- Lumber per plans
- Kreg Jig (See my full tutorial on how to use a Kreg Jig)
- Kreg Face Clamp
- Kreg Corner Clamp
- 1¼” pocket hole screws
- 2-1/2″ pocket hole screws
- Power drill/driver
- 12″ drawer slides
- Kreg Drawer Slide Jig
- Miter Saw
- Wood Glue
- Brad nailer
- 1¼” brad nails
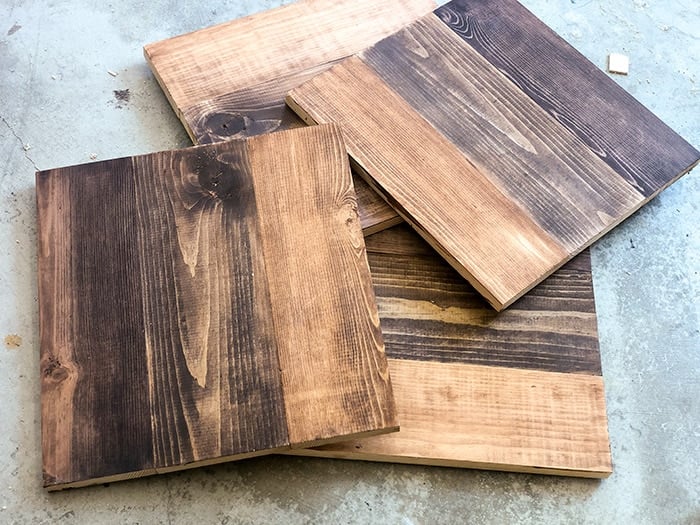
- Stain per your choice. ( I used Java, Dark Walnut and Nutmeg)
- Grey Primer and Oil Rubbed Bronze spray paint
DIY Nightstand Plans
You can get the full plans for building this simple nightstand along with the full lumber list and cut list from BuildSomething.com.
Easy DIY Nightstand Tutorial Video
Below is the full tutorial video on how to build this DIY nightstand with two drawers. The full step by step written instructions follow.
Click here to subscribe to my YouTube Channel for more great videos!
How to Make the Nightstand
Step 1: Make Cuts and Prep Boards
- Make all the cuts in the 1×5 boards according to the cut list.
- Sand all the boards and remove any sanding dust.
- Decide how the boards will be laid out and drill pocket holes on one side of the end boards.
If you are going for an “ombre” effect of stain on the frame like me, this is the perfect time to stain the 1×5 boards that make the frame.

Tip – Mark all the boards in the sequence once you lay them out. I worked with the grain direction and uniform distribution of knots to decide the placement of boards.
Step 2: Assemble the Panels
Edge join and assemble each side panel using wood glue and 1-1/4″ pocket hole screws.
Tip – Face clamps help make this assembly easy and ensure that the boards are flat against each other.
Step 3: Build the Frame
- Make pocket holes on both ends of the side panels
- Assemble the box using wood glue and 1-1/4″ pocket hole screws.

Tip – Using corner clamps help keep everything square and aligned.
Step 4: Build and Install Drawers
- Build two drawers as per the plans. The corner clamps help make it easy to keep them square.
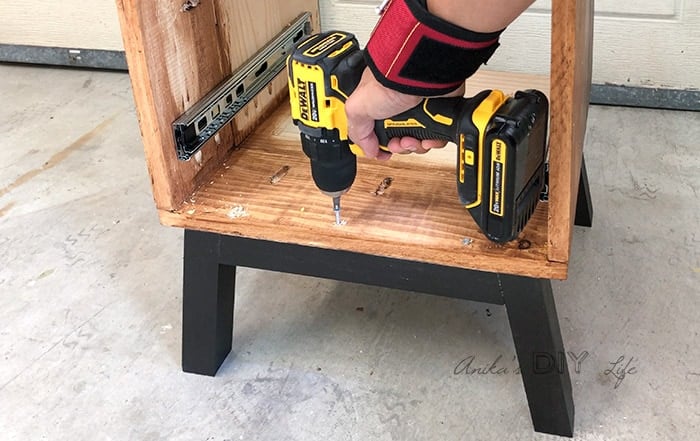
- Install drawers in the frame using the drawer slide jig for the upper drawer. For the lower drawer, a simple spacer 1×2 or a level works. I used 12″ full extension drawer slides.

RELATED: See how to build drawers for beginners
How to Build the Nightstand Legs
Step 1: Make the Cuts
- Make cuts according to the cut list.
- The cut list calls angled cuts at 10° – the legs and the aprons are cut in different orientations. Be carful with those.
Step 2: Build the Front and Back Leg Frames
Make pocket holes in the angled aprons. Attach these aprons to the legs to build the front and back leg of the frames. Refer to the full video to see exactly how everything aligns.
Step 3: Attach Side Aprons and Build the Frame
Attach the straight edge aprons using 2-1/2″ pocket hole screws and complete the leg frame.
Here is the completed leg frame for the nightstand.

I decided to prime and paint the leg frame using spray paint to give it a metallic look.
DIY Nightstand Assembly
- Place the nightstand frame over the leg frame and ensure alignment.
- Attach nightstand frame to the legs using 1-1/4″ wood screws from the inside.
- Place the drawers into the nightstand.
And DONE!

I finished the drawers by staining them in the medium stain color from my panels.
Don’t you just love these knobs?

I specially sourced the knobs for this project and if you like them, let me know, I can help you get some too!
The angled legs and the “ombre” stain add a nice touch to the otherwise simple nightstand.

What do you think of this nightstand? It is simple enough for a beginner to build.
If you build it, I would love to see it! Feel free to email photos to me at [email protected] or tag me on Instagram @anikasdiylife for a chance to be featured on social media! I can’t wait to see what you build!
Don’t forget!
Get the plans to build from BuildSomething.com
More DIY Nightstand Ideas You Might Like –
Anika's goal is to inspire and empower beginners with woodworking, DIY, home improvement, and home decor ideas.
She wants everyone to unlock their creative potential and experience the feeling that comes with making something. Nothing feels better better than seeing something and saying "I can make that!"


What a fantastic project! I won’t use this for night stands (I already have enough), but I have a few ideas if how to use this for organization in the living room. Thank you for the great DIY! I’ll let you know what I come up with!
Very nice, and I like the mixture of rustic woods. Pocket screws are my second choice for joining but they are very strong. I like more traditional wood and glue joints a bit better, but I have no doubt your design will stand the test of time.