DIY Metal Coat Rack – Aluminum Brazing
Learn how to make a simple DIY metal coat rack using aluminum brazing. This is a great beginner-friendly tutorial and project to start working with metal.

This is one of those projects that goes on the list of things to make and you overthink it but ultimately come up with a simple solution!
In our new home, we have a problem with coats and jackets.
The coat closet is very inconveniently located in a hallway far away from both entrances to the house – the front door and the garage door.
The jackets always end up in a pile at the entryway.
We only need jackets for a few months in the year here in California so I decided to whip up a simple and basic coat rack – using Aluminum Brazing!
I used aluminum brazing to make an upholstered bench a few weeks ago and I was really happy with how it turned out and I had a lot of fun making it too!
It was finally time to give all those jackets a place to hang by the door!

**I partnered with Bernzomatic to bring you this project. Thank you for supporting the brands that make it possible to bring you new projects.**
***This post contains referral or affiliate links. It is a way for this site to earn advertising fees by advertising or linking to certain products and/or services. Please read my full disclosure here ***
Materials for Metal Coat Rack
- Aluminum tubes – I used 1″ square tubes – a total of 4′
- 4′ Flat 1.5″ Aluminum bar
- Bernzomatic BZ8250HT Hose Torch
- Bernzomatic Aluminum Brazing Rods
- Bernzomatic MAP-PRO hand torch cylinder
- Acetone
- Flat metal file
- Wire brush
- Miter Saw
- Drill
- Speed Square
- Metal F-clamps
- Heat resistant gloves
- Hooks
- Spray paint – in color fo your choice. I used this one.

Dimensions of the DIY Coat Rack
The coat rack is 24″ wide and 12″ tall. Here is the cut list –
- (2) 1″ square tube cut at 12″ (sides)
- (2) 1″ square tube cut at 22″ (back supports)
- (2) 1.5″ flat bar cut at 24″ (top bars)
How to Cut Aluminum
Aluminum is a very soft metal and can be easily cut using woodworking blades and saws.
I used my miter saw to cut the aluminum tubes and rods to size.
Building the Metal Coat Rack
Click here to subscribe to my YouTube Channel for more great videos!
How to Build a Coat Rack Using Aluminum Brazing
Make a simple DIY metal coat rack using aluminum brazing. This is a great beginner-friendly tutorial and project to start working with metal.
Total Time: 2 days
Prepare the material
Wipe down all the aluminum tubes and bars with a rag dipped in acetone to remove any gunk and oils on the tubes.
Then file the edges of the joints to make a slanted end to create a channel for the brazing compound to sit in.
Clean up the edges using a metal brush. 
Layout the structure and clamp
Decide placement of the main structure.
I used a scrap 2×4 to make sure the spacing from the top and bottom ends was 1.5″ and clamped them in place using a metal clamp.
Be sure to use a speed square to make sure everything is square. 
Braze!
Use the Bernzomatic BZ8250 Hose Torch for Accessibility and Mobility hooked to a Bernzomatic MAP-PRO gas fuel cylinder to heat up the joints one by one and braze them.
This takes a bit of patience.
For a new joint, it took about 3-5 minutes to get the aluminum hot enough to melt the brazing rod.
Be sure to watch the video to see exactly how to do this!
Tip – The brazing rods should NOT be melted directly using the heat from the torch. This will not make a strong joint.

Attach the top bars
Attach the flat bars to the front of the rack by brazing them from the back.
To do this elevate them on a few scrap 4×4 blocks and use face clamps to clamp the bar to the rack.
Then braze along the length of the bar and also on the corners and the front. (Be sure to watch the video to see all the details.)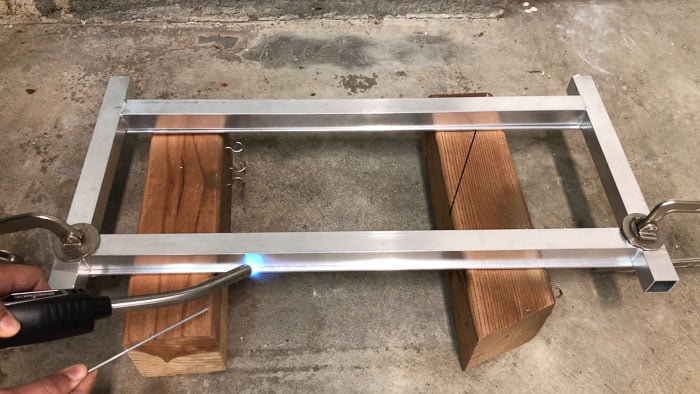
Add hooks
Measure and mark the location of the hooks.
Pre-drill a hole for the screw and attach the hooks to the rack.
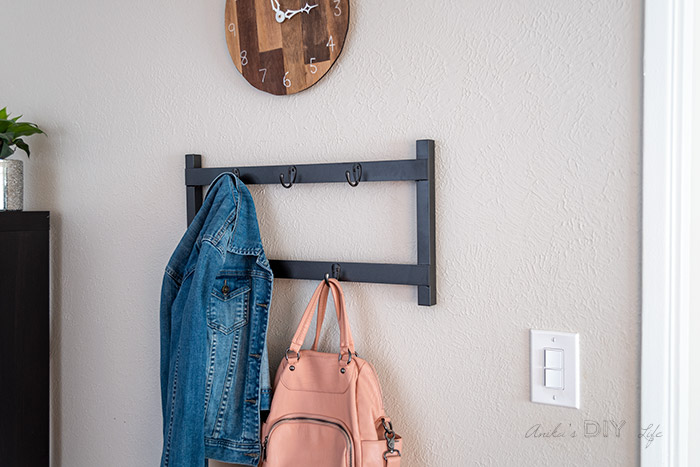
Paint the rack
I decided to give the entire rack a few coats of oil rubbed bronze.
Hang it up!
Add 3″ long screws into the studs or anchors and hang up the coat rack. 
I am happy to report that the coat rack has definitely solved our problem of the pile of jackets on the entryway bench.
It is the perfect size for us but if you wanted, you could easily make it larger or even make multiple of these and stagger them on a wall.
Now I think that will look really good!
What do you think?
More Ideas for the Entryway –
Anika's goal is to inspire and empower beginners with woodworking, DIY, home improvement, and home decor ideas.
She wants everyone to unlock their creative potential and experience the feeling that comes with making something. Nothing feels better better than seeing something and saying "I can make that!"


Girl, I love this project. Working with aluminum looks like so much fun! Great project!