• Skip to primary navigation
  • Skip to main content
  • Skip to primary sidebar
Anika's DIY Life
  • Start Here
  • Projects
  • Woodworking 101
  • Cricut
  • Plans
  • Shop
    • Shop my T-shirts
    • Shop My Workshop
    • Shop my Plans
menu icon
go to homepage
search icon
Homepage link
  • Start Here
  • Projects
  • Woodworking 101
  • Cricut
  • Plans
  • Shop
×

Home » Woodworking » Plans

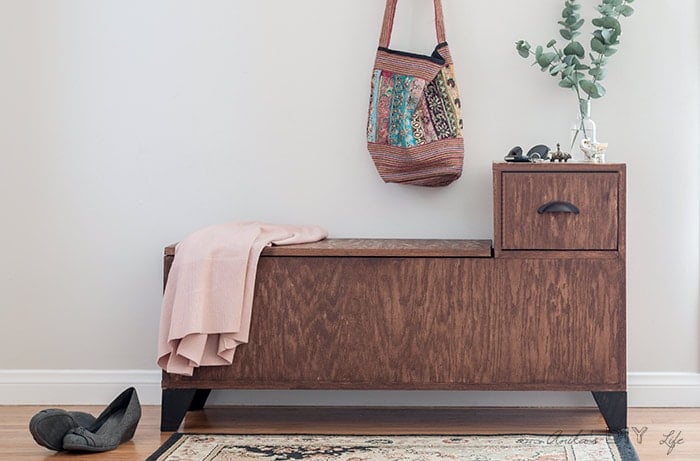
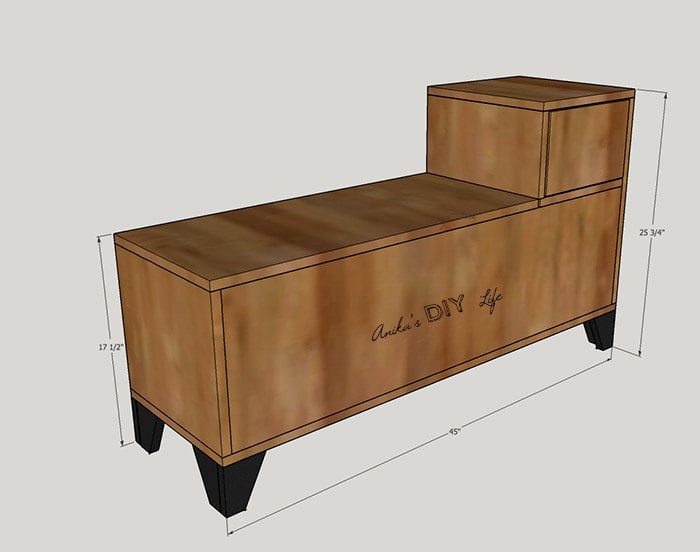
DIY Entryway Bench With Storage

August 17, 2018 By Anika Gandhi

DIY entryway bench with shoe storage collage with schematic and text overlay
collage of entryway bench with storage open and closed with text overlay

Build a DIY entryway bench with covered storage for shoes or jackets and a drawer to stash your keys or small items. Get the full printable plans.

You will also love DIY nightstand with hidden compartment and DIY 2×4 X-leg bench.
DIY entryway bench with storage styled with plant, shoes, jacket and bag.

I am all for multipurpose and functional furniture!

And this DIY entryway bench is the perfect solution for any entryway…

Especially, for a small entryway.

There is shoe storage in the large storage compartment…Storing shoes in the diy entryway bench

and also a drawer to drop small items into!Dropping keys into the drawer of the DIY entryway bench

And then, there is the bench… to sit and put on your shoes… or just catch your breath when you get home!

It is an easy build which uses only 1 sheet of plywood and a couple of other boards!

RELATED: DIY 2×4 bench – Easy indoor/outdoor bench

*** This post is sponsored by Rockler Woodworking and Hardware. All opinions are my own. ***

***This post contains affiliate or referral links. It is a way for this site to earn advertising fees by advertising or linking to certain products and/or services. Please read my full disclosure here ***

DIY Entryway Bench with Storage

Materials needed for DIY entryway bench with storage –

  • ¾” Plywood – 1 sheet – 4′ x 8′ – I used a red oak plywood.
  • 1″ x 6″ x 4′ – 1 board
  • ¼” plywood – 1 Quarter sheet – 2′ x 4′
  • Wood glue
  • Edge banding. I used exactly 2 rolls of this stuff. Learn How to Cover Plywood Edges for a professional finish.

Tools needed to build DIY entryway storage bench –

  • Table saw or Circular saw
  • Miter Saw
  • Jig Saw
  • Pocket hole jig. I use a Kreg Jig.
  • Power Drill/Driver
  • Brad Nailer or hammer

Hardware needed to build the DIY bench with storage –

  • Lid Stay Torsion Hinge Lid support.
    • I used the Rustic Bronze but they also have a Satin Nickel finish.
  • Lid Stay Torsion Hinge JIG IT.
  • 10″ drawer slides
  • Knob or pull of choice.
  • 1 ¼” pocket hole screws
  • 1 ¼” Finish nails

GET THE PRINTABLE PLANS

Before we get started, make sure to follow me on Instagram, Facebook, YouTube and Pinterest to keep up with all my latest builds and projects!

schematic of DIY entryway bench with storage

How to build the DIY Entryway Bench with Storage

All the details for the cut list and step by step instructions are available in the printable plans. Here is a video where I walk you through how to build the bench. Written step by step tutorial follows below.


Click here to subscribe to my YouTube Channel for more great videos!

GET THE PRINTABLE PLANS


Instructions for Entryway Bench with Storage

Step 1 – Make all the cuts per the plansCutting plywood to make the DIY entryway shelf with storage

I cut the plywood using my circular saw and the Kreg Rip cut. I did not cut the storage lid and the drawer front until the rest of the frame was built. That way I could make sure, they fit perfectly.

Important – Be sure to pay attention to the direction of grains for all the cuts so you have grain in the same direction across all pieces. 

Also, when cutting with the circular saw or Jigsaw, you always want the good side facing down so it doesn’t splinter.

Step 2 – Cut out the feetCutting out feet for easy DIY entryway storage bench!

Using the measurements shown in the plans, trace and cut out the feet using a jigsaw.
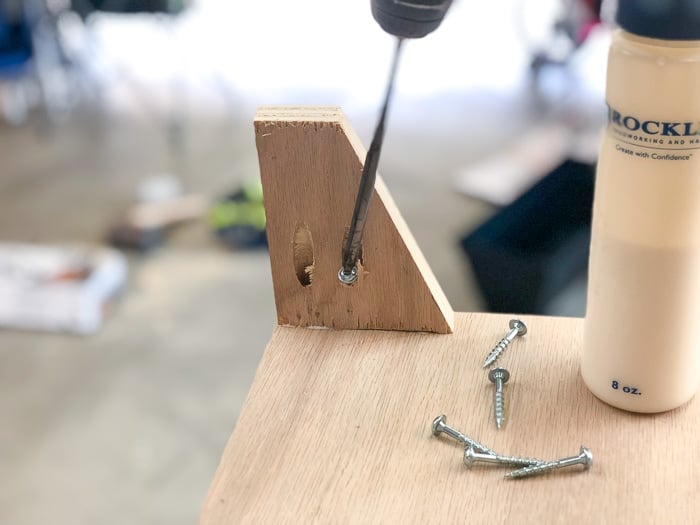
Step 3 – Make all the pocket holes.

Refer to schematics in the plans for locations of pocket holes. If you have never used a Kreg Jig before, check out my How to use a Kreg Jig post to get answers to all your questions.

Step 4 – Assembly –

  • Start by assembling the three equal height sides using wood glue and pocket hole screws.Building the three sides of the DIY entryway storage bench
  • Then, attach the feet to the bottom using pocket hole screws and wood glue. You can also add a few finish nails from the side to make sure the legs are in place.attaching feet for theDIY storage bench
  • Continue by adding the remaining tall side and the panels that make up the drawer frame.Building up the rest of the DIY entryway storage bench

RELATED: How to build an upholstered 2×4 bench

Step 5 – Install Hinges

Rockler makes a Lid Stay Torsion Hinge JIG IT which makes it easy to install hinges. There is no need to measure and re-measure the location for the holes and the hinge. The JIGIT has markings for flush mount or overlay configurations.

Just pick the configuration and make the respective pilot holes!Making pilot holes in the lid using Lid Stay Torsion Hinge JIG IT by Rockler

I went with the flush configuration for this bench.

Once the pilot holes are in, add the Lid Stay Torsion Hinges and attached them to the box using the screws provided. Easy Peasy!Installing the Torsion hinges to the lid and frame.

Step 6 – Build and Install the drawer

Build the drawer using a  1″x 6″ board. I love the Corner Clamping Jig to make sure my drawer stays square.Making a drawer square using corner clamps.

Install the drawer using a 10″ drawer slide.

Step 7 – Finishing touches

Apply edge banding to the raw edges of the plywood, fill in all the holes and splintered areas with wood putty. Stain in the color of your choice and seal it.Applying edge banding to the raw plywood edges.

That is it! The bench is ready!

And I love that it is so functional and has a ton of storage!

The Lid Stay Torsion Hinges make it also extremely safe because the lid opens smoothly and holds its position. So there is so danger of pinched fingers!

Vertical picture of DIY Entryway storage bench

You can get detailed plans for this DIY entryway shoe storage bench below. If you want to see other cool furniture projects for the home then head over to my Woodworking Projects page.

GET THE PRINTABLE PLANS

« DIY Scrap Wood Candle Holder
How To Keep House Cool – 8 Things You Can Do Today! (Giveaway) »

Reader Interactions

Comments

  1. Christine

    August 20, 2018 at 7:00 am

    Great piece, you did a wonderful job!

  2. the cape on the corner

    August 22, 2018 at 8:20 am

    wow, what an interesting piece. i love the storage and the legs being a darker color.
    b

  3. Chas Greener

    August 22, 2018 at 12:15 pm

    This is brilliant and I need one on my home! Thanks for sharing on To Grandma’s House We Go!

  4. Jann Olson

    August 26, 2018 at 9:33 pm

    Cool and unique shaped piece! Thanks for sharing with SYC.
    hugs,
    Jann

Primary Sidebar

Woman in garage

Hi! I am Anika! I am here to inspire you to create a home filled with your unique personality by empowering you with ideas, tools, and skills you need!

More about me →

Connect With Me

  • YouTube
  • Instagram
  • Facebook
  • Pinterest

Footer

↑ back to top

  • About Me
  • Work With Me
  • Terms of use
  • Disclaimer
  • Policies
  • Privacy Policy
  • Contact

IMPORTANT!

Anika’s DIY Life is not liable in any way for injury or loss (whether physical, emotional, monetary or any other kind of loss) resulting from any inspiration, ideas, directions or information gained from this website.
I am NOT a professional. Just learning as I go and trying to inspire others! I advise you to always follow manufacturer instructions, take appropriate safety precautions and hire a professional when in doubt. I love it when you use my site for inspiration, but by using it, you agree that you do so at your own risk.

Anika’s DIY Life is a participant in the Amazon Services LLC Associates Program, an affiliate advertising program designed to provide a means for sites to earn advertising fees by advertising and linking to Amazon.com. Full disclosure here.

Copyright © 2023 Anika's DIY Life