How to Install Lazy Susan Hardware
Learn how to easily install Lazy Susan hardware with this detailed step-by-step tutorial to make a Lazy Susan turntable.

A Lazy Susan is great for decor and all kinds of organization needs. It is also super easy to make – a top, a bottom, and lazy Susan hardware in the middle. Except when you decide to install the hardware, you have no idea where to start.
When I was putting together my patterned plywood Lazy Susan, I read the installation instructions on the package at least 5 times, but it was confusing is an understatement.
After a little bit of trial and error, I found the easiest way to install it.
It is pretty straightforward to install with the help of a little fifth-grade geometry (which I got you covered with).
I have broken it all down for you with detailed pictures to install the hardware yourself easily.
***This post contains referral or affiliate links. It is a way for this site to earn advertising fees by advertising or linking to certain products and/or services. Please read my full disclosure here ***
Material Needed
- The two pieces for the Lazy Susan
- Lazy Susan hardware or this one.
- 8 screws (#8 size) – length depends on the thickness of material.
- Compass and pencil
- Ruler
- 1/8″ drill bit
- Countersink drill bit
- Power Drill
How to Install
The Lazy Susan hardware is basically two plates with ball bearings between them.
The bottom plate has two holes at the corners, and the top plate is the one with one hole at the corners.
Important – Remember that the bottom plate is attached through the small holes. It is easy to miss that.
Some tutorials show you how to use the big hole in the bottom plate to attach the screws to the top, but we will not be using that technique in this tutorial.
Step 1 – Find the center.
- Find the centerpoint of on both the top and bottom.
This tutorial on how to find the center of the circle will be helpful.
I had made a tiny hole to attach my circle jig to cut the circle with a router, so I already had the center identified.
Step 2 – Prepare the bottom.
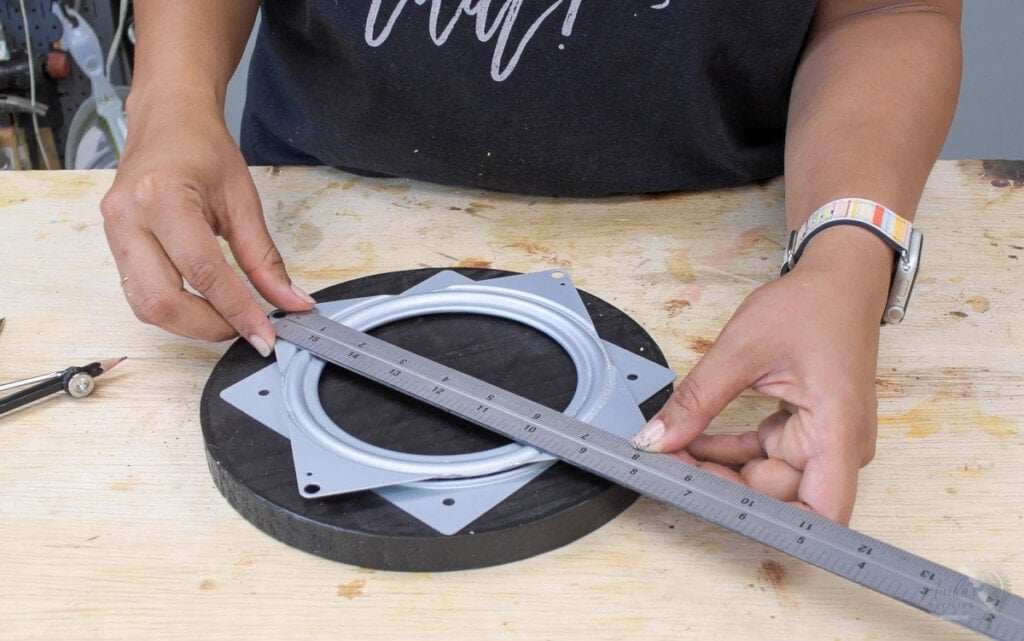
- Measure the distance between the small holes in the bottom part of the lazy susan hardware. This is the side that has two holes on each corner – one large and one small.
You measure the distance between the small holes.

- Divide the measurement in half, set the compass to that measurement and draw a circle.

- Now we need to draw two perpendicular diameters of the circle. To do this, start by drawing one diameter.

- Set the compass to a size larger than the radius. Place the compass on the circle on one end of the line and draw an arc intersecting the circle.
Repeat from the other end of the line.

- Join the intersection with the center of the circle and extend to the edge of the circle. This is the perpendicular line.
We now have 4 locations on the circle that should perfectly align with the small holes in the bottom part of the lazy susan plate.

- Make pilot holes all the way through and then countersunk holes on the lower side of the bottom circle.

Step 3 – Prepare the top.
Measure the distance between the holes in the top plate and repeat the above steps to make the circle, the perpendicular lines, and the pilot holes.

The holes are shallow and shouldn’t go through.
Step 4 – Attach the top.
Using wood screws, attach the top plate of the lazy susan hardware to the top.

The length of screws depends on the thickness of the top. Mine is 1″ thick, so I use 3/4″ screws, but if the top is 3/4″ thick, you can use 1/2″ screws.
Step 5 – Attach the bottom plate.
Start by inserting the screw into the countersunk hole in the bottom plate. As it comes out on the other side, attach it to the bottom plate of the lazy susan. You do need to look from the side and adjust to ensure it goes in.

Attach the diagonally opposite screw. You can look from the side and ensure that the screw goes into the correct hole in the plate.
Once the two screws are in, the other two should be a lot easier to add.
Note – the instructions call for metal screws, but I use wood screws with no problems.
Step 6 – Finish
Once attached, if you like, you can fill in the holes on the bottom to hide the screw with wood putty and apply the finish.
I simply added vinyl bumpers to them to “hide” the screws and give them a scratch-proof surface.

If needed, you can add a little bit of lubricant to the ball bearings in the hardware to help smooth the rotation.
That’s it!
The lazy susan is ready for prime time.
I made this Lazy Susan using scrap plywood, and it has turned into my current favorite project. You can watch the full video here.
Further Reading
Anika's goal is to inspire and empower beginners with woodworking, DIY, home improvement, and home decor ideas.
She wants everyone to unlock their creative potential and experience the feeling that comes with making something. Nothing feels better better than seeing something and saying "I can make that!"


