What is Saw Kerf – Why it is Important When Cutting Wood
A simple beginner-friendly explanation of what is saw kerf and why you need to account for it to get accurate cuts.

One of the most important concepts to understand in woodworking is saw kerf.
You CANNOT make accurate cuts in boards on ANY saw without understanding the concept of the kerf.
Is this you:
“I measured multiple times and made sure to mark the cut properly but my cut is still off!”
“My boards have always been a little short, but I can’t figure out why!”
I was right there with you.
I built my first couple of projects and always found that the boards were just a tad short… over time I realized I had to add 1/8″ to my measurements to get the accurate cut.
It didn’t occur to me that I was in fact accounting for the kerf.
But because I didn’t fully understand the concept just yet, it was still hit or miss.
One day I stumbled on a woodworking glossary and found the term – Kerf. As soon I understood it, I figured out exactly how to get it to work!
Unfortunately, not a lot of tutorials explain this simple concept and how you can take it into account so your cuts are accurate.
I have you covered. Let’s dive in!
What is saw kerf?
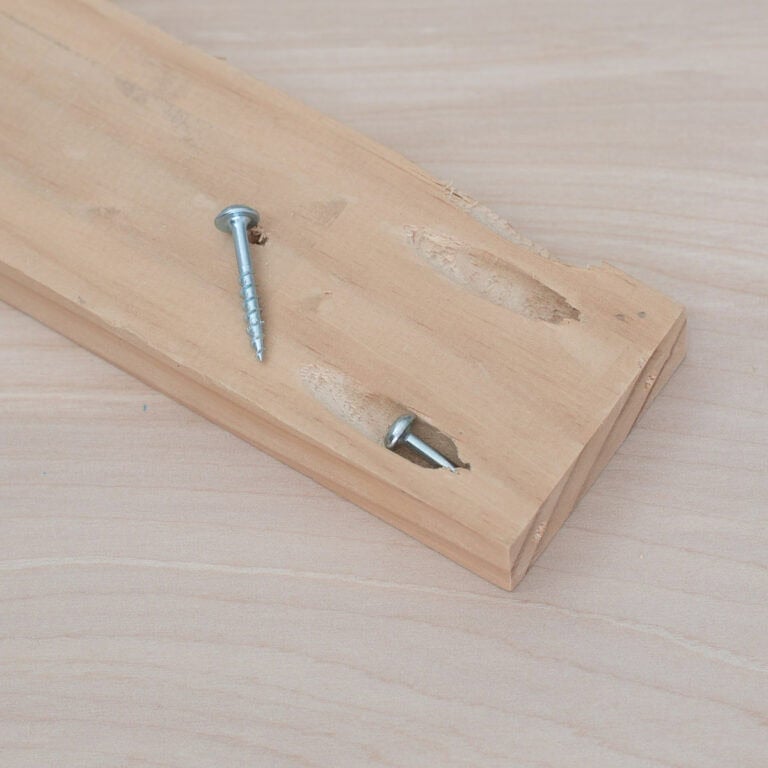
Simply put, the saw kerf is the thickness of the cut made by a blade. Or rather, it is the part of the board that turns into sawdust when you cut through it with a saw blade.
In the figure below, you will see the part of the board that disappeared after the saw passed through it.
That is Kerf.

The kerf width is the width of the material that turns into sawdust.
Typically, the kerf width of a blade is listed clearly on the blade packaging. It is important for any saw that uses a blade to cut – a miter saw, table saw, jigsaw, circular saw, and so on…even a hand saw.
Why is saw kerf important?
A saw’s kerf is crucial in helping you make accurate cuts. When you make the cut, you have to account for the part of the board that will turn into sawdust.
This is important to note for a couple of reasons –
How much material do you need
Saw kerf depends on the thickness of the blade and you need to make sure you have enough material to take that into account the amount of material that will be removed by the blade.
For example – if you had a board that was exactly 10″ long, you CANNOT get two pieces that are exactly 5″ long because one of them will be missing the width of the blade of the saw kerf.
Therefore, in this case, if the blade kerf is 1/8″, you will have to start with a board that is 10+1/8″ to get the exact 5″ long pieces.
Where to place your saw blade for the cut
When you measure a board to cut, you always mark it with a thin pencil line.
You always want to cut on the outside edge of that line to make sure that the saw kerf does not take away any of the board you need.
How do you account for saw kerf in cuts?
Making accurate cuts while taking saw kerf into account is very straightforward and needs attention to one simple factor – alignment of the lad with the cut line.
- When marking the cut line.

If needed, mark the good side of the piece of wood with an “x” or an arrow. This will help you keep track of the piece of wood you need and cannot cut into with the saw blade kerf.
- Line up the saw blade such that the edge of the blade teeth lie on the outer edge of the line and clamp the board.

This will ensure that the saw kerf will lie on the waste side of the wood. This is where you want to make the cut.

- Make the cut with the saw like you would.
How to measure saw blade kerf?
Since the blade kerf is the thickness of the wood that turns to sawdust, measuring the kerf of your blade is very simple –
- Make a cut in the board.
- Be sure not to move the boards at all.
- Measure the thickness of the slot between the two pieces of wood through which the blade had passed.
This width of cut is the blade kerf.

This can be used to find the kerf of any saw blade.
How Much Saw Kerf Is There?
There are a few things that determine the kerf of a saw blade –
- the width of the blade
- the way the carbide teeth are angled away from the blade
- wobble of the blade.
Thick kerf blades
Thick kerf blades have carbide teeth that are welded onto the blade plate with a pretty large angle.
This makes them sturdy and durable and have minimum blade deflection as they make the cut – even through thick material.
These result in fairly wide kerf and are typically 1/8″. These are also known as full kerf blades.
Most general-purpose blades are thick kerf blades. They are most commonly used in construction or for making quick cuts. The cut quality of these blades is pretty rough.
They do make a lot more sawdust compared to a thin kerf blade.
Thin kerf blade
In a thin kerf blade, the carbide teeth are 3/32″ wide with little or no angled set. This thinness allows for less wasted wood and less sawdust.
They are commonly used for fine woodworking. It is especially beneficial when using expensive and exotic woods where you want to waste as little as possible.
They are especially advantageous when used to rip boards compared to cross-cuts where you want to minimize wastage.
Blade Kerf on Table saws
It is important to pay attention to the blade kerf on a table saw blade – not just for accuracy purposes, but also because of the riving knife.

The riving knife is an important safety feature of the table saw and should match the width of the saw blade or blade kerf.
If the riving knife is thicker than the blade kerf, it is not possible to make the cut. If the riving knife is thinner than the blade kerf, you can make the cut you won’t be as protected.
Conclusion
Understanding kerf is extremely crucial to being able to make accurate cuts. With this is mind, I hope you are able to make all the amazing projects without frustration.
Further reading
Anika's goal is to inspire and empower beginners with woodworking, DIY, home improvement, and home decor ideas.
She wants everyone to unlock their creative potential and experience the feeling that comes with making something. Nothing feels better better than seeing something and saying "I can make that!"


Thanks for the explanation.
This is an essential base/understanding for all wood- and metal workers. The correct thickness is best determined with a caliper (x.x > 1/10) for woodworking or with a palmer (x.xx > 1/100) for metalworking or with a micrometer (x.xxx > 1/1000). Or, look at the saw blade itself, there the dimensions are always displayed in the form of a figure. That is why the ‘sawer’ always says: “Twice sawn and still too short!”. Regards, Marc
“Therefore, in this case, if the blade kerf is ⅛″, you will
have to start with a board that is 10-⅛″ to get the
exact 5″ long pieces.”
Actually, if you want two exactly 5″ boards, you will need to start with 10+⅛, not 10-⅛. If you start with 10-⅛ (which is 9 7/8″, you can’t possibly get two 5″ boards.
Thanks for pointing it out… it isn’t supposed to be a minus sign. Its supposed to be a connector but it does look like a “-” I will change it to + so it isn’t confusing.