DIY Woodland Baby Mobile
Learn how to make this simple and chic woodland-themed DIY baby mobile using scrap wood and animals. Step by step tutorial and video to guide you through!

A crib with a mobile hanging over it is probably first thing that comes to mind when you think about a nursery.
A mobile also makes a great gift for an expectant mother or new baby.
While there are certain rules to follow to make sure that a mobile is safe for the baby, a mobile is a great way to stimulate babies.
This baby mobile is really easy to make and although I used animals to make the woodland-themed mobile, you could hang anything from it to match the theme!
In fact this isn’t just for babies! It works just as well in any animal lover kid’s room!
Note – Always keep the mobile out of baby’s reach. This mobile is meant to be hung from the ceiling.
Materials Needed
- Various animals for the mobile . I used Black Bear, Moose, Fox, Grizzly Bear, and White Tail Fawn
- 2×2 board – 18″ long
- Monofilament
- 5/16″ wood dowel
- 5/16″ drill bit
- Miter Saw (See my full tutorial on how to use a miter saw)
- Power drill/driver
- Screw eyes
- Colorful pom-poms
- The stain of your choice – I used this one
How to Make the DIY Animal Mobile
As usual, I have a full video showing you exactly how I made it. Written step-by-step instructions follow below.
Step by Step Tutorial
This mobile is very easy to make and uses a few basic power tools. If you don’t have these, you can easily make this with a hand saw as well!
Click here to subscribe to my YouTube Channel for more great videos!
Step 1. Cut the Lumber
Ideally you would need to use a drill press to make a hole in the middle of 2×2 cube. But I found a work around.
- Measure and mark the centers of the cubes on the 2×2
- Drill holes in the center of each cube using a 5/16″ drill bit.
- Cut the cubes using a miter saw
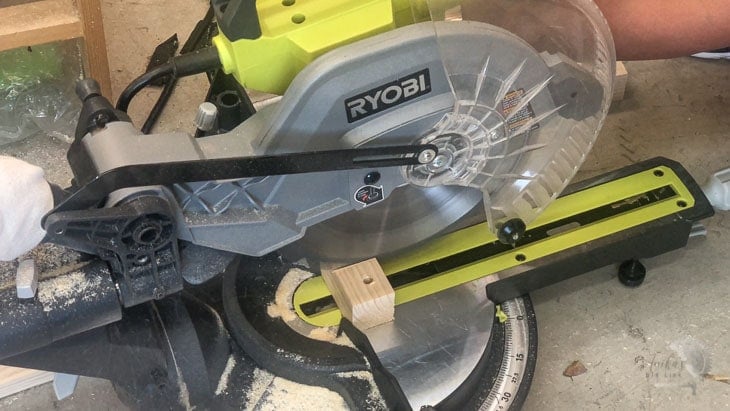
- Also, cut a 12-inch piece of 2×2 to make the top of the mobile
Step 2. Cut the Dowels
- Cut the 5/16 dowel into three 7″ pieces
Tip – This is a good time to sand all the pieces using 220 grit sandpaper to make sure all the edges are smooth. I even went over the edges to make them slightly rounded.

Step 3. Assemble the Cubes
- Put a dowel through each cube.

The dowels should go through the cube easily but be snug at the same time. You can use wood glue if you like, but mine fit perfectly and I didn’t need it.
- Stain or paint the wooden cubes and pieces in the color of your choice. I used this walnut gel stain.
Step 4. Put the Mobile Together
- Make pilot holes in the animal figurines and add screw eyes.

Tip – Be sure to add the screw eyes close to the head of the animal figurine so that the weight is well balanced.
- Tie monofilament wire to the screw eye and cut off around 2ft of wire.
- Tie a knot in the monofilament wire 3 to 4 inches up and using a needle, thread the wire through the pom pom.

The knot will keep the pom-pom from slipping down the wire. Repeat this 2 more times to complete the string.
- Attach the string to the dowel by wrapping and tying the monofilament wire to the dowel.
- Drill a small pilot hole in the top of the cube and add a screw eye.

Make 5 more animal strings and attach to the cubes for a total of 6 strings of pom-poms and animals.
Step 5. Attach Strings to the Hanging Bar
- Drill pilot holes on the 12 inch 2×2 and attach screw eyes.
You want 2 screw eyes on one side to hang the mobile and 3 screw eyes, evenly spaced on the opposite side to hang the cubes.

- Tie monofilament wire to the 2 screw eyes to make the hanger.
- Tie the cubes to the 3 screw eyes on the opposite side.

That’s it!
Hang it up!
Note- be sure to use a very secure hook with anchors for hanging the mobile. Also, make sure it is out of reach of the baby.
The animals move around in a gentle breeze and I think it makes a cute addition to a child’s nursery or really any animal themed room.
More DIY Projects for Kids Room –
See 28 more fun DIY Kids room ideas here.
Anika's goal is to inspire and empower beginners with woodworking, DIY, home improvement, and home decor ideas.
She wants everyone to unlock their creative potential and experience the feeling that comes with making something. Nothing feels better better than seeing something and saying "I can make that!"


