Simple DIY Dog Bowl Stand Plans
Learn how to build a DIY raised dog bowl stand with easy-to-follow DIY dog bowl stand plans show you how to build it for under $5!

I have a simple and quick project for you today!
Or rather a project for your puppy!
I love introducing you to awesome makers and today I am partnering with Brittany to bring you these easy and simple DIY dog bowl stand plans.
Brittany is the voice behind By Brittany Goldwyn and she is an animal and plant-loving talented lady with amazing taste in modern decor!
We collaborated on designing this raised dog bowl stand and I absolutely love how it turned out!
***This post contains affiliate or referral links. It is a way for this site to earn advertising fees by advertising or linking to certain products and/or services. Please read my full disclosure here ***
Materials Needed for DIY Dog Bowl Stand
- Lumber per the plans– basically all 2×2 boards
- Kreg Jig K4 but a Kreg 320 will work too.
- Right angle clamp
- Wood glue
- 2-1/2″ pocket hole screws
- Power drill
- Miter Saw
- Sander
- Stain/paint of your choice.
- Dog bowls
How to Build a Dog Bowl Stand
This stand is designed for these dog bowls. However, I have recently heard from readers that they sometimes are too big or small.
There are maybe small variations in the bowl sizes and I wouldn’t want you to waste lumber if you build the stand the bowls don’t fit.
BEFORE you build this dog bowl stand, I would suggest buying the dog bowls.

DIY Dog Bowl Stand Video
Like I mentioned, my friend Brittany built this dog bowl stand. Here is the video showing exactly how she built it. Step-by-step instructions follow below.
Step 1 – Cut Lumber and Make Pocket Holes
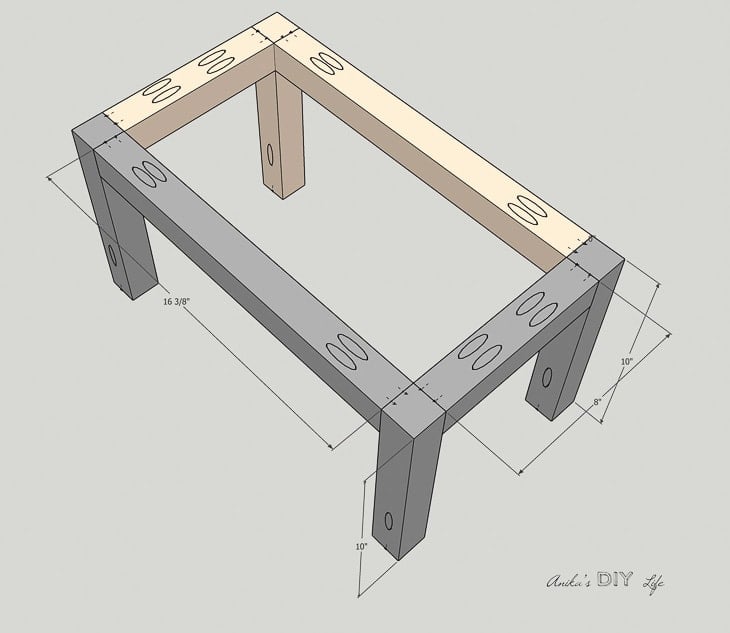
- Cut all the 2×2’s per the plans using a miter saw.
- Make pocket holes with the Kreg Jig at the 1-1/2″ settings. See more about exactly how to use a Kreg Jig
RELATED: Check out my full tutorial on using a miter saw for beginners.
Also, don’t miss these tips to make sure your pocket holes are strong!
Step 2 – Build the Top
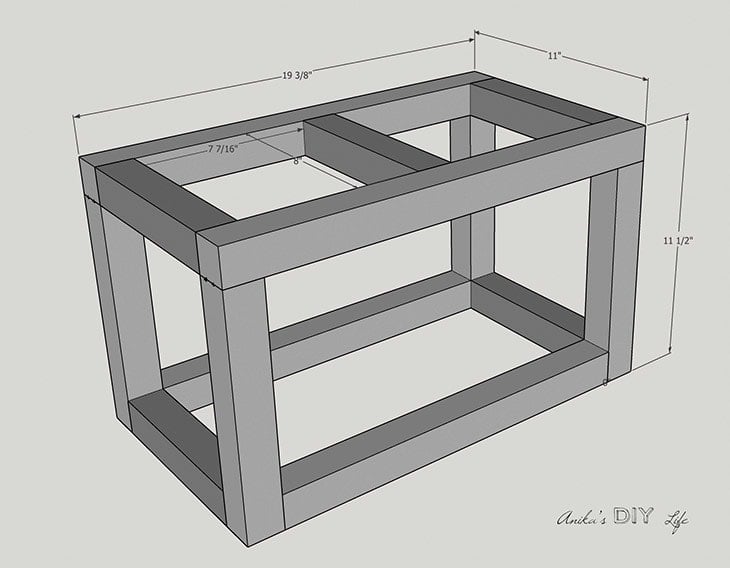
Build the top grid using 2-1/2″ pocket hole screws and wood glue.

Be sure to rough fit the dog bowls before and after you build the top. If the dog bowls don’t fit, you can still take it apart and adjust.
Step 3 – Build the Bottom Leg Frame
Build the leg frame with the remaining 2x2s. There is a specific sequence to follow here to make sure you are able to access all the pocket holes. Be sure to follow the plans

Step 4 – Finish
Stain or paint the stand per your choice. Be sure to keep it pet safe and also protect the wood from splashes.
I love the dipped paint effect that Brittany picked – simple and modern!

You can get the plans for it by clicking below –
Be sure to visit Brittany’s site to see all the details and lots more pictures of the project and how to build this raised pet feeder.
DOWNLOAD PRINTABLE PLANS FOR DOG BOWL HOLDER
Thank you to Brittany for collaborating on this project. Stop by Brittany’s blog for more simple and modern DIY projects.
If you decide to build it, I’d love to see it! Feel free to email photos to me at [email protected] or tag me on Instagram @anikasdiylife and Brittany @brittanymerth for a chance to be featured on social media!
Need More Ideas?
Check out these 21 DIY dog bowl stands
Elevated Dog Bowl Stands to Buy
If you would rather just buy one than build, here are a few options –
Other projects you might like –
Anika's goal is to inspire and empower beginners with woodworking, DIY, home improvement, and home decor ideas.
She wants everyone to unlock their creative potential and experience the feeling that comes with making something. Nothing feels better better than seeing something and saying "I can make that!"


