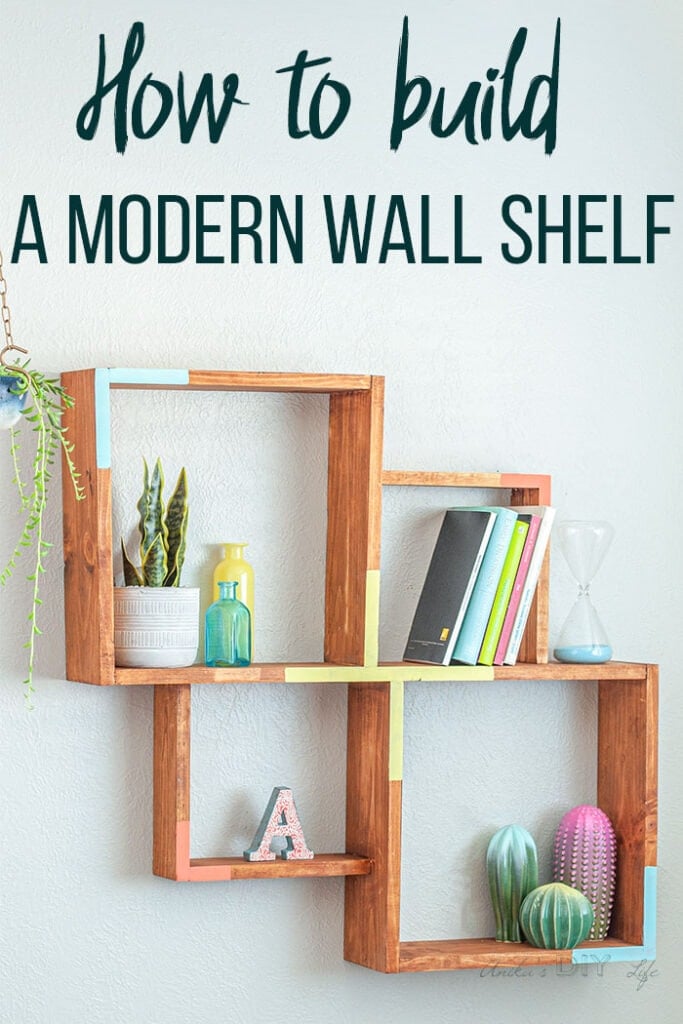
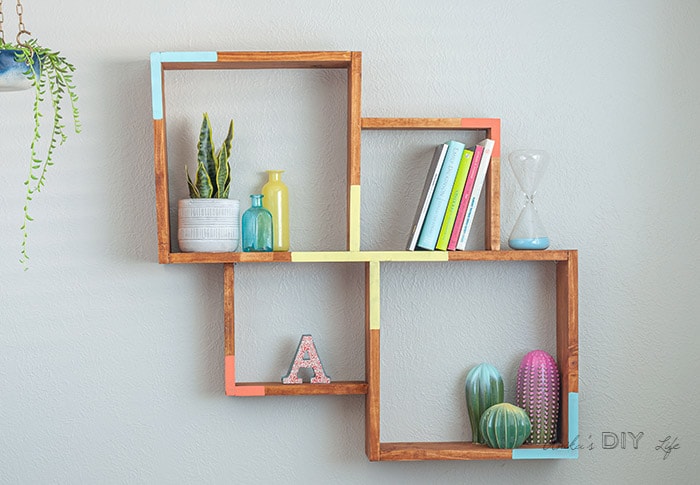
How to Build a Simple Wall Shelf
Learn how to build a simple wall shelf with this full tutorial, video and plans. This modern DIY display shelf is the perfect beginner woodworking project. Make it using the easy Kreg 320!
I know you guys love quick projects that are also a lot of fun.
This wall shelf is really easy and simple to build but is not that that simple to look at.
It uses only 3 boards… well only about 2 and a half but you can’t really buy half-boards…
Or you could make it out of scrap wood if you have the boards in your scrap woodpile.
And you only need 3 tools!

This post is sponsored by Kreg Tools. All opinions are my own. Thank you for supporting the brands that help me bring you projects.
Like I mentioned, to build this shelf, all you need are 3 tools.
One of them is the all-new Kreg 320!
All About the Kreg 320
You know I am a fan of Kreg Pocket Hole systems. Pocket holes make it super easy to create strong joints.
The Kreg 320 is the perfect entry level jig coming in at $40! It is super easy to use and very versatile.
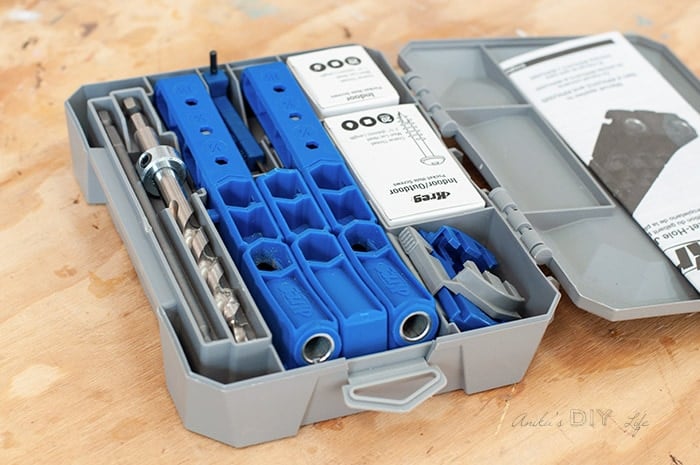
Features of the Kreg 320
Kreg has really put a lot of thought behind this Jig to make it as user and beginner friendly as possible.
- Material Thickness gauge/hex – it helps you measure thickness of boards ranging from 1/2″ to 1-1/2″. It is also a hex wrench to help adjust the collar of the drill bit

- Drill bit with material thickness settings – The Drill bit is marked with the common material thicknesses and the collar can be easily adjusted for the required thickness.

- Thickness stoppers on the Jig – It is easy to adjust the jig for the material thickness used.
- Clamp adapter – Easy to use clamp adapter that works with any brand of clamps. But I love using mine with my Kreg Face Clamps.

- Variable pocket hole spacing – the BEST thing about this jig. The drill guides and the spacers can be easily put together in various configurations to give you the spacing you need for your project.

See more in my video below!
Simple DIY Display Shelf
Materials Needed to Build the DIY Shelf
- Lumber per the plans
- Kreg Jig ( The Kreg 320 is the perfect beginner Kreg jig under $40!)
- Kreg Face Clamp
- Wood glue
- Miter saw
- Power Drill
- Random Orbital Sander and sand paper in various grits.
- Paint or stain of your choice (I used this one.)
How to Build a DIY Shelf
Watch the full video to see how I built the shelf. Get the printable plans below along with the step by step instructions.
Click here to subscribe to my YouTube Channel for more great videos!
Printable Plans for DIY Shelf
As always I have the printable plans for this simple and modern DIY shelf. You can get them delivered straight to your email. Click below!
Tutorial to Build a Modern Shelf
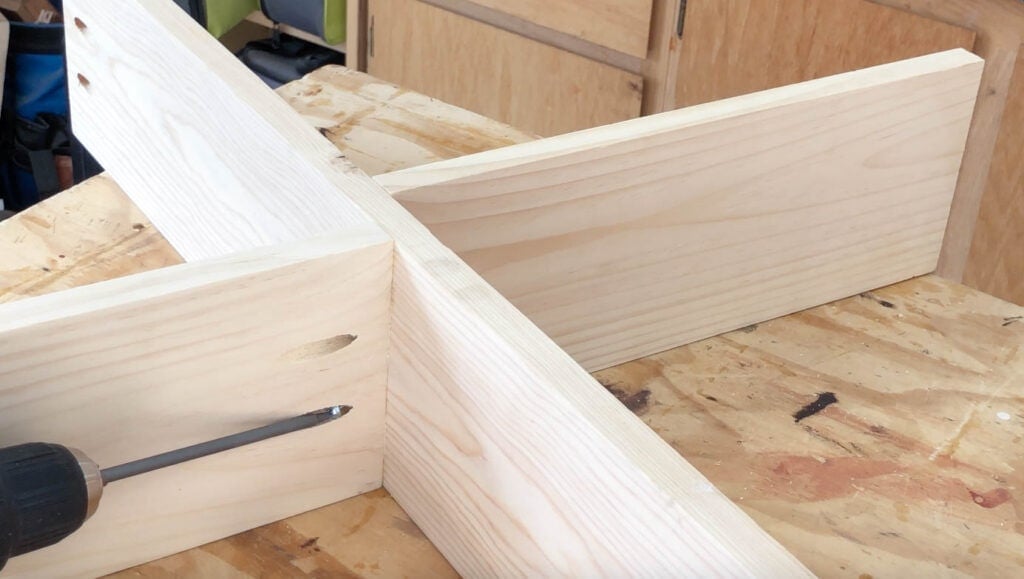
Step 1: Prep Lumber
- Make all the cuts per the plans.
- Sand down all the boards.
- Make pocket holes using a Kreg jig and the drill guide at the 3/4″ setting.
Step 2: Build Large Square Shelves.
- Attach the parts of the large square shelves to the center boards and build the squares. Be sure to use a speed square to make sure everything remains square as you attach.
Step 3: Add Small Square Shelves
- Attach the 1×4 boards to the shelf to make the small square shelves using the pocket hole screws and wood glue.

Step 4: Finish
- Finish it with stain or paint as you like.
- I stained it with this gel stain and then for fun added a few coats of colorful acrylic paint.
That is it!
A simple and fun wall shelf.
As soon as my daughter saw it, she asked it she could have it in her room.
Remember you can get the printable plans for this cute little set by clicking below.
Get the Printable Plans
If you build it, I would love to see it! Feel free to email photos to me at [email protected] or tag me on Instagram @anikasdiylife for a chance to be featured on social media! I can’t wait to see what you build!
More DIY Shelf Ideas –
Anika's goal is to inspire and empower beginners with woodworking, DIY, home improvement, and home decor ideas.
She wants everyone to unlock their creative potential and experience the feeling that comes with making something. Nothing feels better better than seeing something and saying "I can make that!"


Love this design! and besides the list of parts needed, are those metal connectors “Simpson Strong Ties right angle connectors”? I think that’s what they are…? I have some that I bought at a yard sale! Talk about a multitude of uses and applications! Thank you for the posting!
P.S. I know they aren’t supporting any weight, but it’s surprising how many ways they can be used, and that pop of color is perfect!
..or is it only paint?
Hi Linda, that is just paint 🙂
But would be cool with the connectors too!
Neat plans. I’ve enjoyed watching your youtube channel but didn’t know you had a blog too. Love it!
Thank you so much Marti! Welcome to the blog 🙂