How to Convert Recessed Light To Pendant: A Step-by-Step Guide
Learn how to convert recessed lights to pendant lights with our easy step-by-step guide. Upgrade your home lighting and add style.

Recessed or can lights are great! They are functional and can be used in almost any space – from living room to bedrooms to kitchen, bathrooms, and even outdoors.
However, pendant lights or chandeliers bring a certain charm and oomph to any space. They can completely transform a space and add personality – modern, farmhouse, industrial, or anything in between.
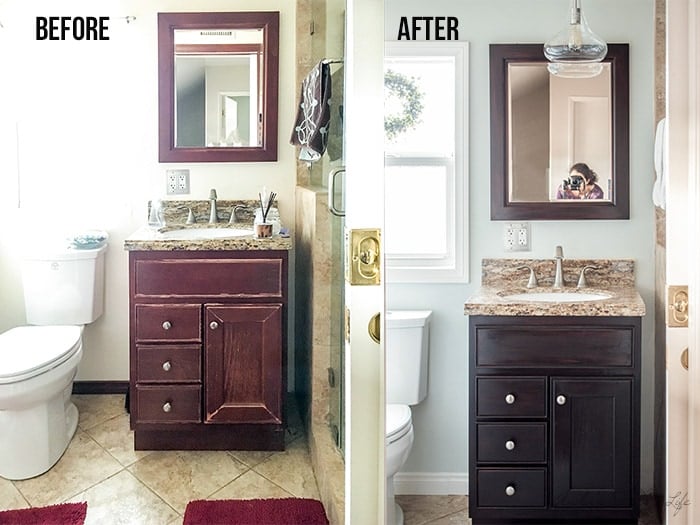
When I updated my small guest bathroom with a few quick and easy projects, there was a recessed light above the sink, but it was just not cutting it with the style factor. I knew I needed a pendant light over the sink to add a little character.
After some research, I found the perfect, easy, and quick way to make the change. I am not even kidding—it took us about 15 minutes to install it except for our debacle with the sheet metal screws (which I will tell you about shortly). But that won’t affect you because now will know and can be prepared with the correct screws.
Oh… and there was this thing where I dropped the pendant and broke it, so we had to wait for a few days to get a new one…
But other than that, it was surprisingly easy!
***This post contains referral or affiliate links. It is a way for this site to earn advertising fees by advertising or linking to certain products and/or services. Please read my full disclosure here ***
Replacing Can Light With Pendant
Material needed
- Westinghouse Recessed light conversion kit – this is where the magic is! You can use the existing can housing and install the pendant light!
- Pendant light fixture of your choice (I used this one)
- Power drill/driver
- Sheet metal screws
- Screwdriver
- Ladder
- voltage tester

Replacing Ceiling Can Light With Pendant Light
Warning: I have basic wiring skills, but I am NOT a certified electrician. This project is completely at your own risk, and I take no responsibility for any mishaps you may have as a result of this tutorial. Please be careful and consult a certified electrician if you have any questions.
Step 1: Turn off the circuit breaker
Safety should always be your top priority when working with electrical fixtures. Installing a pendant light conversion kit involves handling electrical wiring and working at heights, which can pose risks if not done correctly.
First and foremost, turn off the power and the circuit breaker. Double-check that the power is off by testing the light switch or using a voltage tester.
Second, don’t work alone. Always have someone around you when you are working with the wires and at the height. Not just in the case that you need help, they will also be very helpful to hand you things while you work on the project 😉
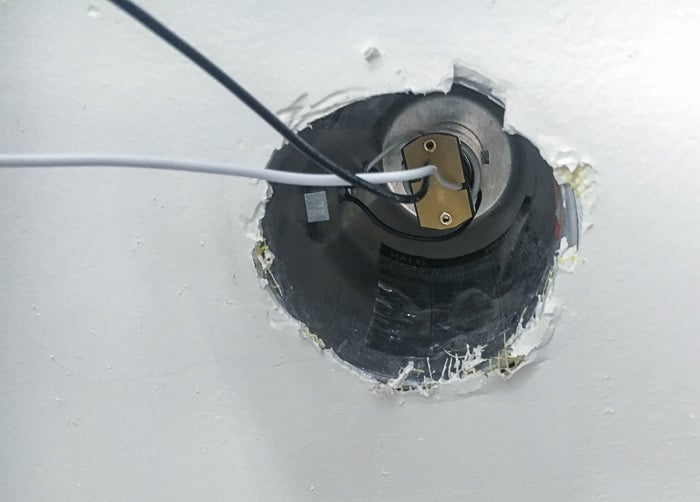
Step 2 – Remove the existing can light
If you want to replace it, you have to remove it. 🙂 The way you remove it will depend on the manufacturer.
We had to pull the light out slightly and then push on the metal clips to get it out of the recess. The metal housing will be left behind.
Step 3 – Attach the recessed light kit
- Open the recessed light conversion kit. Be sure to read and follow the instructions in the light conversion kit.

- The main part is a screw-on “light bulb” without the bulb but with wires. This is the socket pigtail. Screw that into the socket.
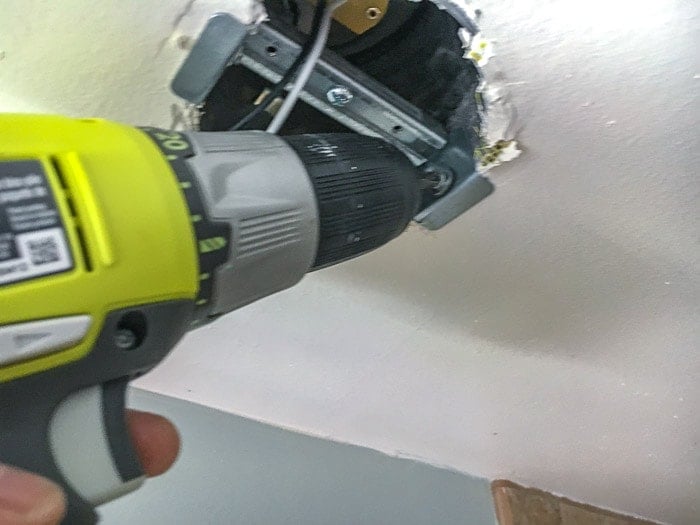
Step 4: Attach the channel brace
The kit also comes with a channel brace that needs to be installed onto the can lights.
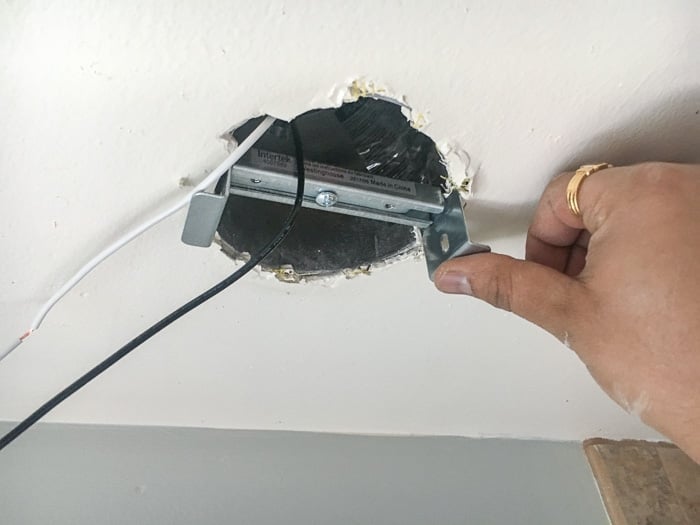
The screw in the middle can be removed to change the size of the plates to make it fit inside the recess. It can be used for can lights between 4-6″. As you can see, we have a 4″ can light, which means keeping the crossbar at the minimum length.
- Tighten the little screw to hold it in place.
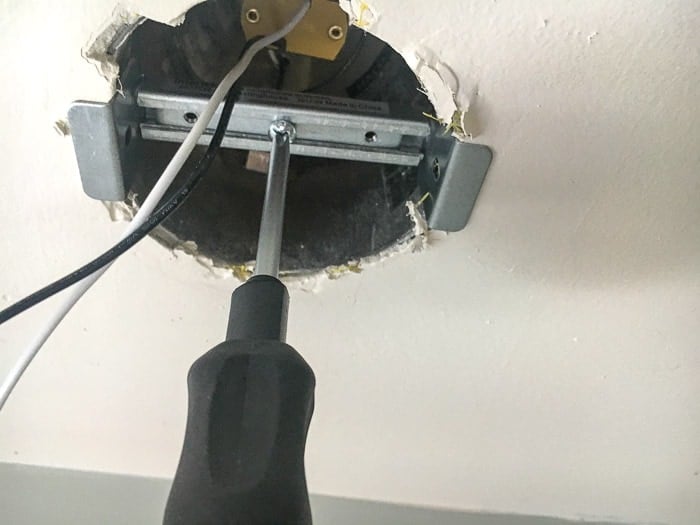
Step 5- Attach the channel brace to the can light.
- The channel brace needs to be attached to the can with screws. The conversion kit comes with metal screws. However, they just did not work for us. Thankfully, I had metal screws left over from my industrial metal sign project.
- Screw the brace to the metal can housing on each side.
Looking back, a lot of reviews mention the same problem. So be sure to have a few sheet metal screws handy for the project.
This is literally it!
This is all you need to do to convert the recessed light into a fixture to add a pendant light.
Step 6 – Install pendant hardware
- Install the crossbar that comes with a pendant like you normally would. You can also use the crossbar that comes with the recessed light converter. We used the two screws on the sides to attach the mounting bracket to the brace.
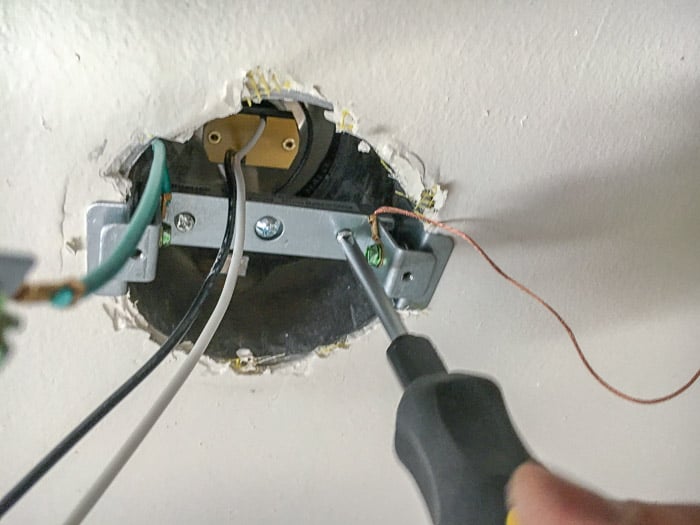
Be sure to attach the ground wire to the side of the recessed can housing. And connect the rest of the wiring for the pendant light.
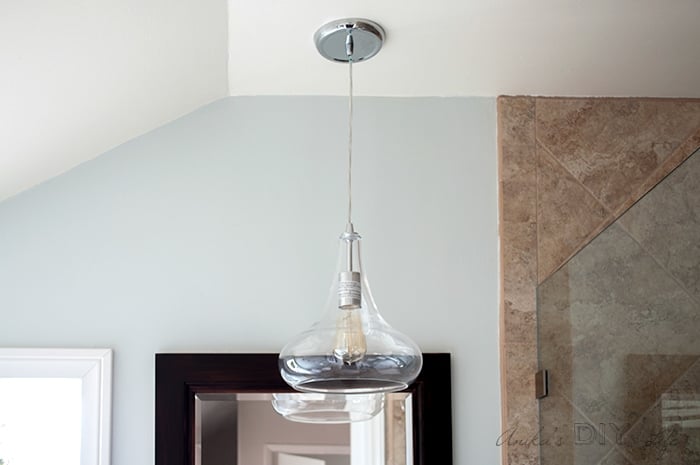
Attach the cover plate and hang up the light!
Connect and install the pendant or a flush mount light according to the instructions that come with it.
That’s it!
It was really super easy! And the pendant adds a lot of character to the bathroom!
This is a super easy home upgrade that requires no major remodel. The best application is if you have current recessed lighting in your kitchen or entryway. You can easily convert them into gorgeous pendant lights.
You will also like:


[mv_create title=”Convert a Recessed Light to a Pendant” type=”diy” key=”39″]
Anika's goal is to inspire and empower beginners with woodworking, DIY, home improvement, and home decor ideas.
She wants everyone to unlock their creative potential and experience the feeling that comes with making something. Nothing feels better better than seeing something and saying "I can make that!"


Anika, I will be building beds with your plans for my new house. I am going to make benches for the gardens and I will do this lamp changeover in both bathrooms and the bedrooms.
You didn’t say why you hung your pendant lamp in front of the mirror. If that is a medicine cabinet you will smash that light the first time you open the door. If it is a stationary mirror only, then it would blind me every time I turned it on with the light reflecting in that mirror. Have you any thoughts on this since this post? I’d shorten the hanging wire if it were me but I love all your ideas and info.
Hi Pamela, It is not a medicine cabinet. In the pictures, the angle is such that the pendant looks like it is in front of the mirror. It is actually just above the mirror and it doesn’t bother the eyes in the mirror.