DIY Solar Light Post Using 4×4 Boards
Learn how to make an inexpensive DIY solar light post to decorate your front yard or backyard. This quick project uses a board of 4×4 and solar lamps. Make it as large or small as you like!
You will also like DIY scrap wood project ideas and How to spruce up a small front porch for spring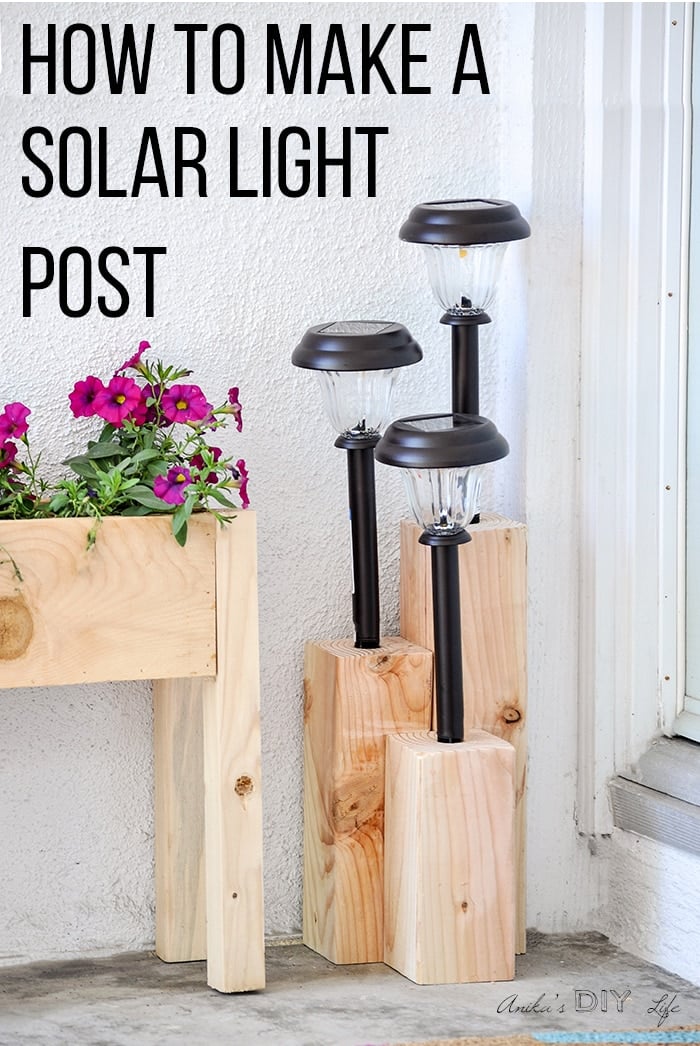
This spring, I am on a spree to spruce up our outdoor space.
I have a few large projects planned and in progress.
It is always good to mix up large and small projects to keep things fun and interesting.
Lighting is one of the key elements to add magic to summer nights…
Or, just to guide visitors to the door.
A couple of years ago, I whipped up this easy DIY solar light stand in about half an hour (not including drying time)
The best part …. you guessed it –
I used up a few scraps of 4×4 boards I had laying around.
It really is a take on my scrap wood candle holder… but here I used solar lights instead of candles or tea lights.
You can easily make this fit your space and requirements – aka as tall or as wide as you like!
Let’s get building!
DIY Solar Light Post Using 4×4
***This post contains affiliate or referral links. It is a way for this site to earn advertising fees by advertising or linking to certain products and/or services. Please read my full disclosure here ***
Materials needed for the solar light post
- 4″ x 4″ lumber
- LED Solar lights
- 7/8″ spade bit (be sure to measure your solar light tube and choose this accordingly)
- Wood glue
- Clamps
- Power Drill or Drill press
- Optional – paint or stain (I used Cub Appeal New England Navy)
Before we get started, make sure to follow me on Instagram, Facebook, YouTube, and Pinterest to keep up with all my latest builds and projects!
Shop My T-Shirt Designs –

How to Make the Solar Light Post:
Step 1 – Cut Lumber
Cut the 4″ x 4″ board down to sizes you desire. I used three pieces cut to 8″, 11″ and 15″.
Again, you can make them as tall as you like… or you can add multiple other lengths and boards.
It really is up to you and what your space needs.
Be sure to sand any rough edges.
Step 2 – Build the structure
Using wood glue and clamps attach the 4″ x 4″ pieces one-by-one.
Allow 12 hours of drying time.
Optional – You can stain or paint the structure at this point. I decided to leave mine bare because it went well with the tiered planter next to it.
Step 3 – Drill holes
Drill holes about 2″ deep into the top of each pillar.
A 7/8″ spade bit in my drill worked perfectly for my solar lights.
You may need larger or smaller depending on the width of your solar lights. Be sure to measure to make sure you get a good fit.
A drill press may be a great way to make these holes, however, I don’t have one, so I just used my power drill fitted with the spade bit.
Step 4 – Add solar lights
Fit solar lights into each hole. If your solar lights had stakes, remove them before fitting.
You can also glue them using a strong glue like E6000 to make them permanent.
I decided against it because the solar lights have a very snug fit so I wasn’t bothered with them falling off etc. Plus, it will also make it easy to change out the lights if needed. 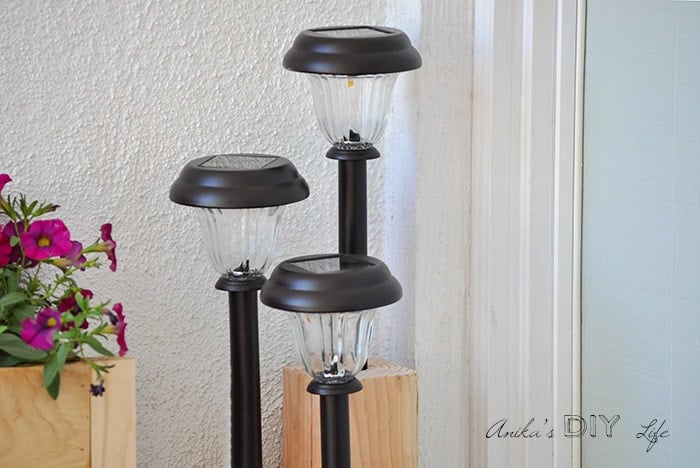
That’s it!
The new solar lights stand looks perfect on my front porch next to the $10 tiered cedar planter.
But the real magic happens at night!
This simple project creates a gorgeous ambience!
And then we moved to our new home.
A Quick Update of the Solar Light Stand –
It felt really bare out front, so I taped it and painted it to add a little punch of color.

I think the paint adds a nice modern touch to the solar lights. Of course, I got new ones because the old ones broke at one point. 
It also makes a nice addition to my backyard. I am debating which one will be its final spot.

If you have or if you make one of these, I would love to see! Please share and tag Anika’s DIY Life on Instagram @anikasdiylife
More Like DIY Outdoor Solar Light Post –
[mv_create key=”11″ type=”diy” title=”DIY Solar Light Post” thumbnail=”https://www.anikasdiylife.com/wp-content/uploads/2019/04/DIY-Solar-light-post-Anikas-DIY-Life-1sq500-1.jpg”]
Anika's goal is to inspire and empower beginners with woodworking, DIY, home improvement, and home decor ideas.
She wants everyone to unlock their creative potential and experience the feeling that comes with making something. Nothing feels better better than seeing something and saying "I can make that!"


..and I love the color you picked! I have got to go find some clamps somewhere…I do a lot of fleas and yard sales, even estate sales, and I’m always looking for cool tools. But you gotta have clamps! Good job, Anika!
Clamps are great but you can also get by on just gluing one post at a time and stack a cinder block on top of it. (don’t know about you but i have a couple bricks and concrete cinder blocks laying around my patio for all sorts of gardening and such). Using a real clamp is ideal but laying your post down and placing a block on top is a poor mans way to get it done. Just make sure the post bottoms are square/flush!
Be sure and add some sort of sealer to the exposed top part of the post, end grain wood tends to split with outdoor exposure (sun/moisture). I planned to make something like this and add a few small USA flags to the posts , just for the 4th of July.
Hi Lexie! I love the idea of using them for the flags! I think it will make a great arrangement!
And yes, I should really add a finish to the exposed wood 🙂
Have a nice woodworking Soil energi good mind.
Wow – here is another project which is exactly like our quite popular Cedar Cube Solar Lights project which originally was made in 2016 and updated in Jan 24, 2018. Now the copied project count is 2 and I wonder if you’re planning to copy any more projects of ours.
I had no intention of copying. I originally made a couple of copies of this project a long time before I started blogging in 2016. And then I made one for the blog in 2017. I am happy to add a reference to your blog post as the inspiration. And, the other project was posted LONG before your project!