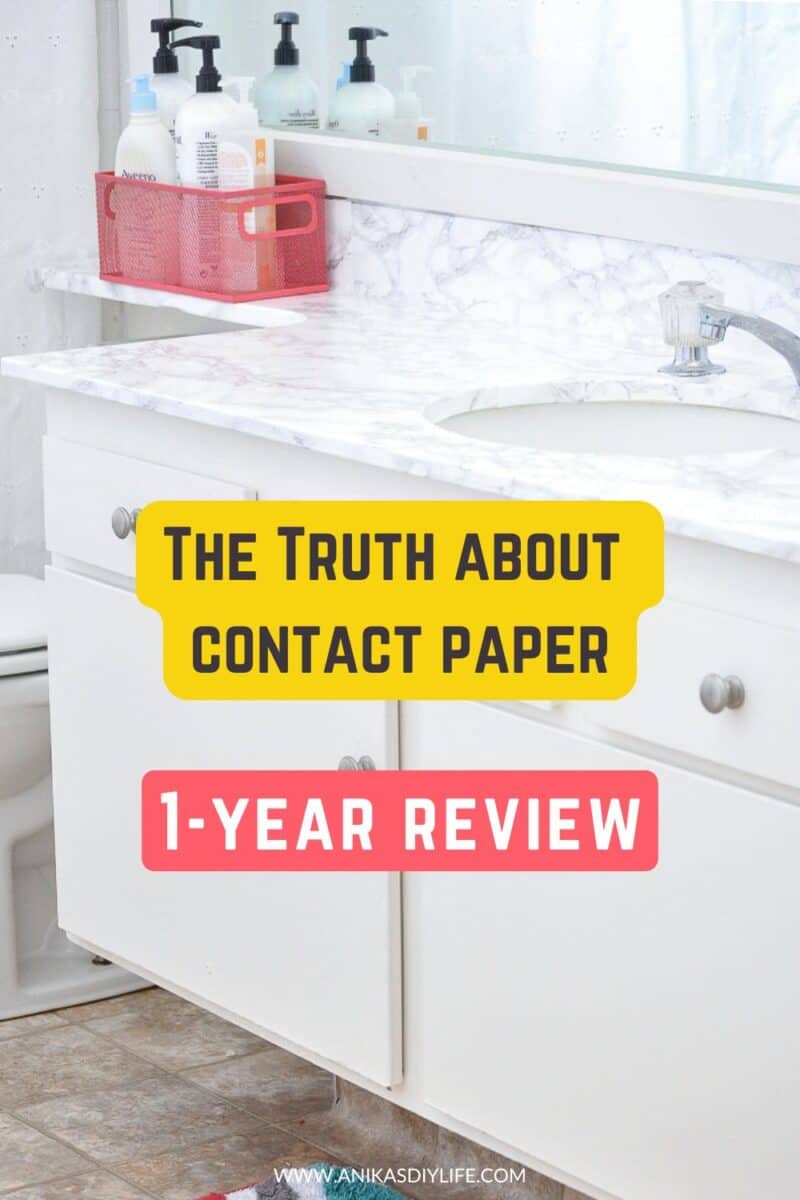
Is Marble Contact Paper Durable? An Honest 1-Year Review & Removal Guide
Is marble contact paper durable in bathrooms? See my 1-year countertop review. Plus how to remove it damage-free.
I get a lot of questions about the faux marble contact paper countertop I installed in the kids’ bathroom. I installed this in 2016 and removed it 1 year later before moving. Here is my honest update on how it is holding up, especially since it lives in a high-traffic kids’ bathroom!
If you are new here, here is a bit of background. Back in September 2016, I decided on a $100 room makeover challenge. Because we live in a rental, there was an extra challenge involved: I couldn’t paint the vanity or change out any permanent fixtures.
My solution? Covering the old, yellowed counters with waterproof vinyl.
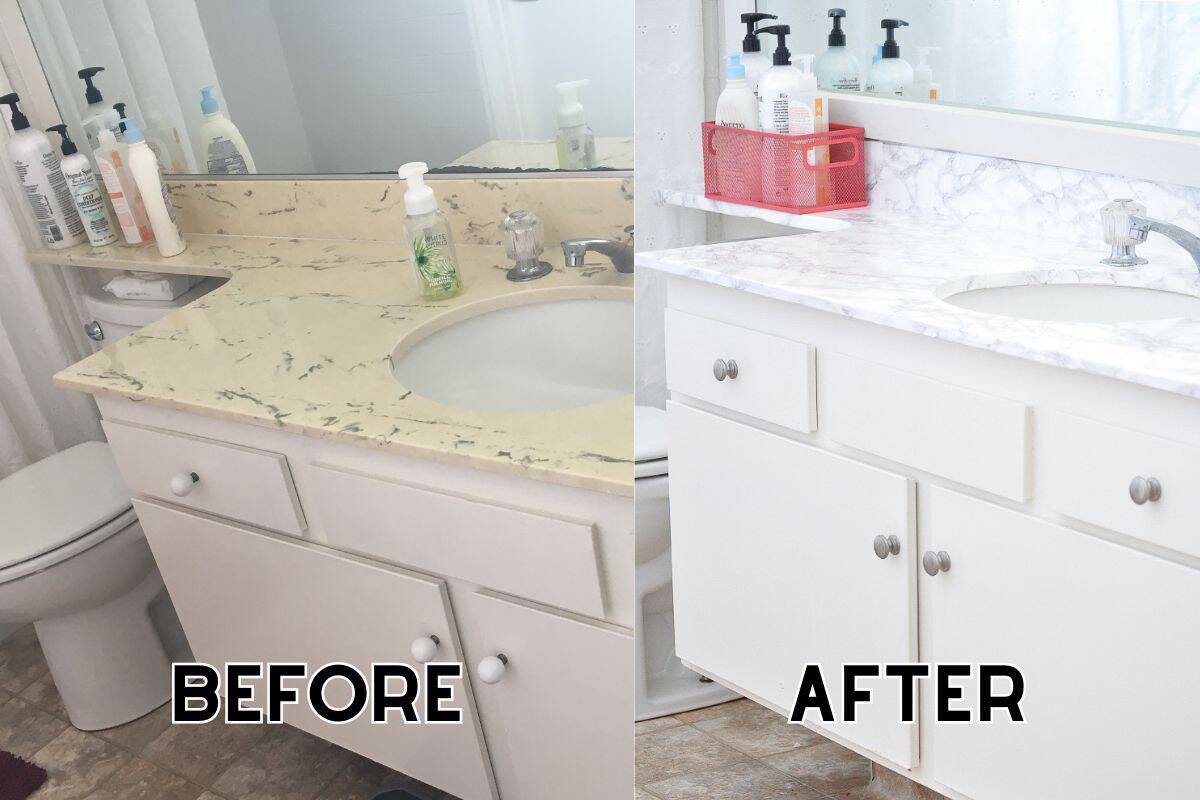
These counters have fooled many, including our landlord! They don’t realize it is faux marble contact paper until I point to the seams. 🙂
See the full step-by-step tutorial on how to install contact paper countertops here.
Quick Verdict: Is Contact Paper Worth It?
- Best For: Rentals, budget makeovers, and bathroom counters.
- Durability: Excellent against water and toothpaste. Low heat resistance (needs trivets).
- Cost: ~$30 for the entire project.
- Removal: 100% damage-free (leaves no residue).
- My Rating: 5/5 stars for functionality and price.
***This post contains referral or affiliate links. It is a way for this site to earn advertising fees by advertising or linking to certain products and/or services. Please read my full disclosure here ***
Supplies Needed
- Marble Contact paper. If you are curious about other finishes like wood grain or granite, check out my full guide on everything you need to know about decorating with contact paper.
- Scissors
- Exacto knife
- Flexible smoothing tool or a credit card. But I do recommend using the smoothing tool to achieve a high-quality finish.
Is Marble Contact Paper Durable? (The 1-Year Test)
The number one question I get is: “Does it actually last?”
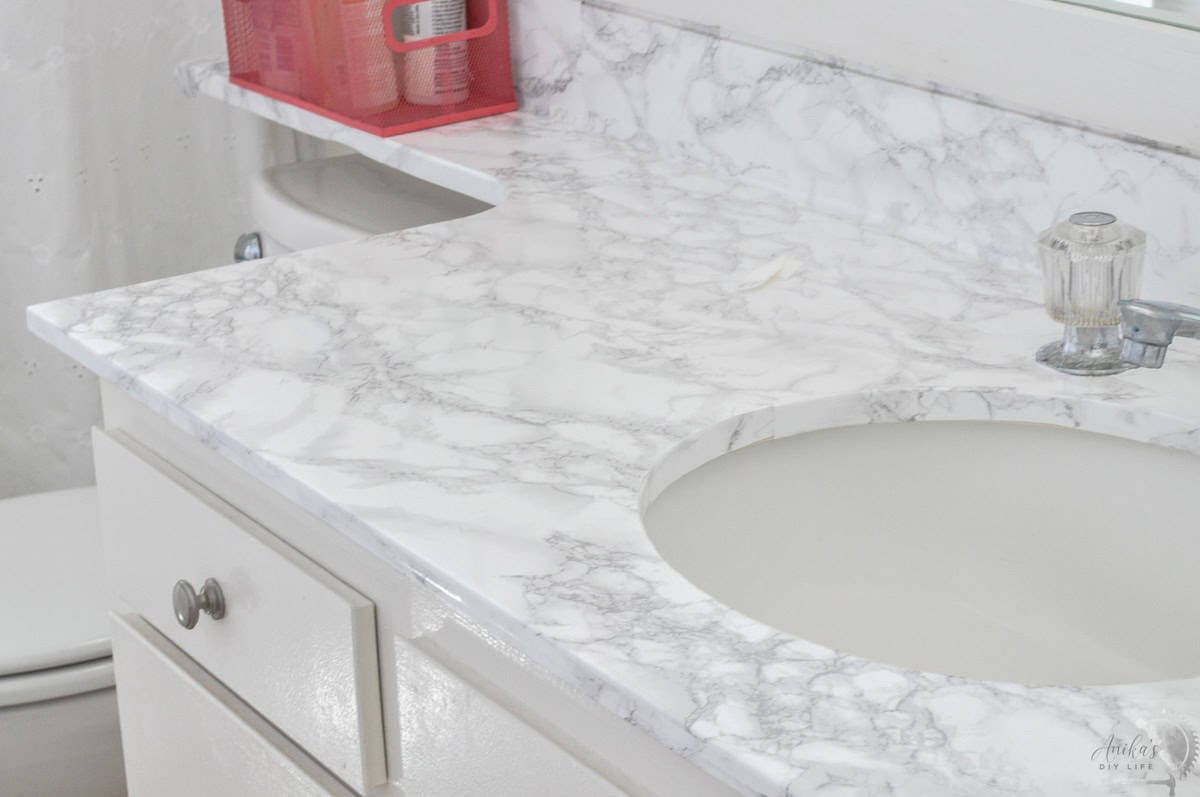
After a full year of daily abuse in a kids’ bathroom, I can honestly say these counters have held up AMAZINGLY. They have fooled everyone, including our landlord! They genuinely don’t realize it is a DIY faux-marble finish until I point out the seams.
Here is a breakdown of how contact paper for bathroom countertops handles specific “real-life” hazards:
1. Water and Mold Resistance
The Verdict: 100% Waterproof. Many people worry about mold growing underneath the paper. The vinyl material is non-porous, meaning water sits on top of it rather than soaking through.
- My Experience: I haven’t seen any “green stuff” or mold.
- The Secret: The key is sealing the edges properly. I added a small fold of paper over the edge of the sink and used silicone caulk around the faucet bases to make sure that no water could seep underneath.
2. Stain Resistance (Toothpaste & Makeup)
The Verdict: Highly Resistant. This counter gets its share of toothpaste spills, soap splatters, and water puddles (why is it so hard for kids to keep water in the sink? 🙄).
- Cleaning: I simply wipe it down with a light spray cleaner and a towel. The surface is smooth, so dried toothpaste scrubs right off, leaving it shiny and looking like new.
3. Heat Resistance
The Verdict: Not Heat Resistant. This is the most important thing to know. Contact paper is essentially vinyl (plastic). If you put a hot curling iron or a flat iron directly on it, it will melt. Or if you use it in a kitchen, you have to be extra careful about hot items.
- My Tip: Always use a trivet or a heat-safe silicone mat for hot tools. Since this is a bathroom, we didn’t have issues with hot pans, but keep this in mind if you are considering contact paper for kitchen countertops.
4. Scratching and Peeling
The Verdict: Durable, but not bulletproof. After a year, the surface looks almost exactly like it did on day one.
The Fix: If this happens, it is an easy fix. I just cut a small patch of fresh contact paper and smoothed it over the damaged spot. Because the marble pattern is busy, the patch blends right in.
Peeling: It does not peel on its own. However, my 3-year-old did find a seam and started picking at it (of course!).
How to Remove Contact Paper From Countertops
When we finally moved out of our rental, I had to remove the paper. This was the moment of truth!
Here is the removal process:
- Start at a corner: Lift one edge of the paper.
- Add heat: Use a hair dryer on a low/warm setting to soften the adhesive. This makes it peel off like butter!
- Pull slowly: Pull the paper back gently.
The Result: The countertop underneath was pristine. There was absolutely no sticky residue left behind. In fact, the counter looked cleaner than when we moved in because the contact paper had protected it from stains for a year!
Final Verdict: Would I Do It Again?
Absolutely. For a $30 investment, this project completely transformed the look of our bathroom.
If you are on the fence about using contact paper for countertops, especially in a rental or a bathroom, I say go for it. It is low risk, high reward, and totally removable.
You might also like:


Anika's goal is to inspire and empower beginners with woodworking, DIY, home improvement, and home decor ideas.
She wants everyone to unlock their creative potential and experience the feeling that comes with making something. Nothing feels better better than seeing something and saying "I can make that!"


Do you know where we can get contact papers which has more width say 3 to 5 ft . I have seen papers with 5 ft length but not the width. Need to use it in a big island.