DIY Crackle Paint Using Glue and an IKEA Malm Makeover
Share this post:
Easy DIY crackle paint using glue to create a unique texture on an Ikea Malm dresser. This easy step by step tutorial shows you how to make crackled paint at home for pennies with this Ikea Malm makeover idea!
You know when you try a technique you have never attempted before and it works out better than expected?
This dresser was my entry into May 2016 Fab Furniture Flippin Contest (TM) (FFFC) sponsored by Country Chic Paint and the theme was Bling! Bling! using their metallic creams.
It took a bit of research to figure out how to get the crackle paint finish.
I didn’t want to spend $$$ on buying crackle medium.
Then I discovered an amazing and simple the white glue technique!
Before we get into details of that, you really need to see the before…
Yes, I am embarrassed to show you this…
It’s from 5 years ago when I discovered stenciled furniture and knobs and pulls at Hobby Lobby…
I matched the design to the bedding in the guest room (!!). I was proud of it for about 5 minutes and hated it ever since but just could not figure out what to do with it!
The 5 years wait has been quite worth it don’t you think?
***This post contains affiliate or referral links. It is a way for this site to earn advertising fees by advertising or linking to certain products and/or services. Please read my full disclosure here ***
How to do make crackle paint step by step
There are crackle paint mediums available that cost $$$. I wanted to figure out how to do this for cheaper and I discovered you can make crackle paint using glue!
Materials for DIY Crackle Paint –
- Country Chic All in one paint – I used Lazy Linen
- Country Chic Paint’s Metallic cream – I used Silver bullet
- White Glue – It is important to use this specific one – trust me!
- Short handle paddle brush
- Foam brushes
- Sanding sponge
- Caulk
- Tack Cloth
DIY Crackle Paint Furniture
Step 1 – Prepare surface for painting
Take off any knobs and pulls and patch up all the holes with caulk.
This Ikea Malm dresser is laminate so I lightly sanded the entire dresser with a 150 grit sanding block and wiped away all the sanding dust with a tack cloth.
Step 2 – Paint the base paint.
I used Country Chic Paints’ All in one paint in Lazy Linen.
The first coat went on a little streaky but after the second coat, the paint was super smooth! 
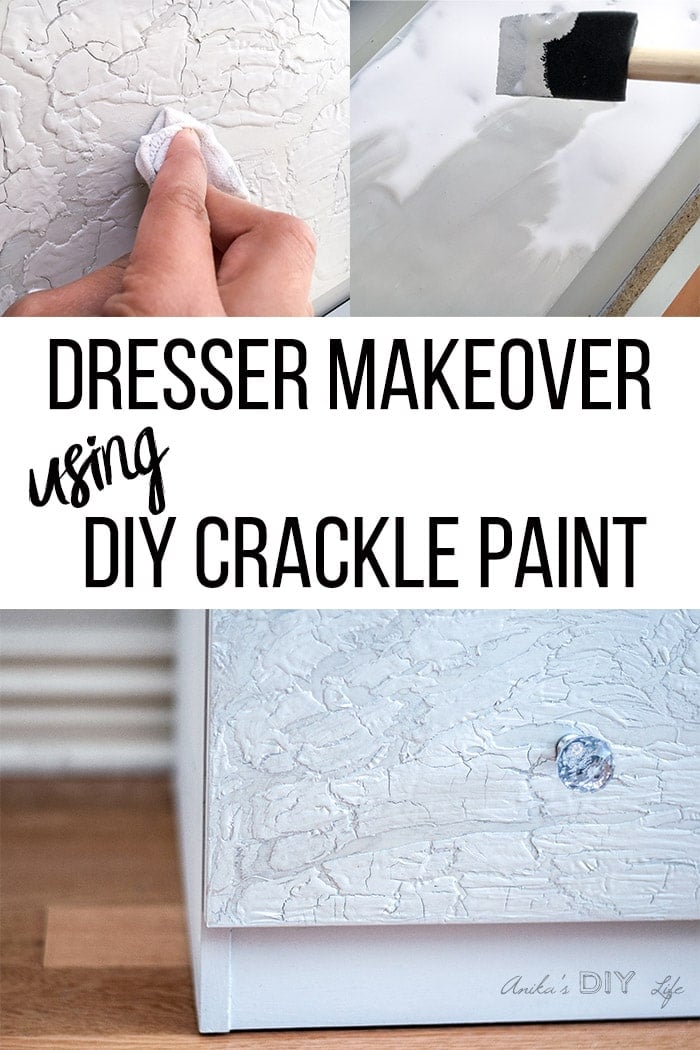
Step 3 – DIY crackle paint with Elmer’s Glue
Now the fun starts!
It’s time to use the white glue crackle paint technique!
Pour glue onto the drawer and spread it across using a sponge brush.
Step 4 – Add your top paint color
Wait (impatiently) for 2 minutes for the skin to form on the glue, then pour the top paint color little by little and spread it out using a foam brush.
I used the same paint that I used for the base color.
Important tip – Be sure to use a light hand and make sure that the glue doesn’t mix with it.
Step 4 – Make Crackle paint
aka watch it dry!
If you are impatient like me, use a hair dryer to accelerate the drying process, but resist the urge to do that a lot because the paint and glue start to ripple.
It took almost 10-12 hours for the paint and glue to completely dry but when it did, it was nice and hard and the crackle was AMAZING!
See how it changed with time –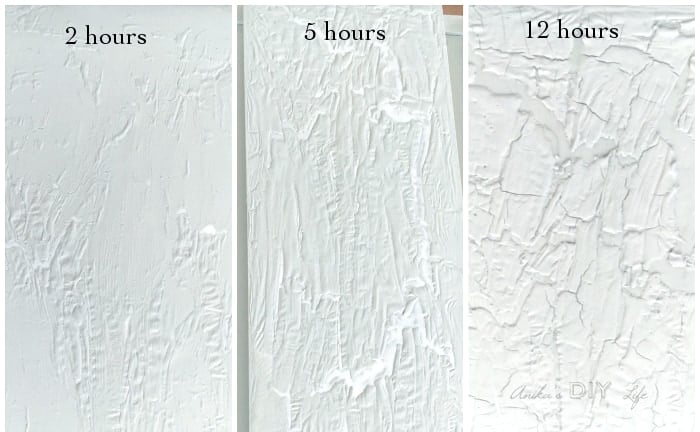
Step 5- Top coat
You could just use Poly.
But we needed bling remember!
I used an old sock to apply the Silver Bullet Metallic cream to the crackled paint.
The texture of the crackled paint was enhanced 10x with the shiny metallic cream. I did 2 coats to get to the shine I wanted.
I gave the dresser top and inside lip of the drawers a wipe down with the metallic cream too. 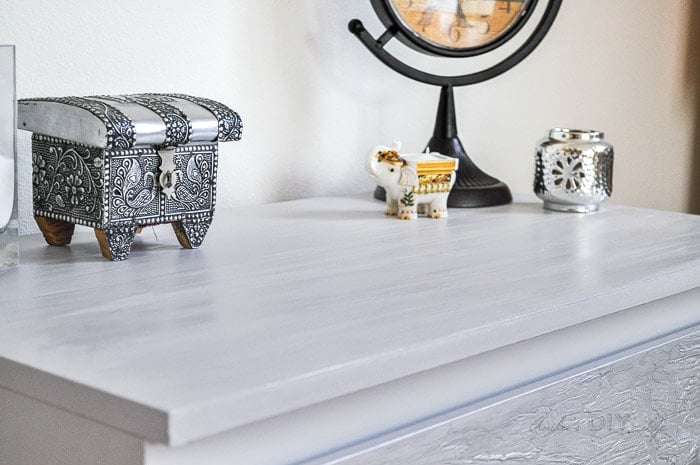
Step 6 – Add hardware
I added some crystal knobs because bling is not complete without diamonds.
Before I go once more, a close up of those gorgeous cracked paint drawers!! 


Be sure to check out Carrie at Thirty Eighth Street and get more inspiration on how to use the Country Chic Paint Metallic creams.
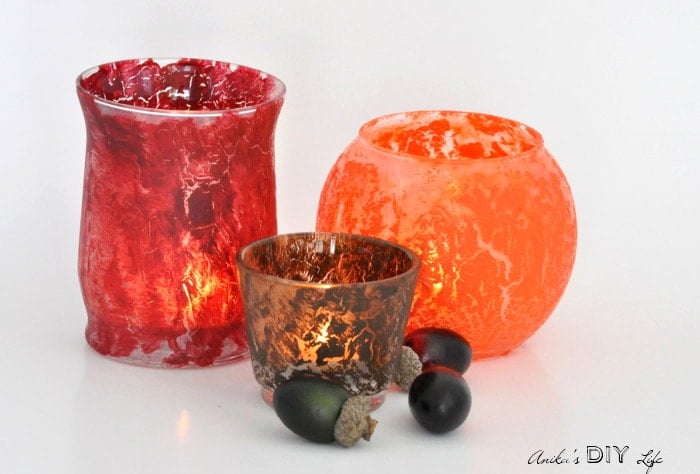
More DIY crackle paint projects-
You might also like –
Anika's goal is to inspire and empower beginners with woodworking, DIY, home improvement, and home decor ideas.
She wants everyone to unlock their creative potential and experience the feeling that comes with making something. Nothing feels better better than seeing something and saying "I can make that!"
- Anika Gandhi
- Anika Gandhi
- Anika Gandhi
- Anika Gandhi
- Anika Gandhi
- Anika Gandhi
- Anika Gandhi
- Anika Gandhi
- Anika Gandhi
- Anika Gandhi
- Anika Gandhi
- Anika Gandhi
- Anika Gandhi
- Anika Gandhi
- Anika Gandhi
- Anika Gandhi
- Anika Gandhi
- Anika Gandhi
- Anika Gandhi
- Anika Gandhi
- Anika Gandhi
- Anika Gandhi
- Anika Gandhi
- Anika Gandhi
- Anika Gandhi
- Anika Gandhi
- Anika Gandhi
- Anika Gandhi
- Anika Gandhi
- Anika Gandhi
- Anika Gandhi
- Anika Gandhi
- Anika Gandhi
- Anika Gandhi
- Anika Gandhi
- Anika Gandhi
- Anika Gandhi
- Anika Gandhi
- Anika Gandhi
- Anika Gandhi
- Anika Gandhi
- Anika Gandhi
- Anika Gandhi
- Anika Gandhi
- Anika Gandhi
- Anika Gandhi
- Anika Gandhi
- Anika Gandhi
- Anika Gandhi
- Anika Gandhi
- Anika Gandhi
- Anika Gandhi
- Anika Gandhi
- Anika Gandhi
- Anika Gandhi
- Anika Gandhi
- Anika Gandhi
- Anika Gandhi
- Anika Gandhi
- Anika Gandhi
- Anika Gandhi
- Anika Gandhi
- Anika Gandhi
- Anika Gandhi
- Anika Gandhi
- Anika Gandhi
- Anika Gandhi
- Anika Gandhi
- Anika Gandhi
- Anika Gandhi
- Anika Gandhi
- Anika Gandhi
- Anika Gandhi
- Anika Gandhi
- Anika Gandhi
- Anika Gandhi
- Anika Gandhi
- Anika Gandhi
- Anika Gandhi
- Anika Gandhi
- Anika Gandhi
- Anika Gandhi
- Anika Gandhi
- Anika Gandhi
- Anika Gandhi
- Anika Gandhi
- Anika Gandhi
- Anika Gandhi
- Anika Gandhi
- Anika Gandhi
- Anika Gandhi
- Anika Gandhi
- Anika Gandhi
- Anika Gandhi
- Anika Gandhi
- Anika Gandhi
- Anika Gandhi
- Anika Gandhi
- Anika Gandhi
- Anika Gandhi
- Anika Gandhi
- Anika Gandhi
- Anika Gandhi
- Anika Gandhi
- Anika Gandhi
- Anika Gandhi
- Anika Gandhi
- Anika Gandhi
- Anika Gandhi
- Anika Gandhi
- Anika Gandhi
- Anika Gandhi
- Anika Gandhi
- Anika Gandhi
- Anika Gandhi
- Anika Gandhi
- Anika Gandhi
- Anika Gandhi
- Anika Gandhi
- Anika Gandhi
- Anika Gandhi
- Anika Gandhi
- Anika Gandhi
- Anika Gandhi
- Anika Gandhi
- Anika Gandhi
- Anika Gandhi
- Anika Gandhi
- Anika Gandhi
- Anika Gandhi
- Anika Gandhi
- Anika Gandhi
- Anika Gandhi
- Anika Gandhi
- Anika Gandhi
- Anika Gandhi
- Anika Gandhi
- Anika Gandhi
- Anika Gandhi
- Anika Gandhi
- Anika Gandhi
- Anika Gandhi
- Anika Gandhi
- Anika Gandhi
- Anika Gandhi
- Anika Gandhi
- Anika Gandhi
- Anika Gandhi
- Anika Gandhi
- Anika Gandhi
- Anika Gandhi
- Anika Gandhi
- Anika Gandhi
- Anika Gandhi
- Anika Gandhi
- Anika Gandhi
- Anika Gandhi
- Anika Gandhi
- Anika Gandhi
- Anika Gandhi
- Anika Gandhi
- Anika Gandhi
- Anika Gandhi
- Anika Gandhi
- Anika Gandhi
- Anika Gandhi
- Anika Gandhi
- Anika Gandhi
- Anika Gandhi
- Anika Gandhi
- Anika Gandhi
- Anika Gandhi
- Anika Gandhi
- Anika Gandhi
- Anika Gandhi
- Anika Gandhi
- Anika Gandhi
- Anika Gandhi
- Anika Gandhi
- Anika Gandhi
- Anika Gandhi
- Anika Gandhi
- Anika Gandhi
- Anika Gandhi
- Anika Gandhi
- Anika Gandhi
- Anika Gandhi
- Anika Gandhi
- Anika Gandhi
- Anika Gandhi
- Anika Gandhi
- Anika Gandhi
- Anika Gandhi
- Anika Gandhi
- Anika Gandhi
- Anika Gandhi
- Anika Gandhi
- Anika Gandhi
- Anika Gandhi
- Anika Gandhi
- Anika Gandhi
- Anika Gandhi
- Anika Gandhi
- Anika Gandhi
- Anika Gandhi
- Anika Gandhi
- Anika Gandhi
- Anika Gandhi
- Anika Gandhi
- Anika Gandhi
- Anika Gandhi
- Anika Gandhi
- Anika Gandhi
- Anika Gandhi
- Anika Gandhi
- Anika Gandhi
- Anika Gandhi
- Anika Gandhi
- Anika Gandhi
- Anika Gandhi
- Anika Gandhi
- Anika Gandhi
- Anika Gandhi
- Anika Gandhi
- Anika Gandhi
- Anika Gandhi
- Anika Gandhi
- Anika Gandhi
- Anika Gandhi
- Anika Gandhi
- Anika Gandhi
- Anika Gandhi
- Anika Gandhi
- Anika Gandhi
- Anika Gandhi
- Anika Gandhi
- Anika Gandhi
- Anika Gandhi
- Anika Gandhi
- Anika Gandhi
- Anika Gandhi
- Anika Gandhi
- Anika Gandhi
- Anika Gandhi
- Anika Gandhi
- Anika Gandhi
- Anika Gandhi
- Anika Gandhi
- Anika Gandhi
- Anika Gandhi
- Anika Gandhi
- Anika Gandhi
- Anika Gandhi
- Anika Gandhi
- Anika Gandhi
- Anika Gandhi
- Anika Gandhi
- Anika Gandhi
- Anika Gandhi
- Anika Gandhi
- Anika Gandhi
- Anika Gandhi
- Anika Gandhi
- Anika Gandhi
- Anika Gandhi
- Anika Gandhi
- Anika Gandhi
- Anika Gandhi
- Anika Gandhi
- Anika Gandhi
- Anika Gandhi
- Anika Gandhi
- Anika Gandhi
- Anika Gandhi
- Anika Gandhi
- Anika Gandhi
- Anika Gandhi
- Anika Gandhi
- Anika Gandhi
- Anika Gandhi
- Anika Gandhi
- Anika Gandhi
- Anika Gandhi
- Anika Gandhi
- Anika Gandhi
- Anika Gandhi
- Anika Gandhi
- Anika Gandhi
- Anika Gandhi
- Anika Gandhi
- Anika Gandhi
- Anika Gandhi
- Anika Gandhi
- Anika Gandhi
- Anika Gandhi
- Anika Gandhi
- Anika Gandhi
- Anika Gandhi
- Anika Gandhi
- Anika Gandhi
- Anika Gandhi
- Anika Gandhi
- Anika Gandhi
- Anika Gandhi
- Anika Gandhi
- Anika Gandhi
- Anika Gandhi
- Anika Gandhi
- Anika Gandhi
- Anika Gandhi
- Anika Gandhi
- Anika Gandhi
- Anika Gandhi
- Anika Gandhi
- Anika Gandhi
- Anika Gandhi
- Anika Gandhi
- Anika Gandhi
- Anika Gandhi
- Anika Gandhi
- Anika Gandhi
- Anika Gandhi
- Anika Gandhi
- Anika Gandhi
- Anika Gandhi
- Anika Gandhi
- Anika Gandhi
- Anika Gandhi
- Anika Gandhi
- Anika Gandhi
- Anika Gandhi
- Anika Gandhi
- Anika Gandhi
- Anika Gandhi
- Anika Gandhi
- Anika Gandhi
- Anika Gandhi
- Anika Gandhi
- Anika Gandhi
- Anika Gandhi
- Anika Gandhi
- Anika Gandhi
- Anika Gandhi
- Anika Gandhi
- Anika Gandhi
- Anika Gandhi
- Anika Gandhi
- Anika Gandhi
- Anika Gandhi
- Anika Gandhi


I like your diy! And i like the beautiful mirror! Where can i get one similar? Thanks
Hi Susana! Thank you! I made that mirror myself. I used to sell these on Etsy in my store (https://www.etsy.com/shop/littlefreemonkeys). I have been slowly winding down the store but if you need one I will be happy to make one for you!
This is amazing. Love it. Have a bureau I’m going to try it on. Do you have written instructions for it?