Easy DIY Staircase Makeover Using Vinyl Plank Flooring
See how you can easily upgrade your Staircase. Vinyl Plank Installation and simple DIY stair risers make this a gorgeous DIY staircase makeover!
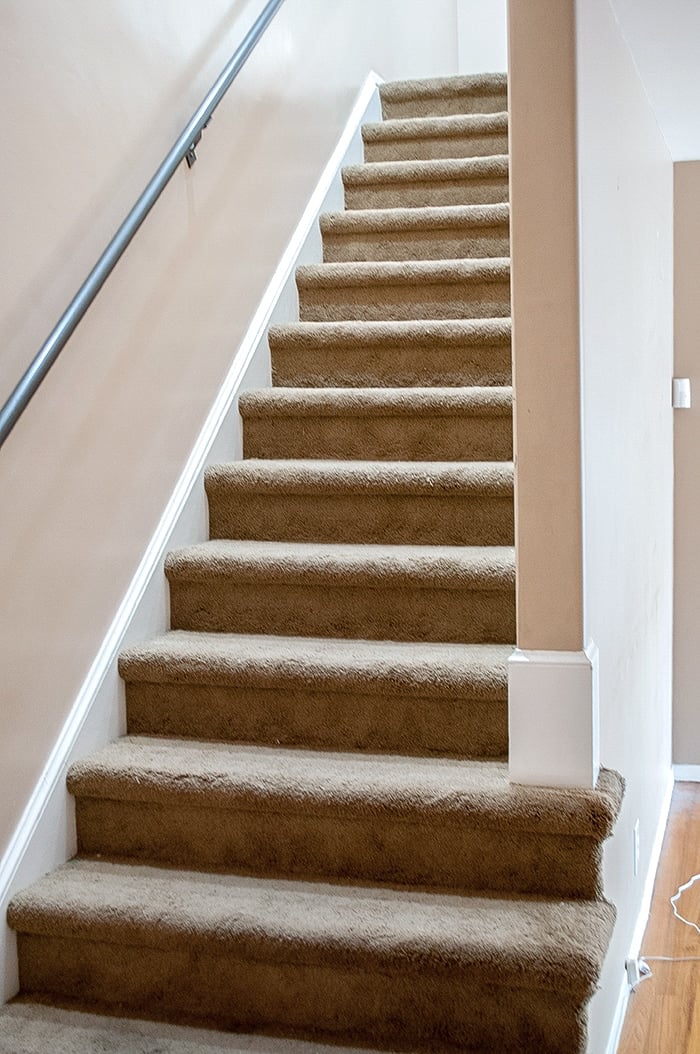
Let’s start with a history lesson. When we moved into this house, the stairs looked like this:
- We took off the carpet. (the hardwood stair treads underneath was not salvageable). I wish it was I we could simply sand, stain and refinish it).
- Hired contractors to install vinyl plank flooring on the stair to match the entryway.
- I designed, cut, and installed the stair risers (more on that in a bit).
- 4 years later, we ended up changing the vinyl plank flooring (See why we replaced the flooring here.)
This is what the stairs looked like after we were done with them.
UPDATE – Fast forward 3 years later, the vinyl plank flooring started to come apart. This time, we changed everything ourselves. Check out all the details on how to install vinyl plank flooring including on a staircase.
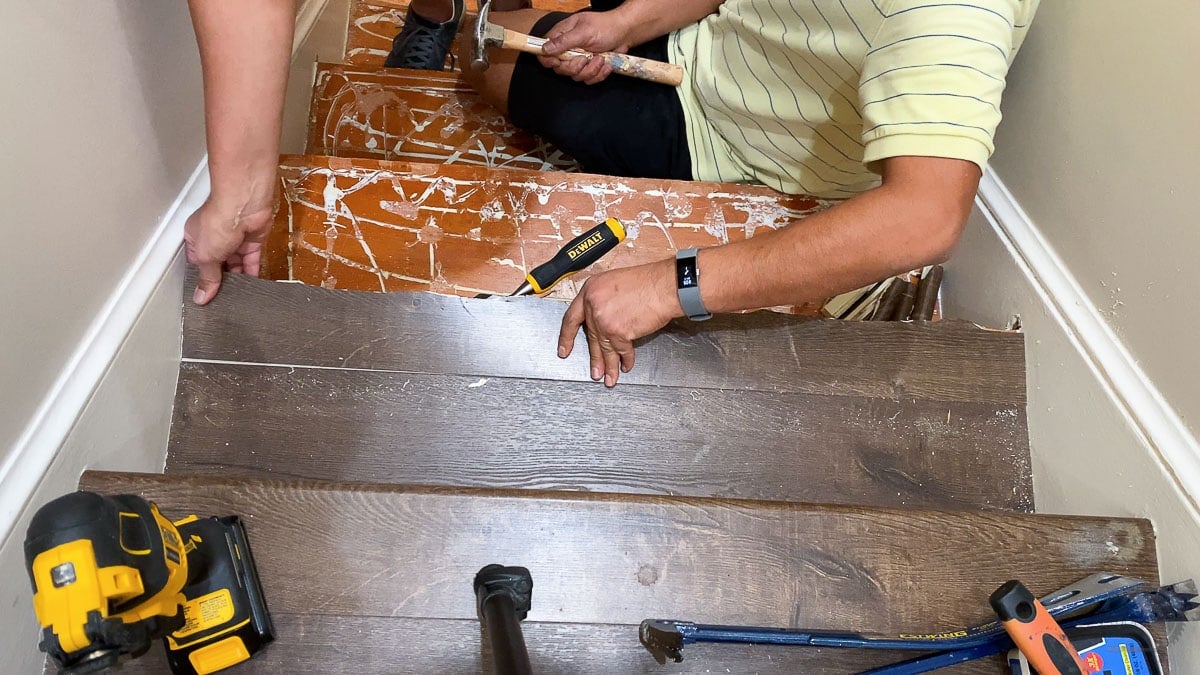
In order to install the new vinyl plank flooring on the staircase, the first step is to remove the existing flooring.
If it is carpet, you want to remove all the carpet, the padding and the tack strips and any staples.
I had existing vinyl plank flooring which needed to be removed.
How to Remove Vinyl Plank Flooring From Stairs
Vinyl Plank flooring is attached to stairways using industrial adhesive.
This makes it very hard to remove the flooring.
After lots of trial and error, we found that the best way to remove it was:
- Make relief cuts using an oscillating tool on the stair nose. Be careful to make sure it only cuts the stair node and not the stairs.
- Break away the stair nose.
- Use a Chisel and crowbar to pull off the vinyl plank floors.
- Use a chisel to scrap off any adhesive residue.
***This post contains referral or affiliate links. It is a way for this site to earn advertising fees by advertising or linking to certain products and/or services. Please read my full disclosure here ***
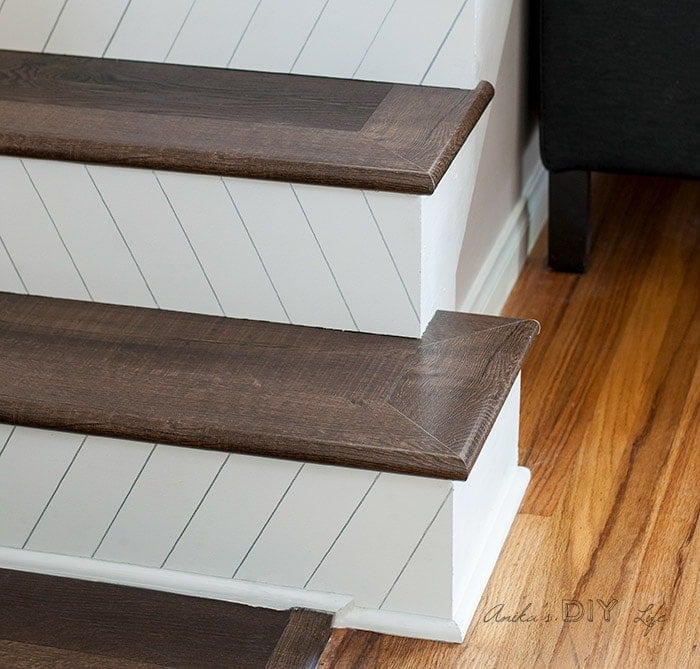
How to Install Vinyl Plank Flooring on Staircase
Vinyl plank flooring for the staircase is made of two parts –
- The flooring plank
- The stair nose.
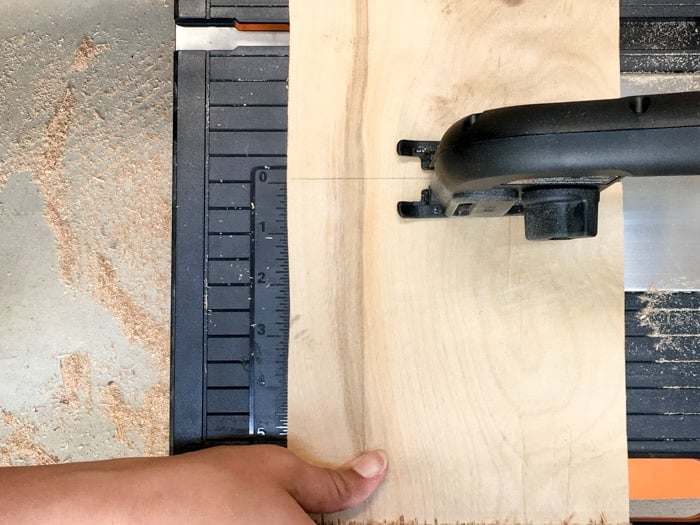
Step 1: Measure the stairs
Measure the exact width and length of each step on the stair. Most of the widths will be the same, but it never hurts to measure to make sure.
Step 2: Cut down planks
- Trim the down the flooring planks as needed.
I used my table saw to rip them down to size but you can also use a sharp utility knife or a jig saw.

I used a miter saw to cut the length of the boards.
- Cut the stair nose to size.
Step 3: Attach on the stair.
- Once everything fits perfectly, attach using industrial strength adhesive like liquid nails.

Use weights to hold the planks down while the adhesive cures or use pin nails to hold the floors in place.
How to Install Corners of Stairs.
There maybe stairs that have open corners or wrap around.
- In that case, you want to measure and create templates to cut and wrap the stair nose around.
I used a combination of miter saw and jigsaw to get the pieces exactly the way they were needed. (I did waste a bunch of pieces too).
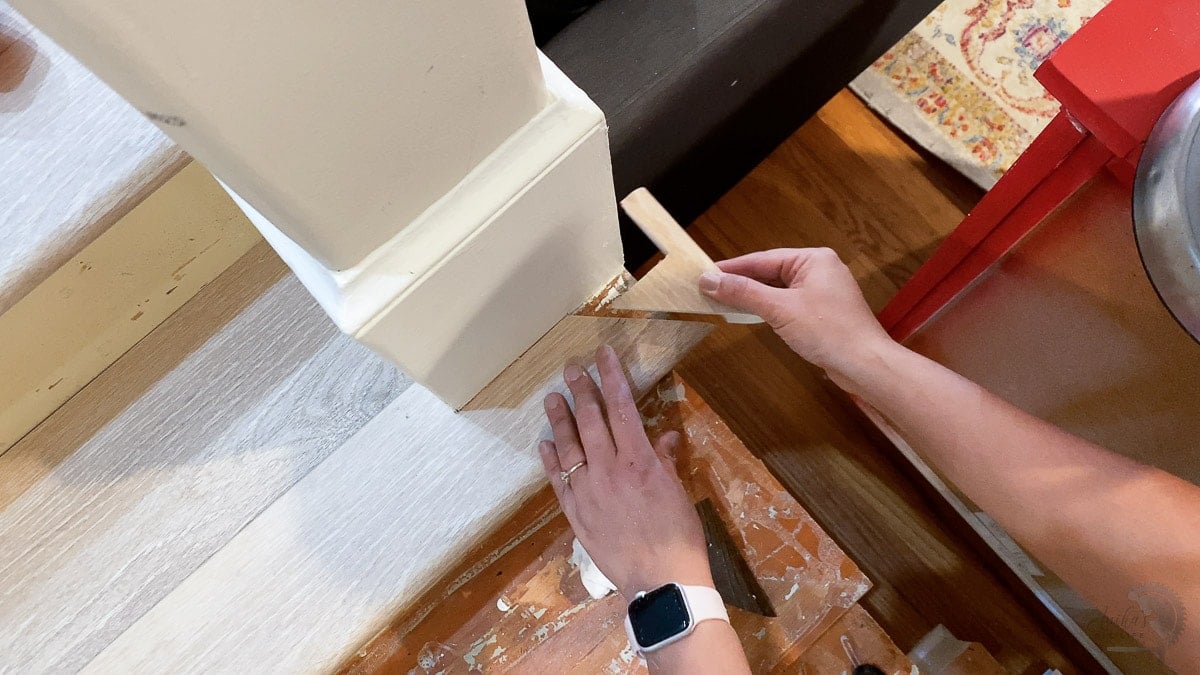
All of the angles are 45-degrees. It is important to make sure that the saws are aligned so you nice tight fit and seams.
- To install these, you want to use liquid nails and a pin nail to hold it in place while the glue cures.
Quick Stair Riser Update Idea
The stair risers had a lot of holes in them.
I debated filing and painting it, but the thought of spending an unknown number of hours fixing all those stairs was just what I needed to keep procrastinating on it…Until… I had an idea!!
I could just cover it all up! I could rip up thin plywood and nail it on – instant smooth stair risers!
Plus I could paint it before attaching it! No need to tape and worry about getting paint on the new stairs! S0 that’s what I did!!
And guess how long it took! 2.5 hours!
That’s right! Two and a half hours TOTAL from start to finish!!! Plus only cost about $15 too! Of course, that is just for the stair risers.
Material Needed
- 1 sheet of 7/32″ Plywood underlayment.
- WORX BladeRunner X2 or table saw
- Paint color of your choice
- Paint Sprayer – My new favorite is this one.
- Spray Shelter
- Metallic Silver paint pen
- 1 ¼” finish nails
- Brad nailer
- Caulking
How to Update the Staircase
I have a quick video showing you what I did. Of course, written instructions with more details follow.
Step by Step Tutorial
Step 1 – Measure and Cut
- Measure the height and width of each stair riser.
- Cutt up the underlayment into strips for each riser using a table saw or a BladeRunner X2.
Tip – Number and keep track of each riser so you know exactly where it goes.
Step 2 – Paint the Boards
- Prime and paint all the boards in the color of your choice. I used my paint sprayer. for a smooth finish but a roller works as well. Overall it is so much faster and easier than taping and painting the stair risers in place.

Step 3 – Draw the Pattern
This is obviously and optional step and you can pick any pattern or color you want to use!
I decided to draw a whimsical zigzag pattern.
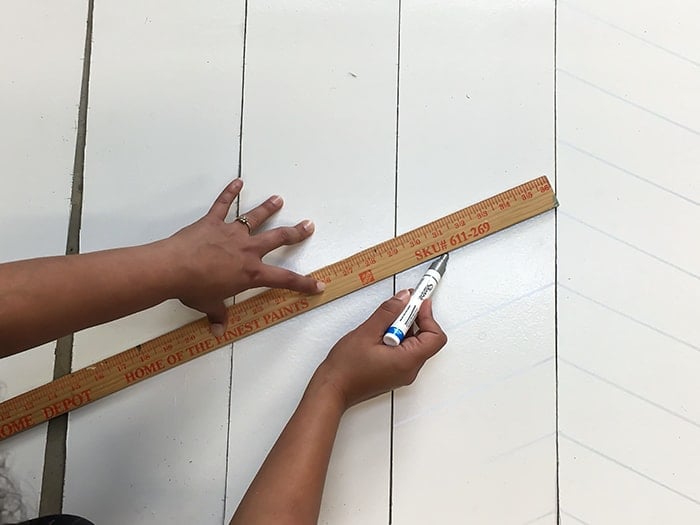
I used 4 ” spacing between the stripes and a yardstick to make all the marks and draw the lines with a silver sharpie. Since the stair risers were laid out in sequence, it was easy to draw the lines to keep the continuity.
UPDATE – For my new stair risers, I decided to stick with the same pattern but used a black paint pen instead.
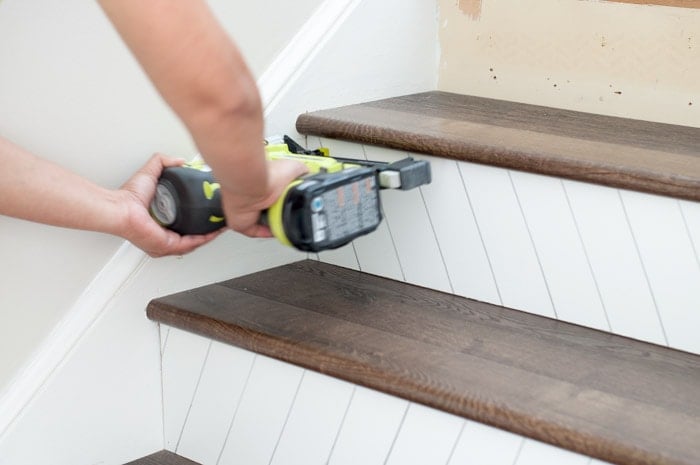
Step 4 – Attach
- Once ready, attach them to the stair risers using a brad nailer and 1-1/4″ finish nails.
- Fix up the edges and nail holes with caulking and wood putty and touch up with paint where needed.
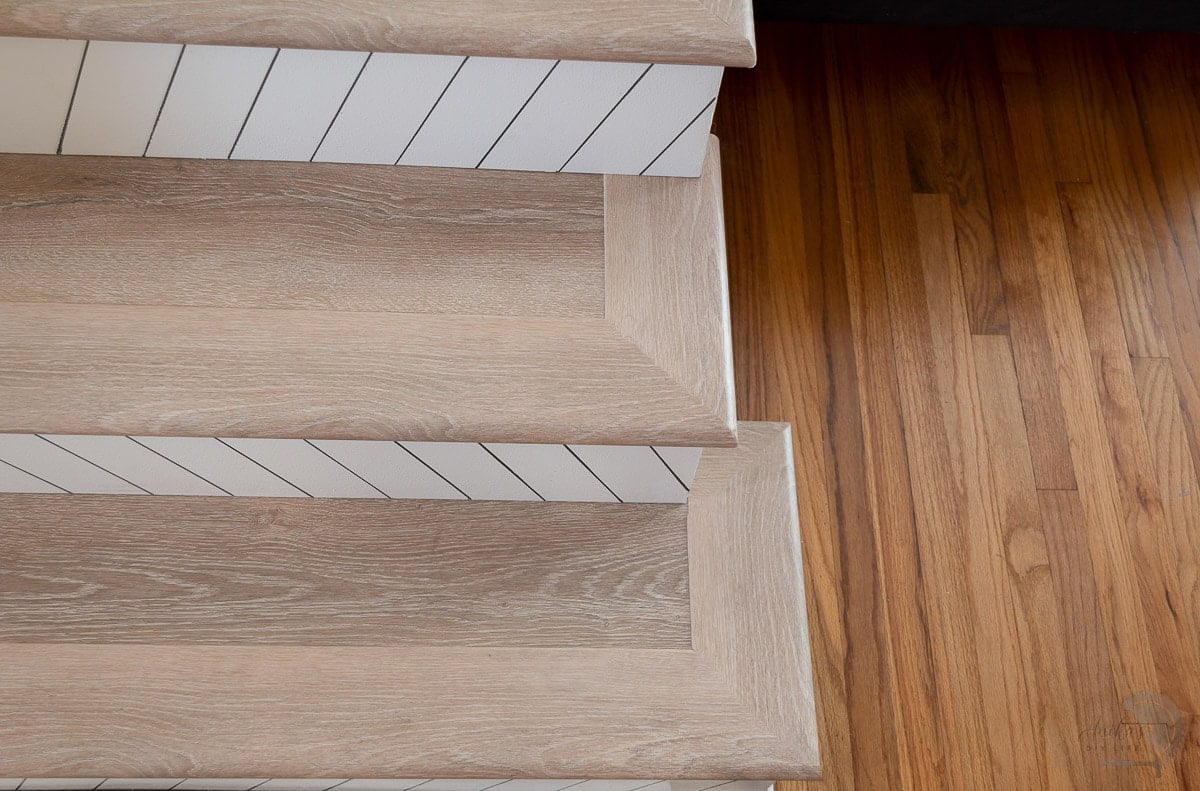
That’s it!
Clean bright stairs with a hint of personality.
Let’s talk time involved. I didn’t do everything the same day because of drying times etc but the total time for the project was just a bit over 2.5 hours.
Marking and drawing the lines was definitely the most time-consuming process. Everything else was super quick. It took about 30 minutes to rip up the plywood, 30 minutes to paint the stair risers including setup and clean up, about an hour to draw the lines and then another 30 minutes to nail the stairs and apply caulk. I had to do a few paint touch ups later which took about 10 minutes.
Over all it is SO much better than having to fill out all those holes and gaps and tape and paint!!
Before I go, I leave you with a side by side of the before and after –

And here is the after the after

More makeover projects:
Anika's goal is to inspire and empower beginners with woodworking, DIY, home improvement, and home decor ideas.
She wants everyone to unlock their creative potential and experience the feeling that comes with making something. Nothing feels better better than seeing something and saying "I can make that!"


I love it, Anika!! Such a clever idea to use stripes drawn on like that… I initially thought you cut each piece at an angle and thought “no way that’s quick and easy!” 😀 Love the dark wood to go with it, too. Though I admit, I’m such a sucker for the grain on plywood’s face that I probably would have stained it, lol.
That is a tiny little table saw!! It looks awfully handy, though. Now I’m kind of considering buying it… but it’s the brad nailer I really need, and $200+ is way out of my budget. 🙁 Do you know of any good but inexpensive ones? I was looking for electric, not pneumatic, but so far the only inexpensive brad nailers I’ve found have been pneumatic (which I’ve used before and am fine with, but the air tank is always at least $70).
Also, have you tried the Crittur paint sprayer? I hear it works really well, too!
Sorry for leaving such a long comment, I guess I just have a lot of questions! 🙂
In my old house I had ripped out the carpet on the stairs also. This would have been so nice to have done to them.My new house will have a few stairs and I will keep this to do for them. You are a total inspiration. Thank you.
This is genius! And it looks fabulous too. I love that it was only 2.5 to do all that work. It looks great and the white makes those new treads really stand out. I have to check out that saw, I need a smaller version than the one my husband has to do smaller projects.
I don’t have a staircase anymore, but am saving this post for friends! I love the “creative thinking” you used on this to help in the time factor. That is always an issue–especially if you are working on several projects in a home!
Great job and I LOVE the subtle stripes,btw. They really give your stairs some great personality! That is what makes YOUR home unique! 🙂
So Adorable! I have made over several staircases before, so I know how time consuming these can be. This caught my eye from our Tribe, and I just wanted to pop over an comment. Great job!