DIY Upholstered Storage Ottoman
Do you know you can make your very own DIY upholstered Storage Ottoman with a few basic tools and simple upholstery? Here is the tutorial!

An upholstered storage ottoman is one of the most functional multipurpose pieces of furniture for the living room.
- It makes a great coffee table (with a tray to provide a flat surface)
- It makes a great footstool to put your feet up.
- The storage is perfect for games or the blankets.
- They make great accent furniture – it is easy to bring in color and pattern to the decor.
Building an ottoman with storage is actually super easy and quick!
We have been on the hunt for the perfect ottoman for a while now.
A couple of years ago I had upholstered an old coffee table from Ikea that we used as an ottoman.
It was finally time to get something that was more functional.

I wanted a nice ottoman that would have the perfect amount of storage. Take a look at some of my favorites. Unfortunately, most fell short of the cuteness factor… I wanted a nice pop of color and pattern!
Obviously, I took things in my own hands and built the perfect piece!
Now, along with the awesome spot to put our feet up, we have a spot to keep all the blankets and games.
Plus, I am obsessed with this print!

RELATED: 20 Creative DIY storage ottoman ideas
***This post contains referral or affiliate links. It is a way for this site to earn advertising fees by advertising or linking to certain products and/or services. Please read my full disclosure here ***
Material Needed –
To Build
- Lumber per the plans
- Kreg Jig
- Miter Saw
- 1 ¼″Pocket hole screws
- wood glue
- 30″ piano hinge
- Center mount toy box lid support (total 2)
To Upholster
- Batting
- ¾″ Foam (I used remnant from a foam mattress topper)
- poly fill (I re-used filling from old pillows)
- 2.5 yds Fabric of choice for outside – I used this fabric.
- 2 yds Fabric to line the inside and bottom (I don’t know what it is called but the lady at Joann called it the sofa liner fabric. It is super cheap at $2.99/yd)
- Staple gun and staples
- spray adhesive
- 5″ doll needle
- Thick upholstery thread
- Fabric covered button kit.
How to Build the DIY Ottoman
The ottoman I built is 36″ x 22″ and approximately 14.5″ high and the plans reflect the same. You can modify the dimensions as needed.
The ottoman is made in two major steps –
- Building the storage ottoman box, and
- Upholstering the entire box
Step 1: Make the Cuts
- Make all the cuts per the plans. The cuts are pretty straightforward and can be easily made using a circular saw or a miter saw.
- Sand all the boards to prepare them for assembly.
- Make the pocket holes as per the plans in the side pieces.
The pocket holes are made with the jig and depth collar set at 3/4″ setting. See more about how to use a pocket hole jig here.
Step 2: Assemble the Box.
- Attach the 2×2 boards to the aprons to make the sides using wood glue and 1 1/4″ pocket hole screws.

You can also use countersunk wood screws from the sides if you do not have a Kreg Jig.
- Attach the long sides using wood glue and 1 1/4″ pocket hole screws to complete building the box.

- On the underside, cut out the leg and attach a 1/4″ sheet of plywood using wood glue and finish nails or staples.
I used hardboard since I already had some .

I had painted the legs of my Karlstad couches with Oil rubbed bronze spray paint. So, I painted the legs of this ottoman to match that!
You can also stain them if you like

You can see, I didn’t even bother taping off the box because all of this would eventually get covered by fabric.
And that’s the box.
The top isn’t attached. It’s just a piece of plywood sitting on top of the box.

Time to upholster!
Step 3: Upholster the Outside of the Box
- Wrap the frame in batting. Staple the batting around the frame. (Unfortunately, I didn’t take any pictures of this step.)
- Follow that with the outer fabric.

Where the upholstery fabric ends, I just created an overlap and folded in the raw edge of the fabric.
I glued that raw edge using fabric glue.
It’s hard to even see the seam.

Step 4: Add the Liner
- Cut the inner lining fabric to size – making allowance for the sidewalls and some extra to fold in.
- Spray the inside of the frame with spray adhesive.

- Smooth the liner fabric along the inner storage box. On the corners, I folded the extra fabric inside, like we do in a gift wrap.

- Fold in the raw edge of the liner fabric and staple along the edges. The bottom storage box is ready.

Step 5: Upholster the Top
- Lay a piece of foam cut about 1/4″ larger than the top plywood on all sides. You can optionally attach this to the top using a spray adhesive.
- Layer polyfill on top of the foam – in my case it was filling from old pillows (don’t worry – I washed them beforehand)
- Wrap it with batting and staple on the bottom.

- Cover the top with the outer fabric and staple it to one of the long sides.
Step 6: Add Tufting (Optional.)
- Put together the fabric covered buttons per directions on the package.
- To tuft, I pretty much followed this awesome tutorial on how to do this. Once the tufting is done, staple the fabric all around the top.

Step 7: Finish the Top
- Cover the back of the top with liner material. I did a double layer since a single layer was not opaque enough. Fold in the raw edge and staple it to the sides.

Step 8: Attach to the Box.
- Attach the top to the storage frame using the piano hinge.
- Attach the toy box lid support hinges. Ideally, these should be attached on either side of the piano hinge.
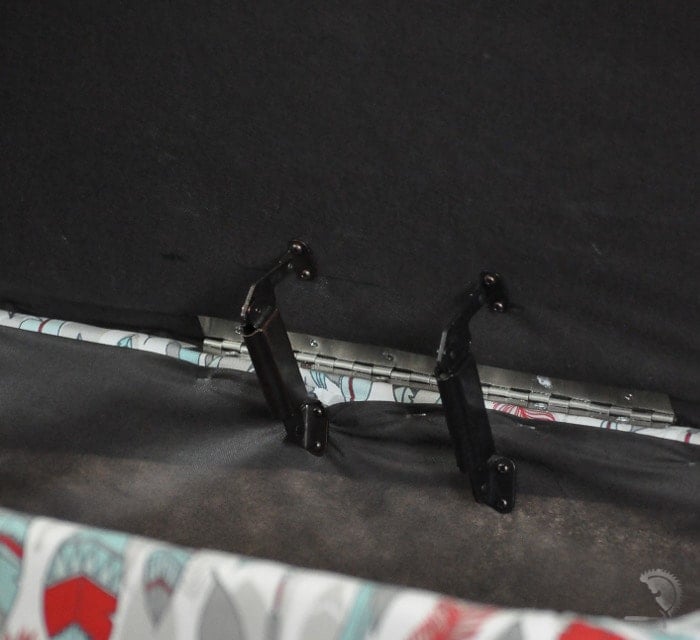
I started with attaching one in the middle but realized it was not enough to hold the weight, so I ended up adding another one next to it.
Ideally, they would be on both ends of the lid.
And we are done!

It was a little bit of a long process but totally worth it!
It is exactly what I was looking for.
I am in love with the fabric pattern. It brings much-needed pattern and color to the living room.
I took a long long time to pick this fabric… I looked everywhere!
Finally, when I saw this, I couldn’t get it out of mind and no matter which design I saw, I just kept coming back to this.
I was afraid it might be a bit too busy, but it actually adds the perfect amount of color and pattern next to my plain couches.

AND it has the perfect amount of storage space too!
What do you think? Have you built a storage ottoman?
Printable Plans
Please click the button below to download the printable plans for the storage ottoman.
More Project Ideas You Like –
More Storage Ottomans –
Anika's goal is to inspire and empower beginners with woodworking, DIY, home improvement, and home decor ideas.
She wants everyone to unlock their creative potential and experience the feeling that comes with making something. Nothing feels better better than seeing something and saying "I can make that!"


This tutorial is amazing! I love an ottoman with storage. I might have to make this. Pinning! Thanks for sharing at #HomeMattersParty
I popped over to comment on the beautiful fabric choice and am blown away that you made this whole thing from scratch! I thought you’d just recovered an older ottoman. You have skills! Thanks for the plans, I’ve pinned them for when I’m gutsy enough to try it.
This is looking really really nice. I like the fabric.
Hiya, just commenting to say thanks for posting this! I’ve had this page open on my browser for about six months to inspire me to get on with making (and actually finishing) my own storage ottoman, and I have finally done it!
To make the box I used white shelves left over from DIYing our kitchen, and used a (probably unnecessarily) large number of metal brackets to fix them together, as well as a few long screws. I bought some 4″ foam for the top, and thick wadding to wrap around that and the base, and covered it all in leftover curtain fabric (so it matches!). The feet are attached separately – cubes of wood cut from a 1.5″ square post picked up at our local wood recycling place, stained walnut brown and with a clear varnish layer on top. The lid currently isn’t attached, and as the sides aren’t really wide enough to add a hinge we are considering adding four blocks of some kind to the corners of the lid so that it fits on top neatly and doesn’t slide around.
Attaching the wadding and curtain fabric was a two-person job (whilst reupholstering our dining chairs my fiance and I developed a system where I hold the fabric in place and he hammers in a metal tack).
I also made a darker removable cover for the lid because our patterned curtain fabric has a light-coloured background (like yours) and we are using this as a footstool! So the nice fabric is there, but it’s usually hidden under a hardwearing navy slip cover that I can wash as necessary.
Thanks again, this inspired me to get on with it! (And I am typing this from my sofa in Bristol, UK…with my feet up).
Hi Alison, That is awesome! I am so glad I was able to inspire you to build this! Especially, I love that you re-used the shelves! Great Job!