Easy DIY Nightstand With Hidden Compartment
Learn how to build a DIY nightstand with hidden compartment and a drawer with the full step by step tutorial, video and plans. Easy beginner woodworking project using concealed joints!
You will also love DIY entryway bench with storage and Simple 2×4 projects
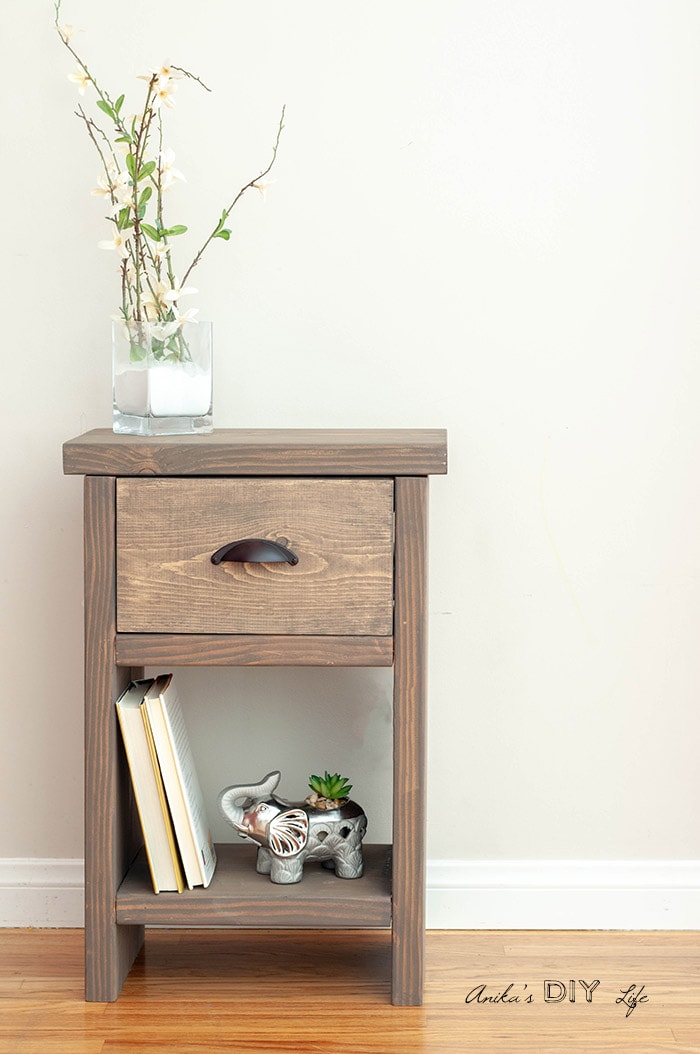
Nightstands, end tables or bedside tables – whatever you call them – can be so versatile! You can use them in the bedroom or as an end table in the living room…
We needed a new nightstand in the master bedroom and it had to be a slim one.
So I built this!
But I just had to add a little twist… or two!
First – there is a hidden compartment…
What would I use it for… not quite sure yet… 
The second… I did not use a single screw to assemble the body. The only screws used were for attaching the hidden compartment.
Which means… NO holes to fill!
And that I love!
*** Thank you to Rockler Woodworking and hardware for partnering with me for this project. All opinions are my own.***
***This post contains affiliate or referral links. It is a way for this site to earn advertising fees by advertising or linking to certain products and/or services. Please read my full disclosure here ***
Materials to Build the Simple DIY Nightstand
-
- Lumber per the plans
- Rockler Beadlock® Pro Joinery Kit
- 3/8″ Beadlock® Tenon Stock
- Wood glue
- Clamps
- Power drill
- 10″ drawer slides
- Lid-Stay Torsion Hinge Lid Support
- Finish nails and finish nailer
Before we get started, make sure to follow me on Instagram, Facebook, YouTube, and Pinterest to keep up with all my latest builds and projects!
DIY Nightstand Plans
Even though I used the beadlock joinery to build this project, I have plans available showing you how to build it using a pocket hole jig too!
You can get the plans by clicking the button below.
DIY Nightstand With Drawer and Hidden Storage
Below is the full video of the build! I have written step by step directions of the major steps below too!
How to Build the Nightstand With a Hidden Compartment
I am listing below the major steps involved in building the nightstand. But I would urge you to watch the video to get a real feel for exactly what is involved in the build.
Step 1 – Make the Cuts
Start by cutting the 1×12 board per the plans – there are 2 sides, 2 shelves and 1 top.
Step 2 – Make holes for the Beadlock joinery.
The manual that comes with it has all the basic steps you need to know about using Beadlock joinery.
Making holes in the edges is pretty straightforward and I just followed the instructions in the manual. 
It gets a little complicated when you have to join the edge to a face of a board like for this project. Here is how you do that.
How to use the beadlock joinery to build nightstand –
- Start by marking the locations for the tenons on both the boards.
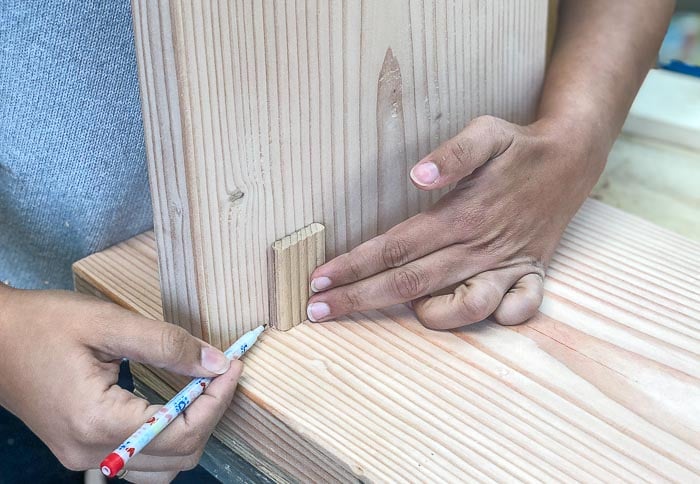
- Disassemble the Beadlock Joinery Kit and take the jig off. Use a scrap wood as a guide, line it up on the side of the first board and clamp it. Then clamp the jig into place making sure the markings line up and drill.

- You drill through the first three holes, then you turn the black knobs to release the hole jig, slide it over and drill through the first two holes. It creates a series of 5 holes joined together that fits the tenon stock. See video for more details.
- It gets a little more complicated when you need to make holes for the center shelf. Mark the center of the shelf and align the center line on the side of the jig to it. Then clamp a scrap board on both sides of the jig to make sure it doesn’t move. Be sure to keep everything square and level!

Step 3 – Assemble
Once all the holes are made for the tenon stock, use wood glue and tenon stock to assemble the frame of the nightstand.
The tenon stock fit in very tightly and make a strong bond. Clamp and let dry overnight. 
Step 4 – Make Drawer and Compartment
Build the drawer and compartment using wood glue and finish nails. I like to use the square clamping jig to make sure the drawers are square. Let dry overnight. See more about how to easily build a perfect drawer and install. 
Step 5 – Install Drawer and Compartment
Once the frame, drawer and compartment are ready, install the drawer.
Then, attach the secret compartment to the top of the frame using wood glue and countersunk 1¼” wood screws. Note it is aligned to the back of the frame.
Attach the drawer front leaving 1/8″ spacing around it. See my Beginner’s guide to building drawers for more tricks and tips.
Step 6 – Attach Top
Finally, attach the top to the back of the hidden compartment using Lid-Stay Torsion Hinge Lid Support.
You could regular hinges too but the top is heavy and I like having the lid support torsion hinges for peace of mind. 
That’s it! Sand and stain or paint in color of choice!
Did you notice, I did not say fill any holes 🙂
Don’t forget to get the printable plans! It also includes instructions to build using pocket holes!
I love having the slim but chunky looking nightstand in the tight space next to our bed.
When the drawer opens, you can’t see the hidden storage!
But here it is!
What would you store in the hidden storage?
Someone suggested to use it as a chocolate hideaway which is quite tempting… but the problem is I would know about it…
[mv_create title=”Easy DIY Nightstand With Hidden Compartment” type=”diy” key=”41″]
Anika's goal is to inspire and empower beginners with woodworking, DIY, home improvement, and home decor ideas.
She wants everyone to unlock their creative potential and experience the feeling that comes with making something. Nothing feels better better than seeing something and saying "I can make that!"


You are becoming quite the expert! great looking little nightstand! I didn’t know there were different kinds of jigs like you have there!
This is so cool. I love that little hidden compartment but I am not sure what I would put in it. I do like the idea of chocolate though. LOL!
Oh my gosh this is awesome! I love that it has a secret compartment for storing valuables or even gifts you don’t want to be discovered until the perfect time.
That would be a fantastic hiding place for your good jewelry. They sell all these beautiful jewelry boxes and armoires for jewelry and then when you read homeowner’s insurance suggestions, they tell you not to put your good jewelry in those fancy jewelry boxes because that’s the first thing the thieves will grab and run with. So you’re just supposed to put your inexpensive stuff in those and hide the good stuff or, as they suggest, keep it in a safe deposit box. If I kept it in a safe deposit box I would never wear it! Your nightstand has the perfect hiding place for it! I would line that space with some velvet and and stash my good jewelry in there. Better yet, I wouldn’t keep it in the bedroom! They would really be unlikely to be searching for a “secret drawer” in an end table in my family room or the telephone stand in my kitchen.
This is perfect! I am in need of new nightstands. This one is just the right size and I love the hidden compartment. Thank you!