How to Countersink Screws – 3 Ways
Learn what countersinking is, why it’s important, and how to countersink screws the right way. Get step-by-step tips for cleaner woodworking projects—even without special tools!

Using screws is the simplest way to attach boards and a great beginner friendly way to get started with woodworking projects. But the screws don’t look great or professional – especially if the screw heads stick out.
This is why you need to countersink screws. It’s such a simple technique, but it instantly makes the project look cleaner and more professional.
Let’s dive into what it is, why it’s so important, and how to get it just right – even if you don’t have special tools.
Table of Contents
What Is Countersinking?
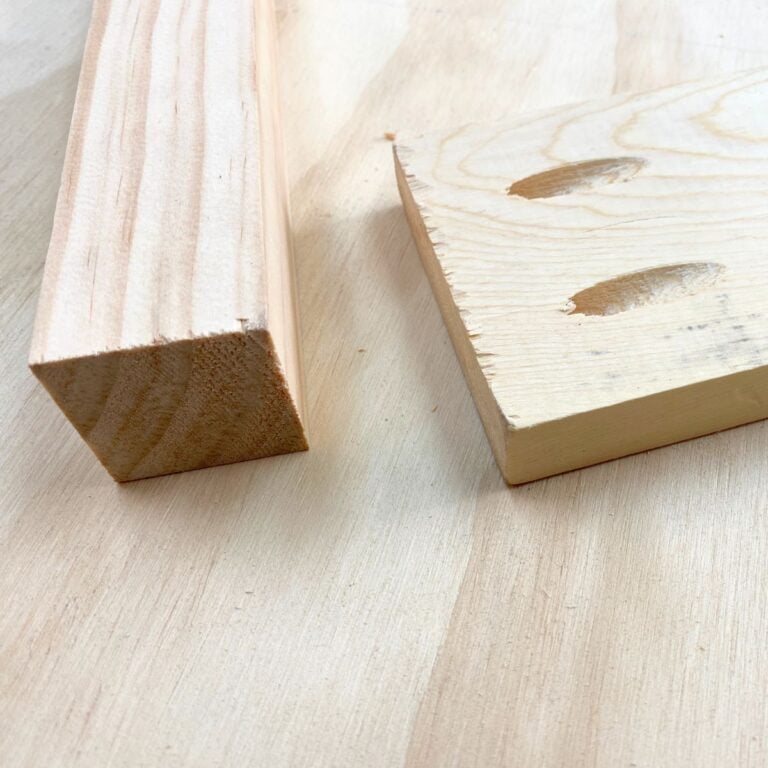
Countersinking is the process of drilling a conical hole into wood so that the head of a screw can sit flush or just below the surface. This is usually done with a special countersink bit, which creates a recess that matches the shape of a flat-head screw. It can also be done without the special bit or with special screws and I will show you exactly how to do that below.

You may also hear the term “counterboring”. This is slightly different and involves drilling a flat-bottomed hole for screws or bolts that require a cap or plug. For most DIY and woodworking projects, countersinking is the more common technique.
Why Countersinking Screws Is Important
There are two important reasons for countersinking screws when building projects:
- Cleaner finish: Countersinking screws gives your project a clean, polished look by allowing the screw heads to sit flush with or just below the surface of the wood. This is especially important for furniture or visible finishes where protruding screws can make the piece look unfinished or amateur.
- Easier to cover: It also makes your work easier to finish. If you’re planning to paint, stain, or fill the holes, a countersunk screw is far easier to conceal. You can simply apply filler or a wood plug over the top, sand it smooth, and finish it seamlessly without a visible bump left by an exposed screw head.
***This post contains referral or affiliate links. It is a way for this site to earn advertising fees by advertising or linking to certain products and/or services. Please read my full disclosure here ***
How to Countersink Screws
There are three easy ways to countersink screws depending on the type of screw or bits you have available.
Using a Self-Countersinking Screw
Some screws come with self-countersinking or self-drilling heads. These have specially designed flutes or cutting edges that carve out a recess as you drive them in.

Using them is easy:
- Predrill a hole for the screw.
- Drive the screw in with the right torque setting on the drill until the head goes below the surface of the wood. See more about the settings of a drill.

Self countersinking screws are convenient and quick, especially with softwoods. But for cleaner, more controlled results in hardwoods, manual countersinking with a special bit is your best bet.
These are my favorite self- countersinking screws.
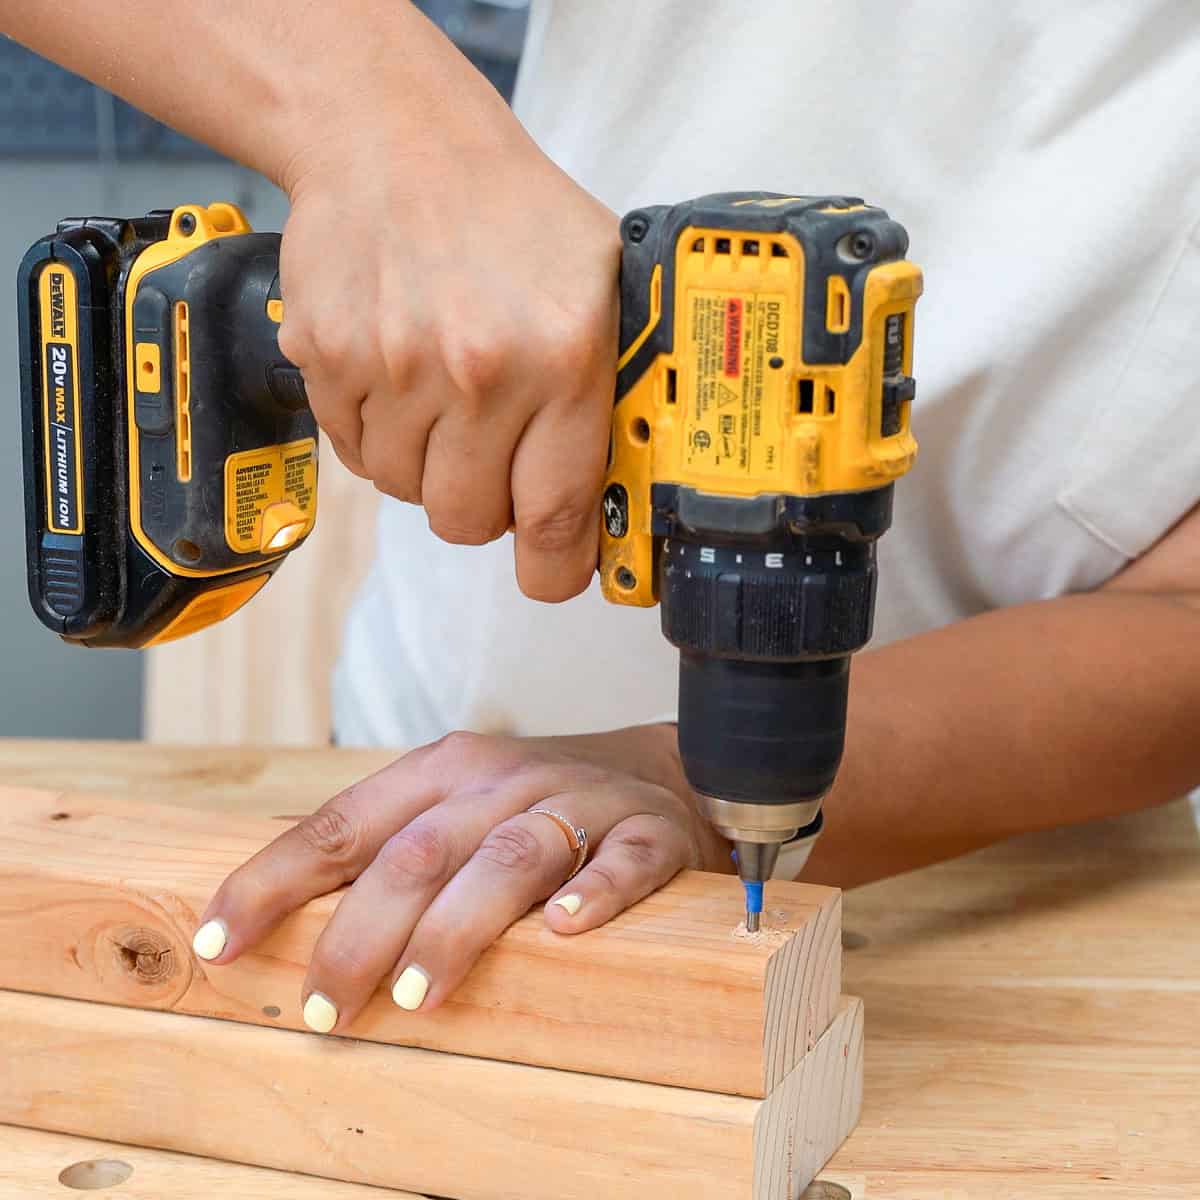
Using a Countersinking Bit
A countersink bit is a specialized drill bit designed to create a conical hole that perfectly matches the angle of a conical-head wood screw. They have a pilot drill bit built in, so you are making the pilot hole and the conical hole for the head at the same time, making the process more efficient.
Here’s how to use a countersink bit
You can pick up a set of countersinking bits for a very reasonable price. I’ve used this countersinking bits set for a while now, and it’s been great for all my projects.

Step 1: Pick the right size bit
Choose a countersink bit that matches the diameter of the screw head. You’ll usually find the screw size—like #6, #8, or #10—printed on the packaging. These are the most common sizes.

Step 2: Set the depth:
The bit usually has a hex screw on its side so you can adjust the depth of the screw. Set it to match length of the screw such that the head of the screw is just above the conical part of the bit. Test the depth on a piece of scrap wood first.

Step 3: Make the countersunk hole
Make sure that the drill is on the drill setting, and drill the countersunk hole at the desired location. Make sure that as you are drilling, the drill stays perpendicular to the surface to keep the countersink even and centered.

Tip: as the bit begins to cut the hole for the screw head, slow down the drill to keep control of the depth and prevent tearout.
Step 4: Drive the screw
Insert and drive the screw until the head fits neatly into the recessed area. If done correctly, it should be flush or slightly recessed without crushing the wood fibers.

Note: Make sure your drill torque settings are set up correctly. Learn how to here.
Countersinking Screws Without a Special Bit
Don’t have a countersink bit? No problem. You can still get a similar result with a basic set of drill bits. This method is called the two-bit method. While this method may not be as clean or precise, it definitely gets the job done when you’re in a pinch.
Here’s how to do it:
For best results, be sure to test the depth and sizes on a scrap piece before using it on your project.
Step 1: Pick the drill bits
- Pick a drill bit that’s slightly smaller than the screw’s shank (the smooth part of the screw, not the threads). Learn about wood screws here.
- Choose a bit that’s roughly the same diameter as the head of your screw. Use this to gently widen the top of the hole to create a chamfer.

Step 2: Make the pilot hole
- Wrap a small piece of painter’s tape around the pilot bit at the depth you want to drill. This acts as a visual stop so you don’t go too deep.
- Hold the drill perpendicular to the wood and drill to the depth marked with tape.

Step 3: Make the countersunk hole
- Align the larger bit at the top of the pilot hole.

Important: Run the drill at the lowest speed possible. Go slow and check your progress often to avoid drilling too deep.
The resulting hole will be a little rough but will be a countersunk hole. You can lightly sand away the food splinters and drive the countersunk screw.

Step 4: Drive the screw
Drive the screw until the head fits neatly into the recessed area.

With this two-bit method, it’s easy to accidentally drill unevenly, go off-center, or create a jagged edge around the hole, especially if you’re working with hardwoods or using a higher drill speed. This method takes a little more patience, but it’s totally doable.
While this works in a pinch, for a clean, consistent look, I definitely recommend investing in a set of countersink bits.

Tips for Getting the Best Results
Getting the perfect countersink takes a little bit of practice. Here are a few tips to remember to avoid common mistakes and get clean, professional results:
- Use a depth stop or painter’s tape: If your bit doesn’t have a built-in stop collar, wrap painter’s tape around the bit at the depth you want to go. It provides a visual cue to prevent you from going too far.
- Clamp your material: Countersinking can apply lateral force that might shift or lift your board, especially on smaller or lighter pieces. Clamping keeps everything steady and reduces the risk of splintering or off-center holes.
- Plan for filler if painting: If you will be painting the project, aim for the screw head to be slightly below the surface. Once the screw is in, apply wood filler, let it dry, and sand it smooth before painting. This leaves a seamless finish and hides the screw completely.
- Plan for a plug if staining: If you plan to stain the project, aim for the screw head to be deeper below the surface (be sure to account for this when picking the screw length). Once the screw is in, you can cover it with a wood plug and stain. I used a plug cutter to make a plug in the outdoor chair project.
Countersinking might seem like a tiny detail, but it’s one of those things that takes your project from “homemade” to “well-crafted.” When I first started building, I didn’t realize how much difference this little trick could make—and now, I never skip it.
So whether you’re working on your very first project or you’ve already got a few under your belt, remember: every skill you pick up – like countersinking – adds to your confidence and your confidence!
If you want to learn more from me, be sure to check out all The Fearless Woodworker™ – A detailed, hands-on program with a first-this-then-that approach to help you get started with woodworking and learn to build any project confidently.
You might also like:


Anika's goal is to inspire and empower beginners with woodworking, DIY, home improvement, and home decor ideas.
She wants everyone to unlock their creative potential and experience the feeling that comes with making something. Nothing feels better better than seeing something and saying "I can make that!"