IKEA Tarva Nightstand Hack
Share this post:
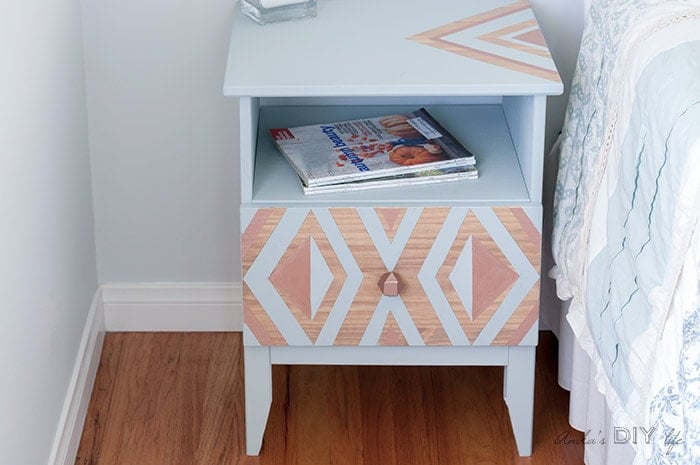
This Ikea Tarva nightstand hack is so simple and yet so amazing! This quick Ikea nightstand makeover is sure to add a punch to your room!
You will also love Easy Ikea Rast makeover, DIY colorful Ikea Tarva makeover and 15 Genius Ikea Tarva Dresser Hacks!
Ikea Tarva… it is one of my favorite pieces in Ikea.
The Ikea Tarva 3 drawer and 6 drawer dressers have already been through a makeover in my home. Now it is time for the Ikea Tarva nightstand hack!
This one is super quick and simple!
The truth is – it took me only a few hours to get it done!
Of course, not counting putting together the nightstand itself 🙂
I decided to go with a 3 tone look – stain, paint and metallic paint. And I am digging the end result! 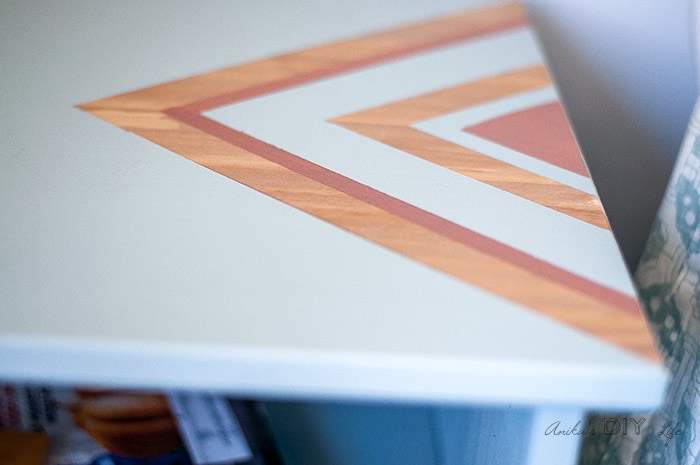
*** This post is sponsored by HomeRight. All opinions are my own ***
***This post contains affiliate or referral links. It is a way for this site to earn advertising fees by advertising or linking to certain products and/or services. Please read my full disclosure here ***
IKEA Tarva Makeover
Material Needed for IKEA Tarva Nightstand Makeover –
- Ikea Tarva nightstand. If you don’t have an Ikea nearby, you can also get it here.
- Jigsaw, Miter saw or BladeRunner
- HomeRight Super FinishMax Extra paint sprayer
- Medium Spray Shelter
- Chalky Finish paint in Vintage
- Matte metallic paint in Rose Gold
- Golden Oak stain
- Painters tape
RELATED: How to paint unfinished wood furniture
Painted IKEA Tarva Nightstand Makeover Instructions –
Before we get started, make sure to follow me on Instagram, Facebook, YouTube and Pinterest to keep up with all my latest builds and projects!
Step 1 – Cut legs to create angles.
Measure and decide the angle at which to cut the legs. I measured ¾” on the bottom and 3″ up on the side. 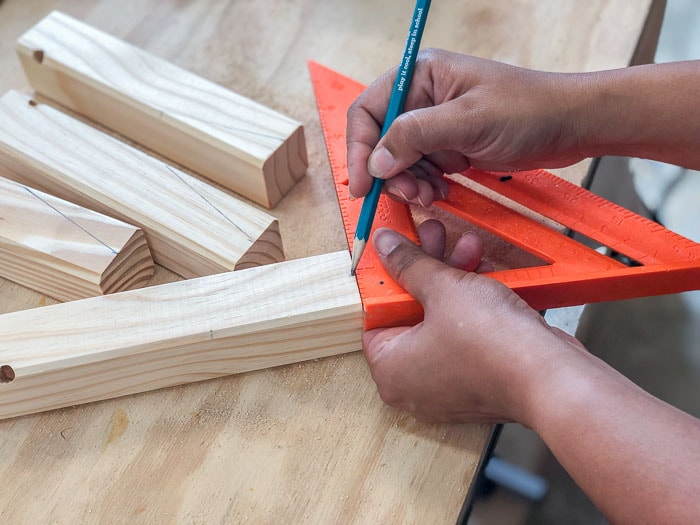
Cut the legs on the marked lines. I used my BladeRunner to do this but you can also use a Miter saw or Jigsaw. 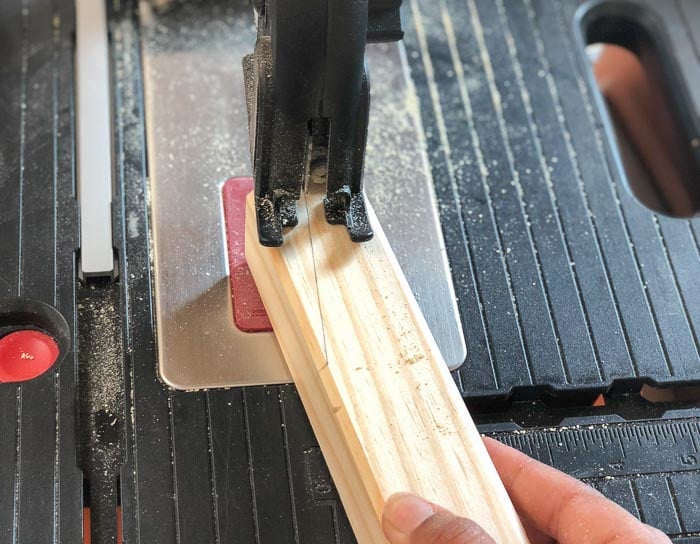
I already love the feet so much better! 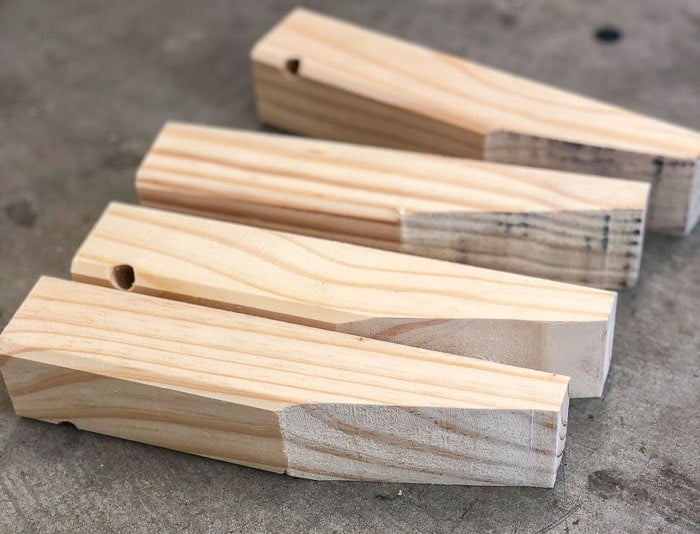
Step 2 – Assemble IKEA Tarva Nightstand
Assemble the Ikea Tarva nightstand except for the drawer. I decided to add a pattern to the drawer which I thought will be easier to do on just the drawer face.
Step 3 – Stain

Stain the drawer face and part of the top and allow to dry.
Step 4 – Tape

Decide the pattern you want and tape off all the areas you don’t want to paint.
Step 5 – Paint It in Your Favorite Color!
I broke out my favorite – HomeRight Super FinishMax Extra to get it painted in a snap! The new pop-upMedium spray shelter is perfect for simple quick projects like these!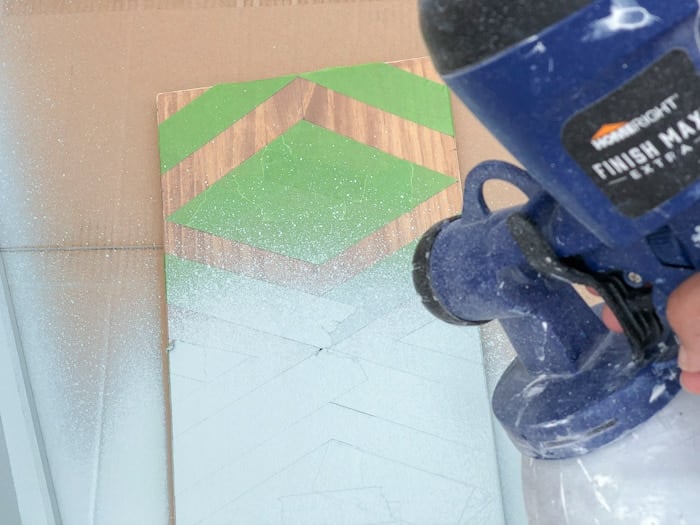
It took me about 10 minutes to paint the entire nightstand.
I used DecoArt Chalky Finish in Vintage. With the Super FinishMax Extra, I didn’t have to thin the paint at all! I just directly poured it into the paint sprayer. It was a hot day and the paint dried super fast so I could get 2 coats done within 30 minutes! 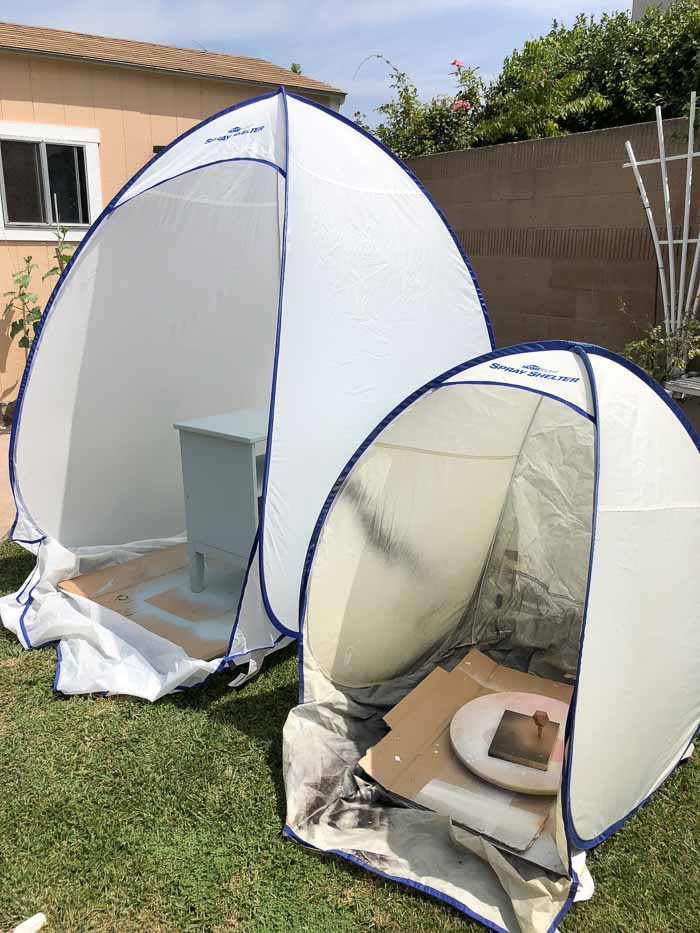
While it was drying between coats, I also spray painted a knob to match the rose gold in the small spray shelter.
Step 6 – Paint the next color!

Remove the original tape and retape for the next step. I was just adding a few lines of the rose gold so I finished it off with a paint brush.
That’s it!
In about half a day, I had a brand new nightstand with gorgeous metallic accents.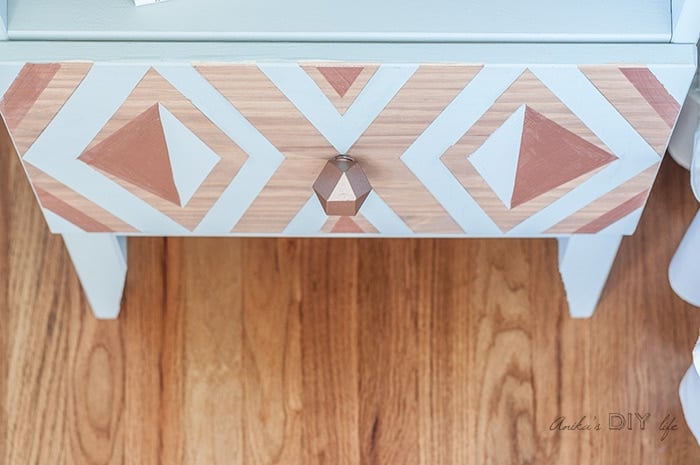
I am also glad I added a little personality to the feet by cutting them up! 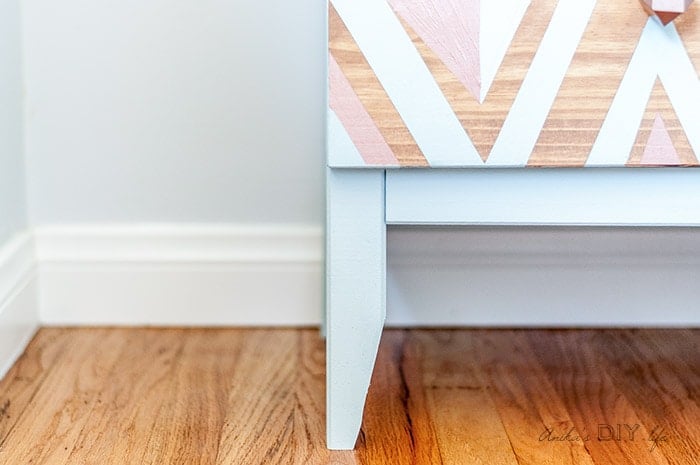
So what do you think of this Ikea Tarva makeover?
Also, be sure to check out all the project ideas using the HomeRight Super FinishMax Extra!

Anika's goal is to inspire and empower beginners with woodworking, DIY, home improvement, and home decor ideas.
She wants everyone to unlock their creative potential and experience the feeling that comes with making something. Nothing feels better better than seeing something and saying "I can make that!"
- Anika Gandhi
- Anika Gandhi
- Anika Gandhi
- Anika Gandhi
- Anika Gandhi
- Anika Gandhi
- Anika Gandhi
- Anika Gandhi
- Anika Gandhi
- Anika Gandhi
- Anika Gandhi
- Anika Gandhi
- Anika Gandhi
- Anika Gandhi
- Anika Gandhi
- Anika Gandhi
- Anika Gandhi
- Anika Gandhi
- Anika Gandhi
- Anika Gandhi
- Anika Gandhi
- Anika Gandhi
- Anika Gandhi
- Anika Gandhi
- Anika Gandhi
- Anika Gandhi
- Anika Gandhi
- Anika Gandhi
- Anika Gandhi
- Anika Gandhi
- Anika Gandhi
- Anika Gandhi
- Anika Gandhi
- Anika Gandhi
- Anika Gandhi
- Anika Gandhi
- Anika Gandhi
- Anika Gandhi
- Anika Gandhi
- Anika Gandhi
- Anika Gandhi
- Anika Gandhi
- Anika Gandhi
- Anika Gandhi
- Anika Gandhi
- Anika Gandhi
- Anika Gandhi
- Anika Gandhi
- Anika Gandhi
- Anika Gandhi
- Anika Gandhi
- Anika Gandhi
- Anika Gandhi
- Anika Gandhi
- Anika Gandhi
- Anika Gandhi
- Anika Gandhi
- Anika Gandhi
- Anika Gandhi
- Anika Gandhi
- Anika Gandhi
- Anika Gandhi
- Anika Gandhi
- Anika Gandhi
- Anika Gandhi
- Anika Gandhi
- Anika Gandhi
- Anika Gandhi
- Anika Gandhi
- Anika Gandhi
- Anika Gandhi
- Anika Gandhi
- Anika Gandhi
- Anika Gandhi
- Anika Gandhi
- Anika Gandhi
- Anika Gandhi
- Anika Gandhi
- Anika Gandhi
- Anika Gandhi
- Anika Gandhi
- Anika Gandhi
- Anika Gandhi
- Anika Gandhi
- Anika Gandhi
- Anika Gandhi
- Anika Gandhi
- Anika Gandhi
- Anika Gandhi
- Anika Gandhi
- Anika Gandhi
- Anika Gandhi
- Anika Gandhi
- Anika Gandhi
- Anika Gandhi
- Anika Gandhi
- Anika Gandhi
- Anika Gandhi
- Anika Gandhi
- Anika Gandhi
- Anika Gandhi
- Anika Gandhi
- Anika Gandhi
- Anika Gandhi
- Anika Gandhi
- Anika Gandhi
- Anika Gandhi
- Anika Gandhi
- Anika Gandhi
- Anika Gandhi
- Anika Gandhi
- Anika Gandhi
- Anika Gandhi
- Anika Gandhi
- Anika Gandhi
- Anika Gandhi
- Anika Gandhi
- Anika Gandhi
- Anika Gandhi
- Anika Gandhi
- Anika Gandhi
- Anika Gandhi
- Anika Gandhi
- Anika Gandhi
- Anika Gandhi
- Anika Gandhi
- Anika Gandhi
- Anika Gandhi
- Anika Gandhi
- Anika Gandhi
- Anika Gandhi
- Anika Gandhi
- Anika Gandhi
- Anika Gandhi
- Anika Gandhi
- Anika Gandhi
- Anika Gandhi
- Anika Gandhi
- Anika Gandhi
- Anika Gandhi
- Anika Gandhi
- Anika Gandhi
- Anika Gandhi
- Anika Gandhi
- Anika Gandhi
- Anika Gandhi
- Anika Gandhi
- Anika Gandhi
- Anika Gandhi
- Anika Gandhi
- Anika Gandhi
- Anika Gandhi
- Anika Gandhi
- Anika Gandhi
- Anika Gandhi
- Anika Gandhi
- Anika Gandhi
- Anika Gandhi
- Anika Gandhi
- Anika Gandhi
- Anika Gandhi
- Anika Gandhi
- Anika Gandhi
- Anika Gandhi
- Anika Gandhi
- Anika Gandhi
- Anika Gandhi
- Anika Gandhi
- Anika Gandhi
- Anika Gandhi
- Anika Gandhi
- Anika Gandhi
- Anika Gandhi
- Anika Gandhi
- Anika Gandhi
- Anika Gandhi
- Anika Gandhi
- Anika Gandhi
- Anika Gandhi
- Anika Gandhi
- Anika Gandhi
- Anika Gandhi
- Anika Gandhi
- Anika Gandhi
- Anika Gandhi
- Anika Gandhi
- Anika Gandhi
- Anika Gandhi
- Anika Gandhi
- Anika Gandhi
- Anika Gandhi
- Anika Gandhi
- Anika Gandhi
- Anika Gandhi
- Anika Gandhi
- Anika Gandhi
- Anika Gandhi
- Anika Gandhi
- Anika Gandhi
- Anika Gandhi
- Anika Gandhi
- Anika Gandhi
- Anika Gandhi
- Anika Gandhi
- Anika Gandhi
- Anika Gandhi
- Anika Gandhi
- Anika Gandhi
- Anika Gandhi
- Anika Gandhi
- Anika Gandhi
- Anika Gandhi
- Anika Gandhi
- Anika Gandhi
- Anika Gandhi
- Anika Gandhi
- Anika Gandhi
- Anika Gandhi
- Anika Gandhi
- Anika Gandhi
- Anika Gandhi
- Anika Gandhi
- Anika Gandhi
- Anika Gandhi
- Anika Gandhi
- Anika Gandhi
- Anika Gandhi
- Anika Gandhi
- Anika Gandhi
- Anika Gandhi
- Anika Gandhi
- Anika Gandhi
- Anika Gandhi
- Anika Gandhi
- Anika Gandhi
- Anika Gandhi
- Anika Gandhi
- Anika Gandhi
- Anika Gandhi
- Anika Gandhi
- Anika Gandhi
- Anika Gandhi
- Anika Gandhi
- Anika Gandhi
- Anika Gandhi
- Anika Gandhi
- Anika Gandhi
- Anika Gandhi
- Anika Gandhi
- Anika Gandhi
- Anika Gandhi
- Anika Gandhi
- Anika Gandhi
- Anika Gandhi
- Anika Gandhi
- Anika Gandhi
- Anika Gandhi
- Anika Gandhi
- Anika Gandhi
- Anika Gandhi
- Anika Gandhi
- Anika Gandhi
- Anika Gandhi
- Anika Gandhi
- Anika Gandhi
- Anika Gandhi
- Anika Gandhi
- Anika Gandhi
- Anika Gandhi
- Anika Gandhi
- Anika Gandhi
- Anika Gandhi
- Anika Gandhi
- Anika Gandhi
- Anika Gandhi
- Anika Gandhi
- Anika Gandhi
- Anika Gandhi
- Anika Gandhi
- Anika Gandhi
- Anika Gandhi
- Anika Gandhi
- Anika Gandhi
- Anika Gandhi
- Anika Gandhi
- Anika Gandhi
- Anika Gandhi
- Anika Gandhi
- Anika Gandhi
- Anika Gandhi
- Anika Gandhi
- Anika Gandhi
- Anika Gandhi
- Anika Gandhi
- Anika Gandhi
- Anika Gandhi
- Anika Gandhi
- Anika Gandhi
- Anika Gandhi
- Anika Gandhi
- Anika Gandhi
- Anika Gandhi
- Anika Gandhi
- Anika Gandhi
- Anika Gandhi
- Anika Gandhi
- Anika Gandhi
- Anika Gandhi
- Anika Gandhi
- Anika Gandhi
- Anika Gandhi
- Anika Gandhi
- Anika Gandhi
- Anika Gandhi
- Anika Gandhi
- Anika Gandhi
- Anika Gandhi
- Anika Gandhi
- Anika Gandhi
- Anika Gandhi
- Anika Gandhi
- Anika Gandhi
- Anika Gandhi
- Anika Gandhi
- Anika Gandhi
- Anika Gandhi
- Anika Gandhi
- Anika Gandhi
- Anika Gandhi
- Anika Gandhi
- Anika Gandhi
- Anika Gandhi
- Anika Gandhi
- Anika Gandhi
- Anika Gandhi
- Anika Gandhi
- Anika Gandhi
- Anika Gandhi
- Anika Gandhi
- Anika Gandhi
- Anika Gandhi
- Anika Gandhi
- Anika Gandhi
- Anika Gandhi
- Anika Gandhi
- Anika Gandhi
- Anika Gandhi
- Anika Gandhi
- Anika Gandhi


Beautiful, looks amazing
Beautiful. You are so very creative. Thanks for sharing.
What a great Ikea hack. I will be featuring this at my Sizzle into Summer party. Please stop by and pick up an I’ve Been Featured button. Thanks. http://diybydesign.blogspot.com
Thank you Judy!! I will certainly be there!
Very cute and modern! Thanks for sharing it with SYC.
hugs,
Jann
Are you not concerned with knots showing through the painted section? Is that because the stain seals them?
Hi Murray, I was lucky enough to not have knots on this piece.
However, if you have any, then I would suggest sealing them before you paint. I have a full tutorial on it here – https://www.anikasdiylife.com/paint-unfinished-pine-furniture/