DIY Small Mobile Workbench With Storage
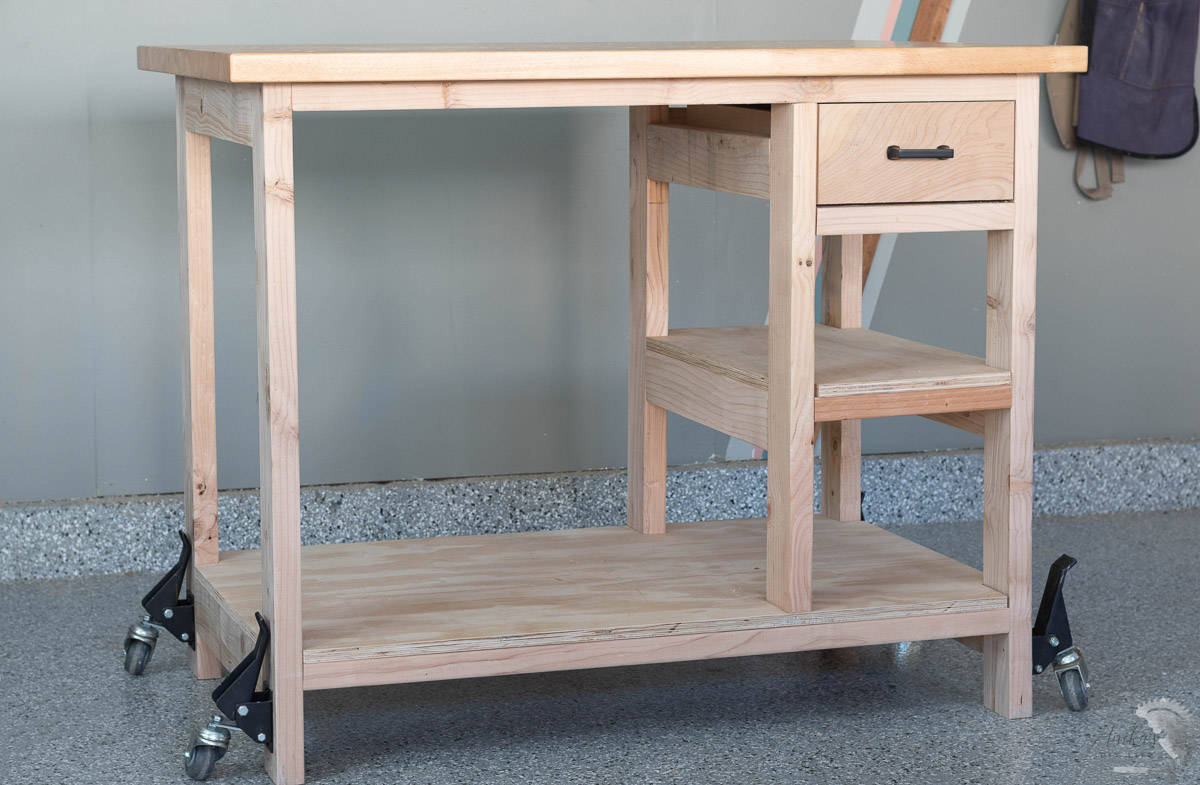
Need a small workbench for your workshop but want storage as well? Here is how to build a simple DIY small mobile workbench with shelves and a drawer.

I built my current workbench almost 12 years ago! Time flies! I shared the project and the plans for the simple 2×4 workbench here. While it is a great starter workbench, it has its drawbacks.
My main concern was the lack of storage and organization. Almost from day one, the bottom shelf became a space for scrap wood to accumulate. I tried to constrain it to one area, but it would essentially spread across the entire shelf. There was a lot of wasted space.
If you are looking for a small starter mobile workbench with a little bit of storage to keep important things at hand, this workbench is for you.
***This project is sponsored by Kreg Tool. Thank you for supporting the brands that make it possible to bring you new projects and ideas.
***This post contains referral or affiliate links. It is a way for this site to earn advertising fees by advertising or linking to certain products and/or services. Please read my full disclosure here ***
Material Needed
- Lumber per the plans (see plans link below)
- Hardwood Workbench Top (highly recommended)
- Wood glue
- 2-1/2” pocket hole screws
- 2″ trim head screws
- Kreg Quick Flip
- Kreg right angle pocket hole driver
- Kreg Rip Cut
- Drop down casters
Tools Needed
- Miter Saw
- Circular saw
- Power Drill
- Staple Gun and 1 1/4″ staples
- Pocket hole jig. See which pocket hole jig is right for you.
- Jigsaw or a hand saw.
Small Workbench Plans
I am partnering with Kreg to bring you build plans for this workbench. You can download the plans for this workbench below.
How to Build
Here is the full video showing you how I built the workbench. The detailed written step-by-step instructions are below.
Step 1: Prep the Boards
- Make the cuts per the plan’s cut list and sand the boards.
The frame is built using 2×4 boards and the boards can be cut using a miter saw or a circular saw.
Sanding is optional because this is workshop furniture but I like to give it a few passes with the sander. In fact, I did run it through the planar to make the process faster. But sanding with a random orbital sander works well.
See more about sanding wood here.
- Make pocket holes per the plans.
Since most of the boards are 2×4, the pocket holes are made using the 1 1/2″ setting on the pocket hole jig and the drill bit depth collar. See more about how to use a pocket hole jig here.
Step 2: Build the Leg Frame
When building this workbench, you want to go from bottom to top. If you add the top aprons before adding the plywood shelves, it will be impossible to get the plywood in.
- Start by attaching the short aprons to the legs using 2 1/2″ pocket hole screws and wood glue.
The plans explain the exact locations of the short aprons. One side of the leg frame has two short aprons, and the other has four to accommodate the drawer and the extra shelf.

- Attach the long aprons to build the bottom frame.
This can be a little tricky because you have to support the long 2×4 apron. In cases like these, I like to use glue as a helper. If you apply enough glue and hold it in place for a little bit, the surface tension of the glue helps support the board while you attach it in place. You still need to hold the board and ensure it stays square and aligned.

Step 3: Add the Large Plywood Shelf
- Cut the plywood to size using a circular saw. I like using the Kreg Ripcut guide to help with this. You can also use a straight edge as a guide.
- Cut out the notches for the legs using a jigsaw. The notches are 3 1/2″ x 1 1/2″ to accommodate the legs.
- Add the plywood shelf to the workbench and attach using 2″ trim head screws.

Step 4: Build and Attach the Middle Support
The middle support is going to support the smaller shelves and the drawer. I found it easiest to build and install it separately into the workbench. This also helped keep everything even and square.
- Build the middle support using the 2×4 boards and 2 1/2″ pocket hole screws and wood glue.
Pay close attention to the direction and orientation of the boards. It is very easy to mix these up.

- Attach to the workbench using 2 1/2″ pocket hole screws and wood glue.
It can be hard to get into the tight spaces to add the 2 1/2″ pocket hole screws, but the Kreg right angle driver helps make it possible.
- Once the middle support is attached, cut and attach the plywood shelf using trim head screws.

Step 5: Build and Install the Drawer
- I built the drawers using 3/4″ plywood and simple butt joints.
The key to making good drawers is to make sure that the drawer, as well as the frame, is square. Learn how to check for square.

- To install the drawers, I like to use the full extension drawer slides – especially since this drawer is extremely deep at 22″. The full extension slides make accessing anything in the back of the drawer easy.

See more about how to build and install drawers.
- Once the drawer was installed, I added the drawer front and the hardware.
Step 6: Install the Casters
Before adding the workbench top, it is a great idea to add the casters. These are my favorite casters for workshop furniture. I have installed them on pretty much all of the workshop furniture.

I was going to get rid of the old workbench so I took the casters off and attached them to this new workbench. It’s all about repurposing as much as possible.
Step 6: Add the Workbench Top
It’s time for the finale – the workbench top.
The workbench top is the star of this workbench. Kreg recently launched universal hardwood bench tops. These come with or without dog holes. I opted to go with the dog holes so I have extra clamping capabilities.

The workbench top is super durable and finished; glue spills can be easily wiped away.
The Universal Hardwood Workbench Top is available in multiple sizes. I opted for the 48″ x 32″ to add on top of the workbench I built.
- The workbench top is attached to the frame using 2 1/2″ screws through the 2×4 supports. I used pocket hole screws with the Kreg Quick Flip to add them.

You can use two sheets of plywood glued together and coated with polyurethane as the top. However, I highly recommend the hardwood workbench top because it is manufactured especially to be durable.
And done!
I have a brand-new workbench!

There is perfectly enough space for everything I want to store in it.
The drawer holds the bench dog accessories, my safety glasses, and hearing protection – things I can grab quickly while building.

The small shelf is perfect for holding all my small Kreg tools, like the drawer mounting jig and the cabinet hardware jig. The lower shelf will hold some of my scrap wood (which will hopefully remain confined to that space).
The larger shelf space fits my shop vac and Kreg ACS perfectly.

It feels really great to have an organized workbench without any wasted space.
But let’s talk about the gorgeous workbench top. I am most excited about the fact that I have dog holes in the workbench, which will help make clamping SO much easier.

Clamping accessories that work perfectly with this table shown above are:

Remember, you get the step-by-step printable plans to build this workbench.
You might also like:
- DIY Planer Stand with outfeed rollers
- DIY Table Saw Stand with folding outfeed table
- 21 Best DIY Workbenches with Step-by-Step Plans
Anika's goal is to inspire and empower beginners with woodworking, DIY, home improvement, and home decor ideas.
She wants everyone to unlock their creative potential and experience the feeling that comes with making something. Nothing feels better better than seeing something and saying "I can make that!"


