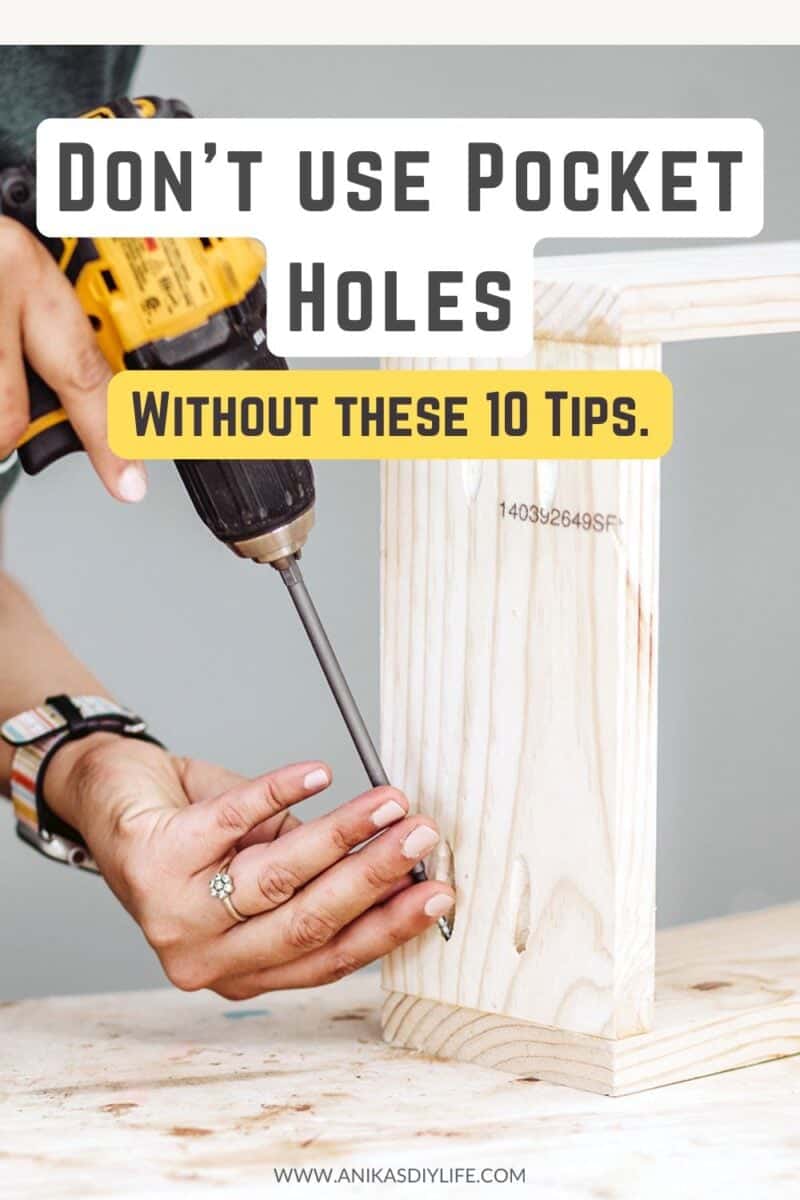
10 Pocket Hole Tips to Build Like a Pro
Learn the best pocket hole tips for beginners to build stronger, cleaner joints with a Kreg Jig. Avoid common mistakes and improve your woodworking projects!
Pocket hole joinery is one of the easiest and most beginner-friendly ways to make strong wood joints, and it’s the method I started with when I was brand new to woodworking.
In fact, a Kreg K4 was my very first investment in woodworking tools.
However, even with the best jig (I now use a Kreg 720), there are small details that can make or break your project.
Over the years, I’ve learned a few simple tips that help avoid frustration, wasted materials, and wobbly joints. I’m sharing them all here so you can build with confidence right from the start.
Keeping these in mind can totally change the look and strength of your project!
Summary: Top Pocket Hole Tips for Beginners
- Measure your wood thickness before setting your jig – don’t assume!
- Always use 2 pocket holes, even on narrow boards, for a strong joint.
- Use pocket hole screws (not regular wood screws) for the best grip.
- Never screw into end grain. It won’t hold.
- Match settings to the thinner board when joining two different sizes.
- Pay attention to the direction of the pocket hole screws to avoid splits.
- Adjust settings slightly for plywood since it’s usually thinner than labeled.
- Use clamps to prevent shifting as you drive screws.
- Add wood glue to strengthen the joint and reduce movement over time.
- Watch for stuck drill bits—it could be a knot or sawdust buildup.
Let’s dive into each of these!
But first, be sure to grab your Free Pocket Hole Quick Reference Guide here!
***This post contains referral or affiliate links. It is a way for this site to earn advertising fees by advertising or linking to certain products and/or services. Please read my full disclosure here ***
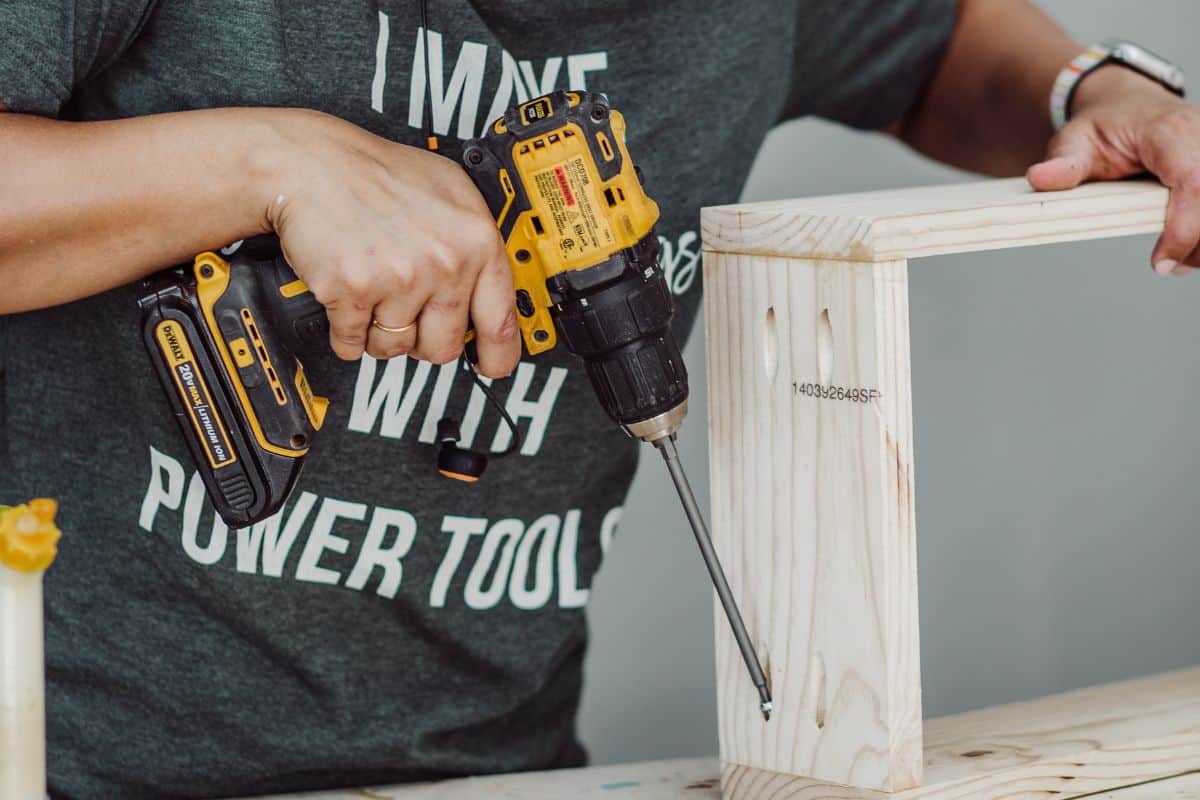
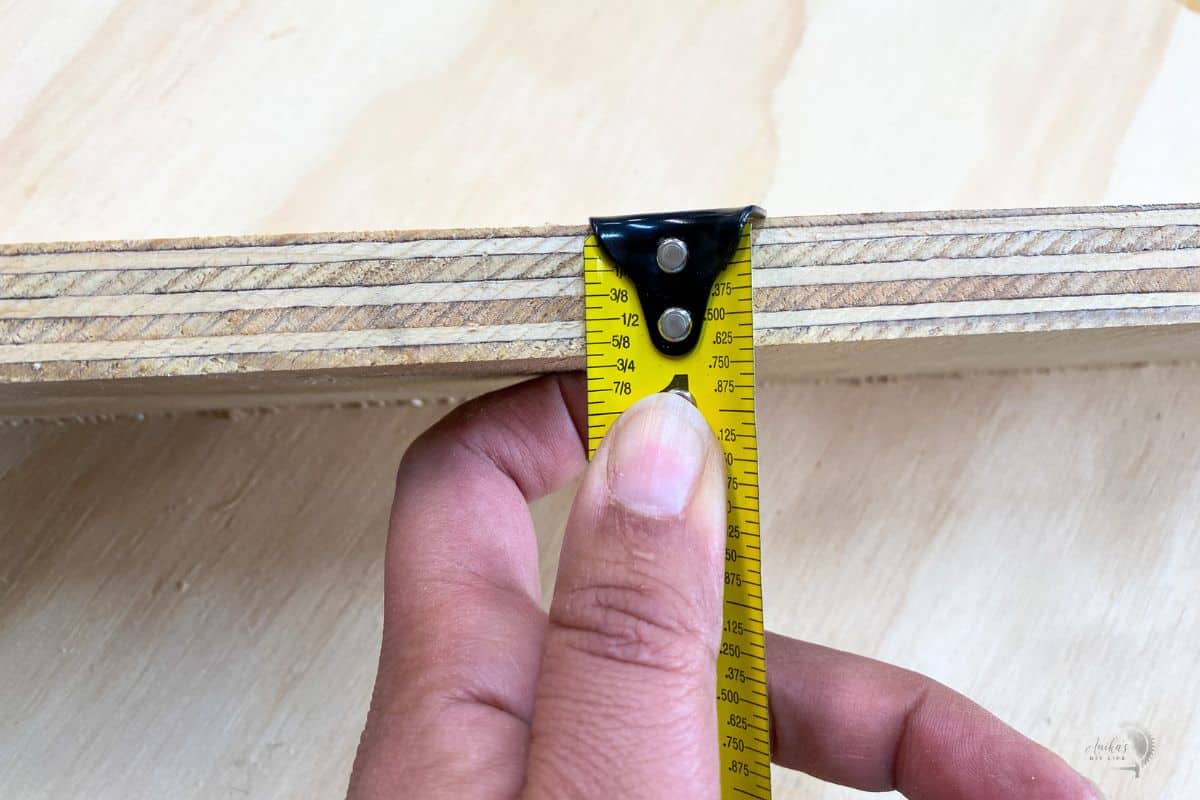
1. Always Measure the Board Thickness
And then measure again!
Before you drill a single hole, measure your board’s thickness with a tape measure or caliper.
Even if a board is labeled as 3/4″, especially plywood (more on that below), it can be slightly thinner. And that small difference can throw off your jig and drill bit settings.

Never assume.
Even if the board says 1×2 or 2×4, measure to be sure. There can be variations between various stocks. By taking a few seconds to confirm the thickness, you are saving yourself a lot of potential frustration and wasted materials.
And double-check the settings on your jig and drill bit, too!
Tip: Get a measuring tape with printed fractions and decimals. Seriously, it is life-changing!
2. How Many Pocket Holes Do You Need?
You always need to make a minimum of two pocket holes. Always.
Even on narrow boards like a 1×2, always use at least two pocket holes. One screw acts like a hinge, allowing the board to twist around it. Two screws make a rock-solid joint.
Here’s a quick cheat sheet for placement:
| WIDTH OF MATERIAL | POCKET HOLE PLACEMENT |
|---|---|
| 1″ to 2″ | B and C |
| 2″ to 3″ | A and B |
| 3″ to 4″ | A and C |
| 4″ to 8″ | A, B and C |
Always do a visual check to make sure that the board covering the holes in the jig because you don’t want holes along the side of your board.
Here are the common dimensional boards with pocket holes.
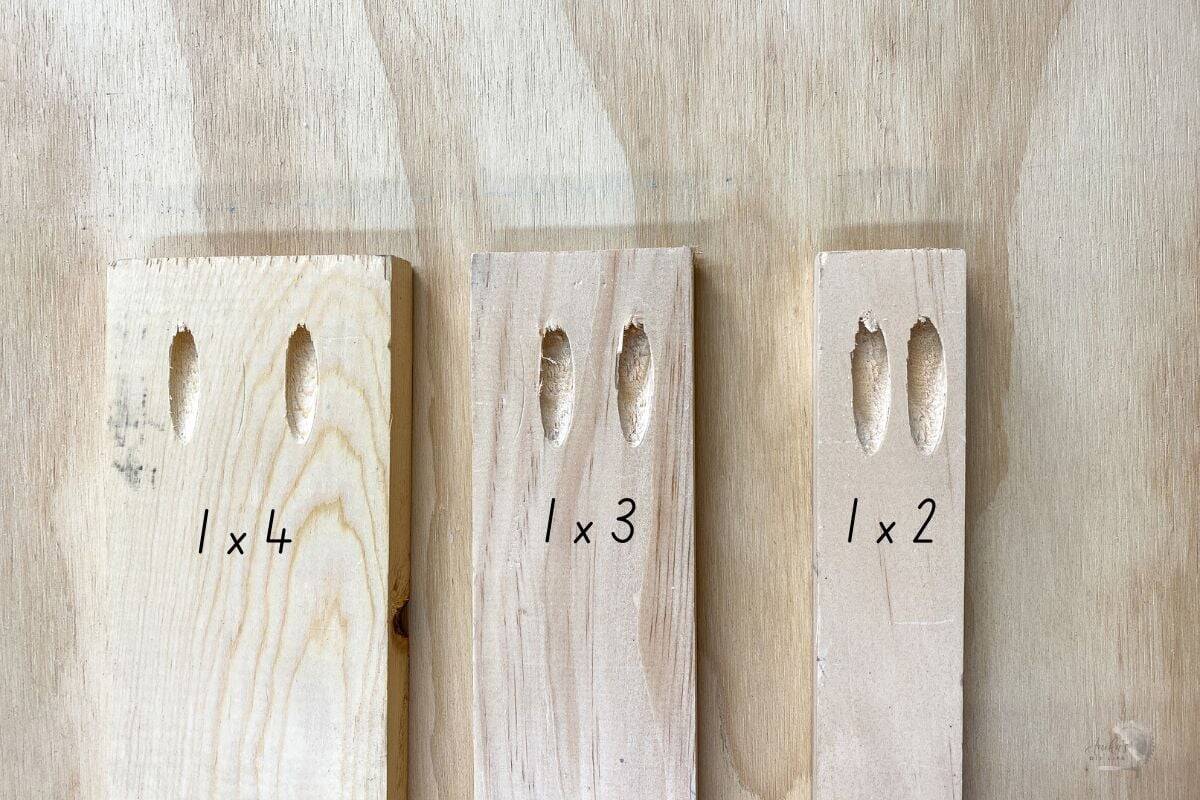
For wider panels or plywood: Add pocket holes every 6–8 inches for maximum support.
3. What Screws Do You Need?
You NEED to use pocket hole screws and NOT regular wood screws. Pocket hole screws are specially designed specifically for pocket holes with:
- A smooth upper shank (so the pieces clamp tightly together)
- A flat washer-style head
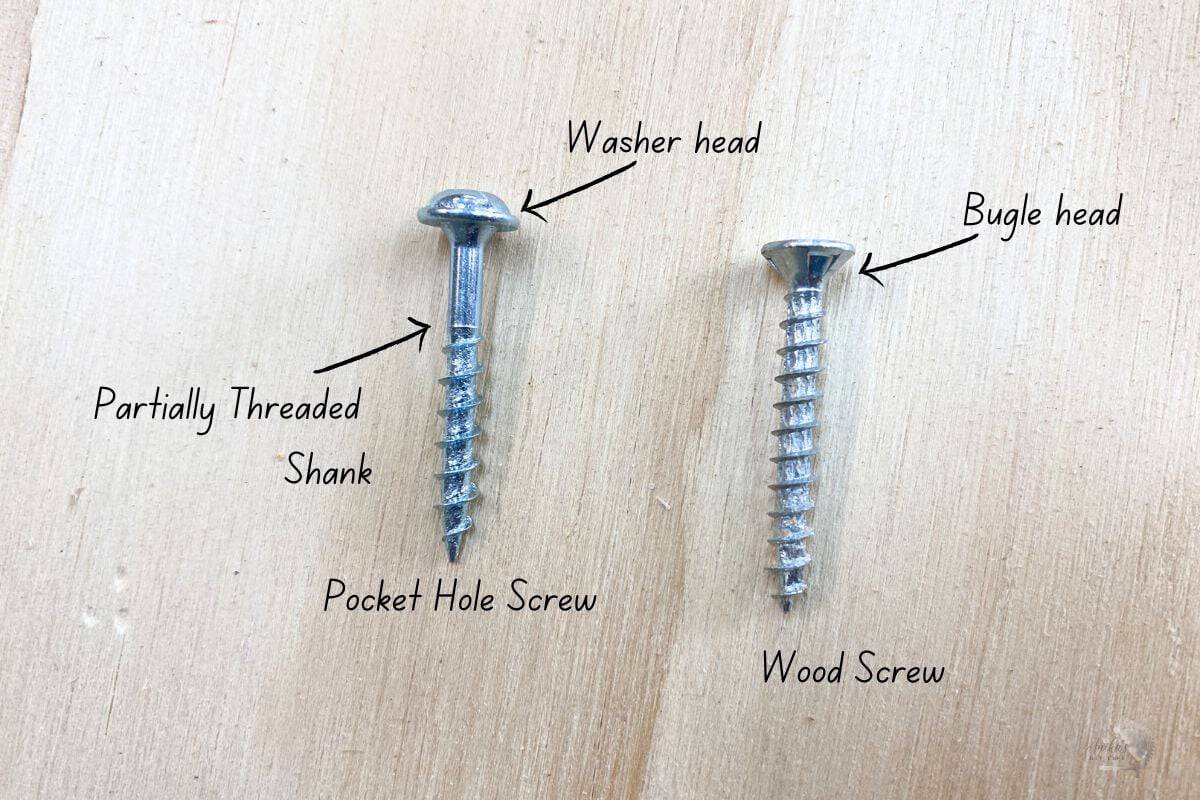
Which type should you use?
- Coarse-thread screws: For softwoods (like pine) and plywood
- Fine-thread screws: For hardwoods (like oak or maple)
Read more about how to pick the right pocket hole screws.
I always keep these on hand:
- 2-1/2″ coarse-thread Blue-Kote screws for outdoor use
- 1-1/4″ coarse-thread for most indoor softwood projects
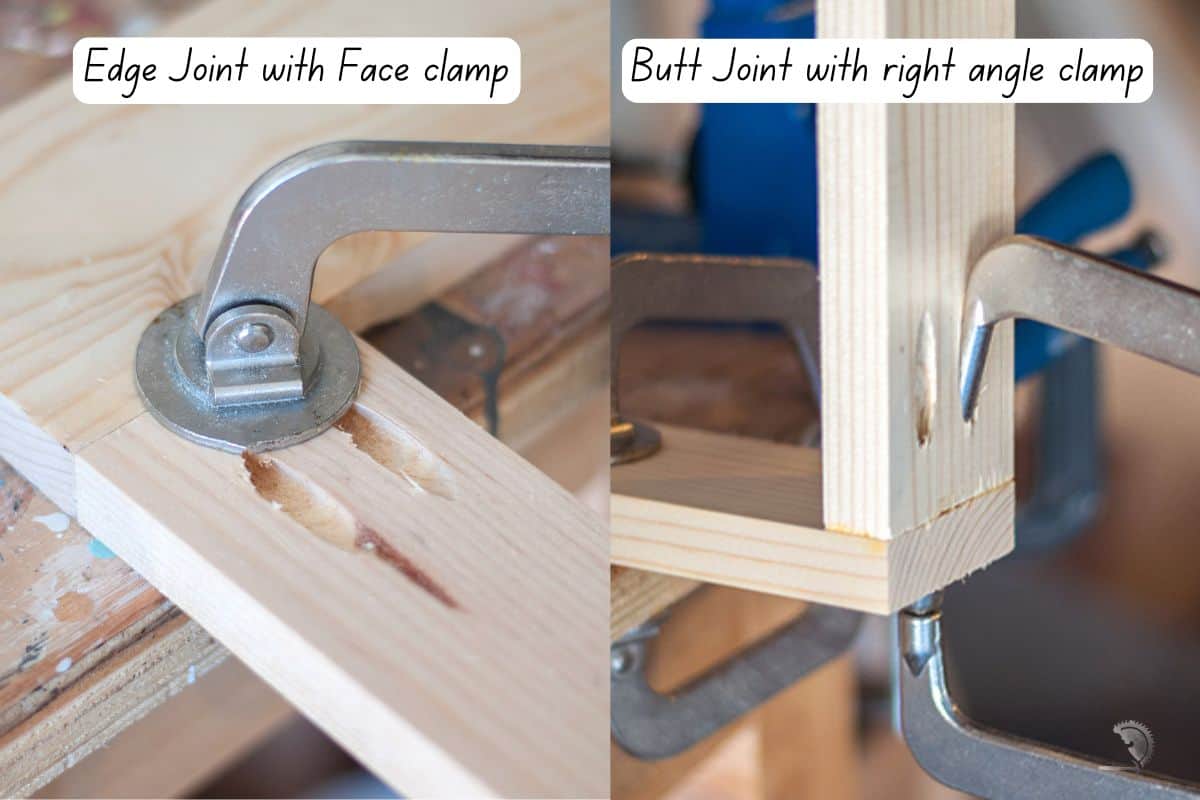
4. What Is the Best Way to Join Boards Using Pocket Holes
Understanding wood grain makes all the difference. Every board has 3 faces:
- End grain
- Edge grain
- Face grain
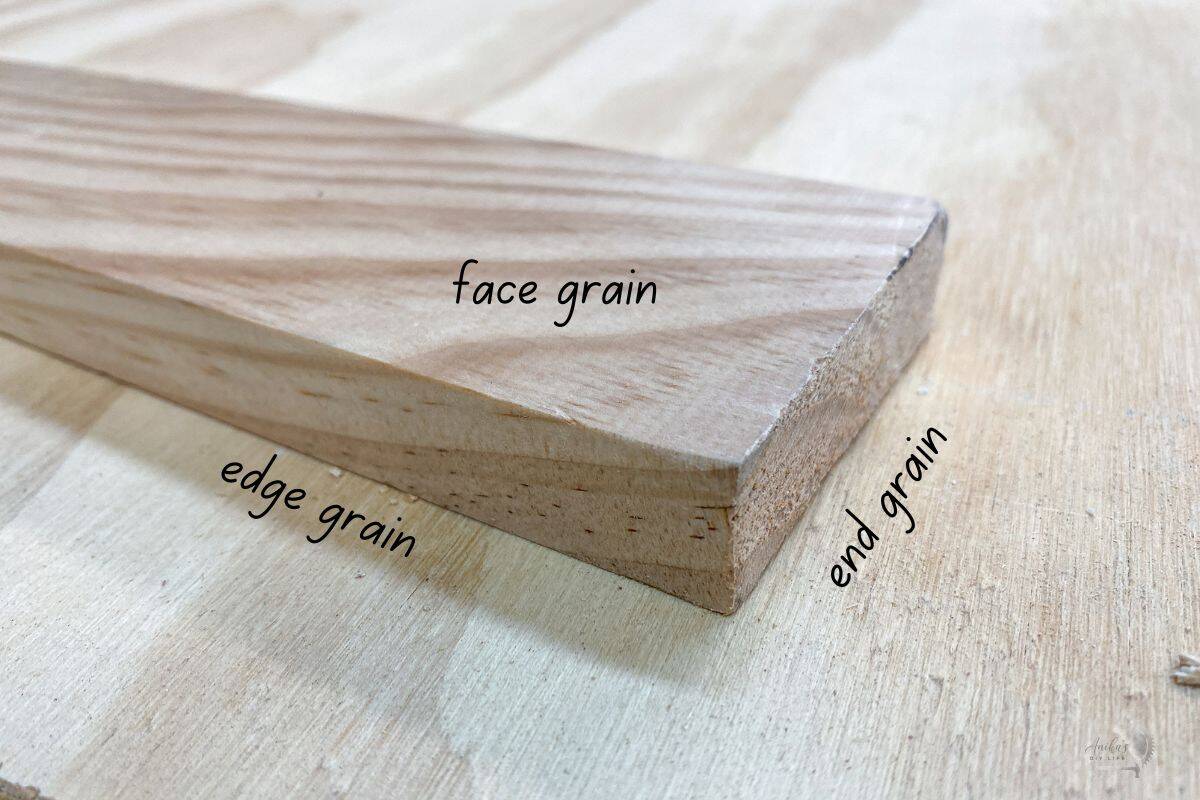
- End Grain: Weak and can’t hold screws. Think of it like screwing parallel into a bundle of straws.
- Edge Grain & Face Grain: Great for joining. This of it as screwing perpendicular to the bundle of straws.
Never screw into end grain. It won’t hold. You always want your screw to go into the edge or face grain of the other board.
There are two common ways of joining boards using pocket holes:
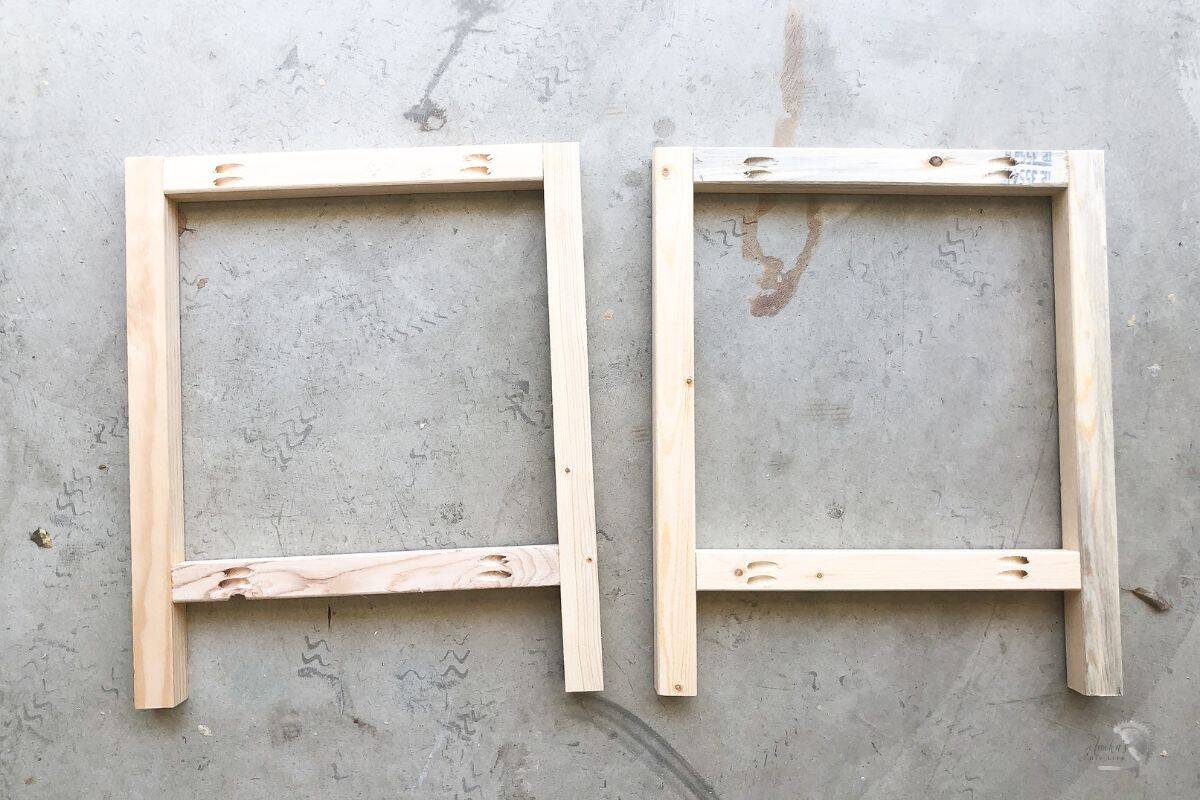
1. The Butt Joint
This is a simple 90-degree joint between two boards. In this case, the pocket holes are made on the ends of the board and the screws are driven into the edge grain of the other board.
For example when you build a frame for a simple table.
2. The Edge Joint
The edge joint is used to join boards side-by-side to make a wider panel.
The pocket holes are made on the edge of a board the screws are driven into the edge of the adjoining board.
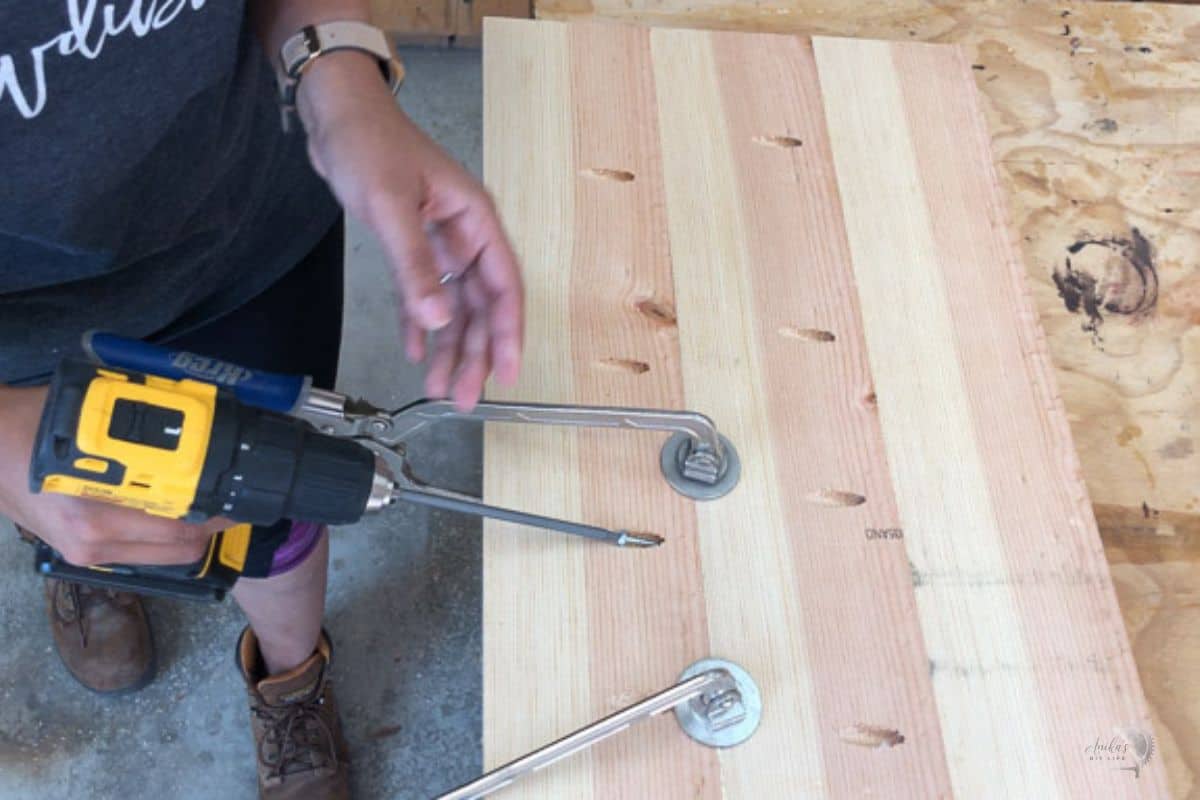
Need a visual? take a look at how I built the panels for the sides of the nightstand.
5. How to Join Different Size Boards With Pocket Holes
When joining boards of different thicknesses, always base your settings on the thinner board. That includes:
- Drill bit collar depth
- Jig height setting
- Screw length
Example: Joining a 1×3 (3/4″ thick) to a 2×2 (1-1/2″ thick)? Use 3/4″ settings and 1-1/4″ screws.
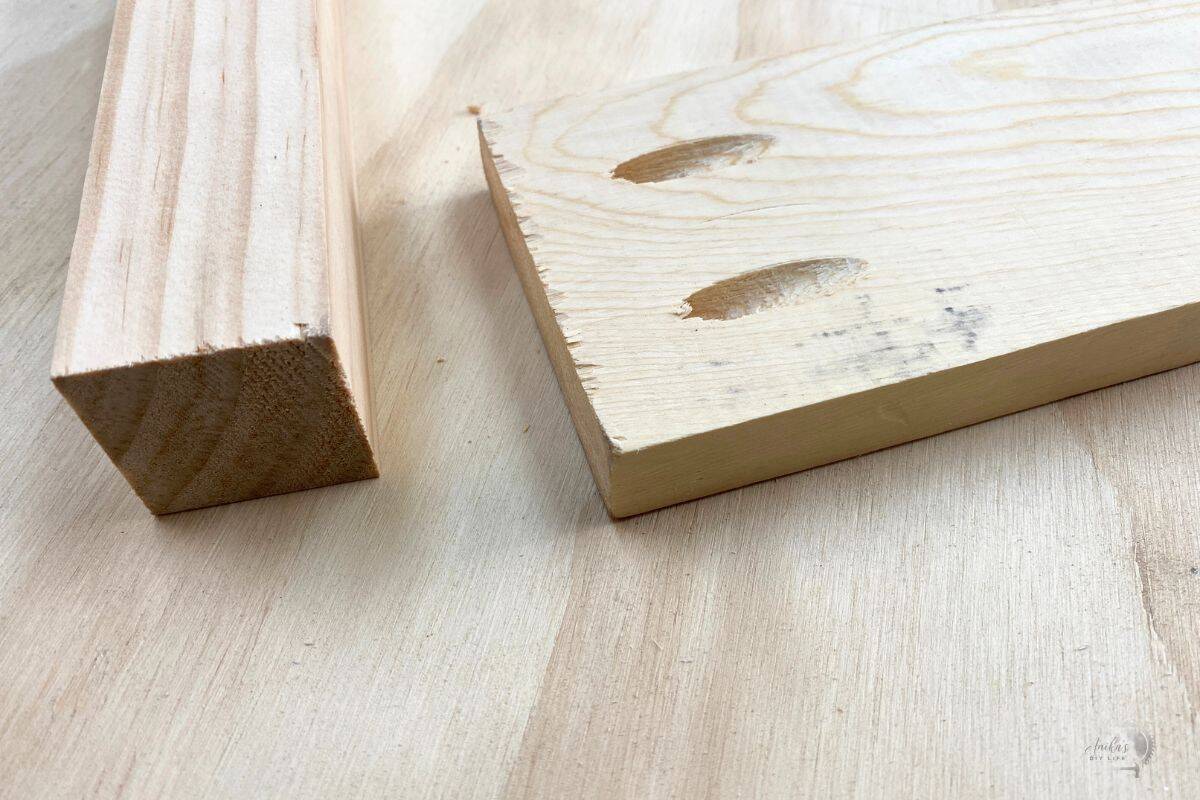
6. How to Avoid Splitting of Boards
I get asked all the time, why do I make pocket holes on the outside of this chair rather than on the inside and hide them.
It is true that you should try your best to put the pocket holes on the insides to hide them as much as possible. However, there is an important reason for the exception to that rule.
Remember what a pocket hole looks like – it is basically a hole drilled at a 15-degree angle i.e., the screw is going in at that angle too.
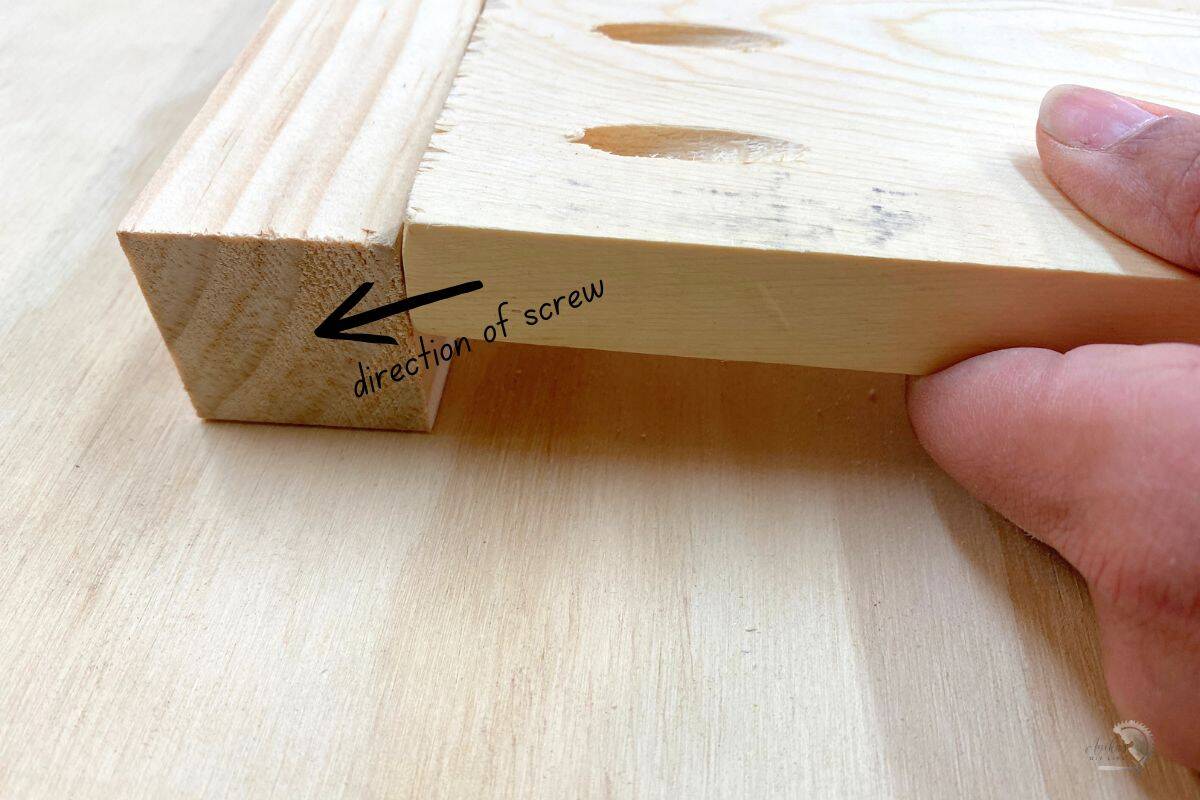
If I put the pocket holes on the inside of this joint, the screw would be going towards the outside of the 2×2, giving the screw very little material to grip and a high probability of splitting.
By putting the pocket holes on the outside, we are making sure the pocket hole screw goes into thicker material and minimizes splitting.
7. Joining Plywood Using Pocket Holes
I mentioned at the very start that the most important thing was to measure the thickness.
Have you measured “3/4-thick” plywood? Or for that matter any other plywood?
They can be ever so slightly thinner than 3/4″. This means that you need to set your drill accordingly.
In this case, I would still set the drill height at 3/4″ BUT set the drill bit between 3/4″ and 1/2″. This helps account for the thickness variation – as drilling less is always better than drilling deep!
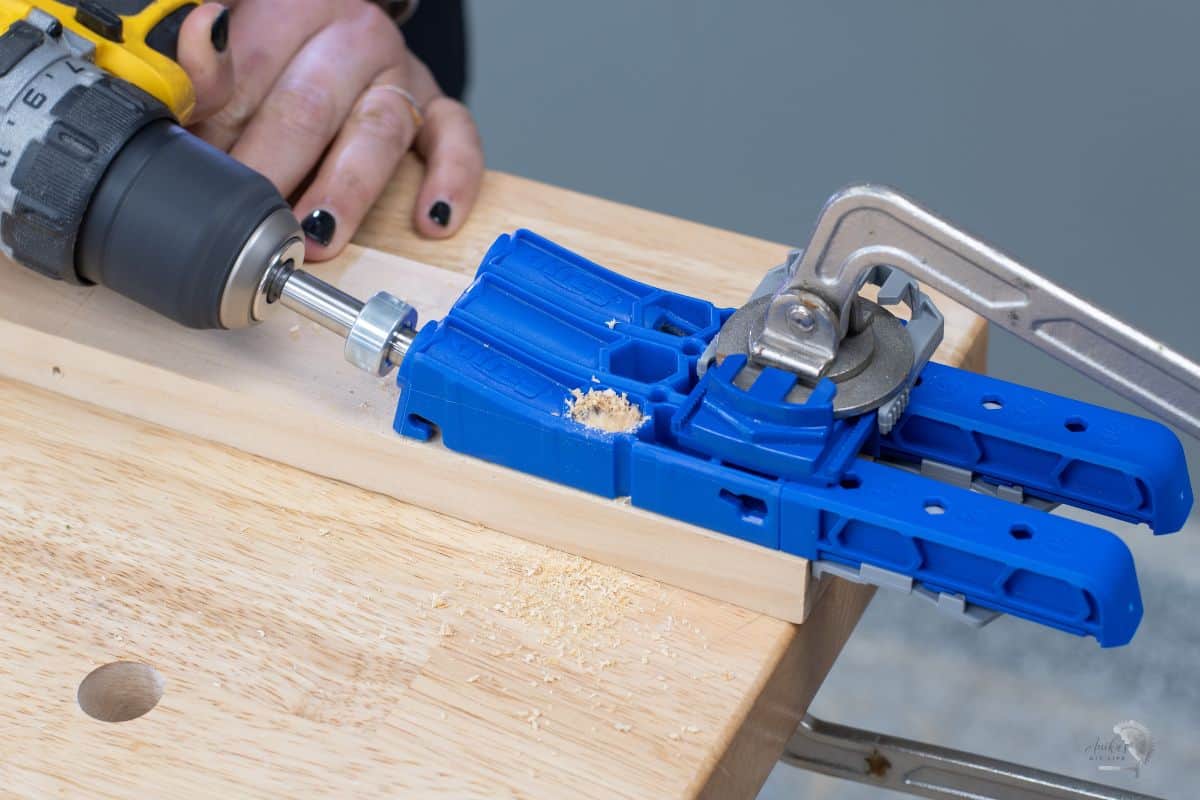
8. Use Clamps
Clamps are not just like having a second hand, when correctly used, they help make the joints professional looking.
I love the right angle clamp and the face clamp. But when needed, I use as many other clamps as needed to make sure the boards don’t move as you join them.
See all my favorite Kreg clamps and accessories.
9. Use Wood Glue
Yes, pocket holes are strong enough without the wood glue.
But wood glue makes the joint not just a lot stronger, it helps in preventing wood movement from moisture fluctuations that can cause cupping and cracks.
10. Drill Bit Stuck?
Sometimes as you drill pocket holes, you might find that the drill bit gets stuck and doesn’t go any further.
There can be 2 reasons –
- You may be hitting a knot in the wood. If so, change the pocket hole location.
- You may have sawdust stuck in the jig, preventing your bit from doing its job. Just clear it up, and you should be good to go!
With these simple tips in mind, you’ll get stronger, cleaner joints every time and avoid some of the most common beginner mistakes.
Learn More About Pocket Holes:
See my full Pocket Holes resource center.
Still unsure about pocket holes?
Pocket Hole Ninja takes the mystery out of joinery—step-by-step guidance for beginner builders!
Ready for Your Next Project?
Now that you are a pocket hole pro, here are a few friendly project ideas using pocket holes.
- DIY X-leg indoor/outdoor bench
- Easy DIY nightstand with drawers
- DIY Kids Toy Organizer
- 34 other Kreg Jig projects for beginners!
Anika's goal is to inspire and empower beginners with woodworking, DIY, home improvement, and home decor ideas.
She wants everyone to unlock their creative potential and experience the feeling that comes with making something. Nothing feels better better than seeing something and saying "I can make that!"


what a beautifully informative article! Great ideas & perfect supporting pictures! Am sending this to my son who is into woodworking and bought him a Kreg 4 & the drawer jig for xmas. He loves them both. This information will help get better & better at woodworking! Thank you so much!