How to Paint Plywood
Want to paint plywood for a flawless, professional look? This simple but game-changing trick will help you achieve a smooth and seamless finish—without buying expensive plywood!

Ever since I built the two-tone A-frame desk, the most common questions I get are –
- How did you get that smooth feel on plywood?
- Did you use expensive veneer?
the truth is – I used the cheap sanded plywood – the main reason being that Birch plywood (the one I usually use) wasn’t available at my store that day and I really needed to get started with the project. Sanded plywood’s rough surface (unlike its name) can make it tricky to paint. The secret? A special step that fills imperfections and creates a sleek surface.
It is time I wrote down a full tutorial and give you all the details about
- the best type of plywood for painting
- the right paint to use, and
- how to get a smooth durable finish.
RELATED: See all the techniques to cover plywood edges!
Table of Contents
What Type of Plywood is Best for Painting?
While you can paint any plywood, birch plywood is the best option for a smooth and even finish.
Higher-grade plywood, such as A or B grades, typically have fewer imperfections, making them easier to work with and requiring less preparation. Lower-grade plywood (like Sanded plywood) may contain knots and voids that need filling before painting.
Learn more about the types of plywood.
Do you need expensive veneer plywood?
No!
You can use basic sanded plywood if you want to save money. It will just need a little extra elbow grease to get the same smooth finish like any other premium veneer.
If you are staining the project, definitely consider a good quality veneer like oak or maple. But for painting, birch or sanded plywood is the best option.
Best Paint for Plywood
If you follow the below directions to prepare and prime your plywood, you can use any paint you like!
I usually use latex door and trim paint in satin or semi-gloss – depending on the final finish I am looking for.
Door and trim paint is pretty durable without a top coat. The key is to make sur eyou give it enough time to completely cure.
If you use regular latex plaint, you would need a top coat. You can also use acrylic paint or chalk paint – just be sure to seal them appropriately at the end.
***This post contains referral or affiliate links. It is a way for this site to earn advertising fees by advertising or linking to certain products and/or services. Please read my full disclosure here ***
Materials Needed to Paint Plywood
- Wood Filler
- Joint compound
- Putty knife
- Tack Cloth
- Random orbital sander
- Good quality sealing primer
- Paint (in color of your choice)
- Paint sprayer. I use this one. (optional, but recommended)
- Paint tray (if not using paint sprayer)
- Roller and Foam roller cover (if not using paint sprayer)
- Floterol (if not using paint sprayer)
Be sure to download the printable instructions below –
How to Paint Plywood
Painting plywood is very similar to painting any other lumber – you have to fill all the holes and non-uniformities (there is a special trick to this!!), prime, and then paint and seal it.
However, there is one special step that makes all the difference!
Step 1 – Fill Deep Holes
- Fill in any pocket holes, nail holes and deep dents using wood filler. Allow to dry overnight.

Sometimes, the wood filler shrinks as it dries up and would need a second coat.
Also, this is a good time to round out the edges of the plywood. You can do this simply by running a screwdriver across it.

Step 2 – Apply Joint Compound
Yes, you heard that right!
This is the most critical step!
- Apply joint compound all over the surface using a putty knife.
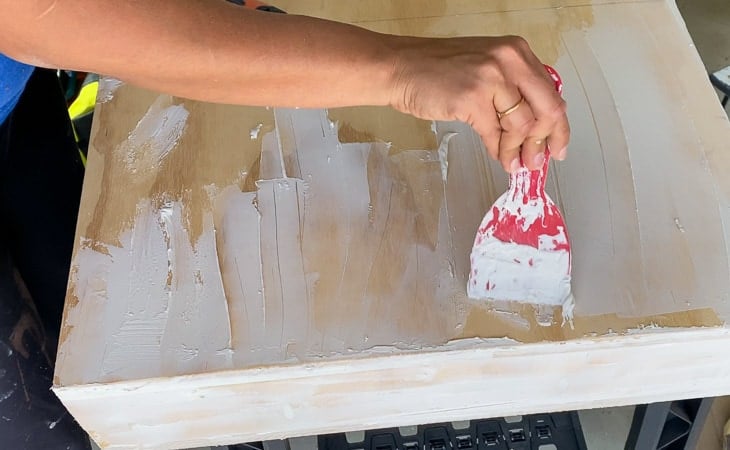
- Try to make it as uniform as possible.
How to seal plywood edges for painting
- To make sure the edges are smooth and uniform, cover the exposed edges with joint compound and smooth it out. Make sure all the holes and crevices are covered.

- Allow to dry overnight
This step is literally like frosting! Just keep smoothing it out till the entire surface is covered.
The joint compound helps fill up the rough splintered surface of the sanded plywood.
Step 3 – Sand
- Using a random orbital sander, sand down the joint compound.

This is the messiest step ever. Please do this in a well-ventilated space with proper eye and breathing protection. Just put on some music and enjoy your sanding session.
RELATED – My favorite Bluetooth hearing protection (get $10 off with code ANIKA10)
Honestly, sanding the soft joint compound is a lot faster and easier than sanding away wood filler… so don’t let it intimidate you!
Be sure to not sand everything away!
When finished you will be left with white patches on the plywood. This means the joint compound is doing its job by filling in the rough surface.
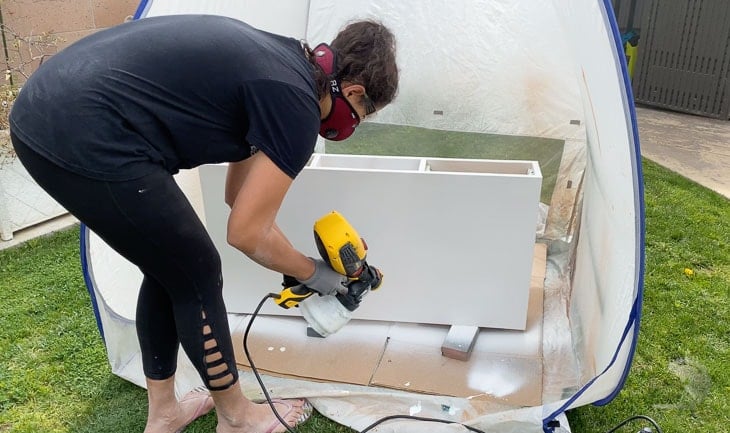
Step 4 – Prime
- Once the joint compound is properly sanded down, wipe off all the dust using a tack-cloth or a wet rag.

This is important. If there are any particles left on the surface, it can cause issues later during painting.
- Apply 2 coats of primer using a paint sprayer (or manually).
- Allow to dry 3-6 hours between each coat ( depending on temperature and humidity). I usually wait for it to be dry to touch.
- Sand lightly between each coat with super-fine grit and wipe off all the dust.

The primer seals the plywood and joint compound and gets it ready for paint.
Step 5 – Paint
It’s time to paint!
- Apply 2 coats of paint using a paint sprayer or manually.
- Sand lightly between each coat with super-fine grit and wipe off all the dust.
Typically you need 2 coats to get good coverage and color. However, depending on the paint or the color, you might need extra coats.
Step 6 – Seal
Every paint project needs protection – especially if you use satin or flat paint.
- Apply a couple of coats of polyacrylic – in matte or gloss – depending on your preference.
That is it!
Be sure to download the printable instructions below –
Be sure to allow the project to cure well before using.
The final result will be a nice smooth surface!

In fact, it will be hard to tell where the edges of the plywood were or the fact that you started with sanded plywood!
You might also like


Anika's goal is to inspire and empower beginners with woodworking, DIY, home improvement, and home decor ideas.
She wants everyone to unlock their creative potential and experience the feeling that comes with making something. Nothing feels better better than seeing something and saying "I can make that!"


Great work !! Thank a lot Buddy!!
The use of joint compound is genius! I never heard of that before. Great tip!
As a regular woodworker I learned something new today. Never considered using joint compound to smooth open grain wood. Great idea!
Thank you for your post. As a weekend warrior woodworker I think it’s hard enough to do the task, never mind photographing it and explaining it!
A technique I’ve used for painting or staining plywood I got from an old George Grotz (AKA The Furniture Doctor) book. It is to varnish, let dry, then sand, and repeat. The varnish seeps into the soft part of the plywood. The sanding takes it off the had part of the plywood. Then when the plywood is stained or painted the surface is smooth.
Also I like rounding the edges just a little bit.
Anyway, thank you again. Great post. It’s also great that you’re wearing a mask! That dust is no good for us.