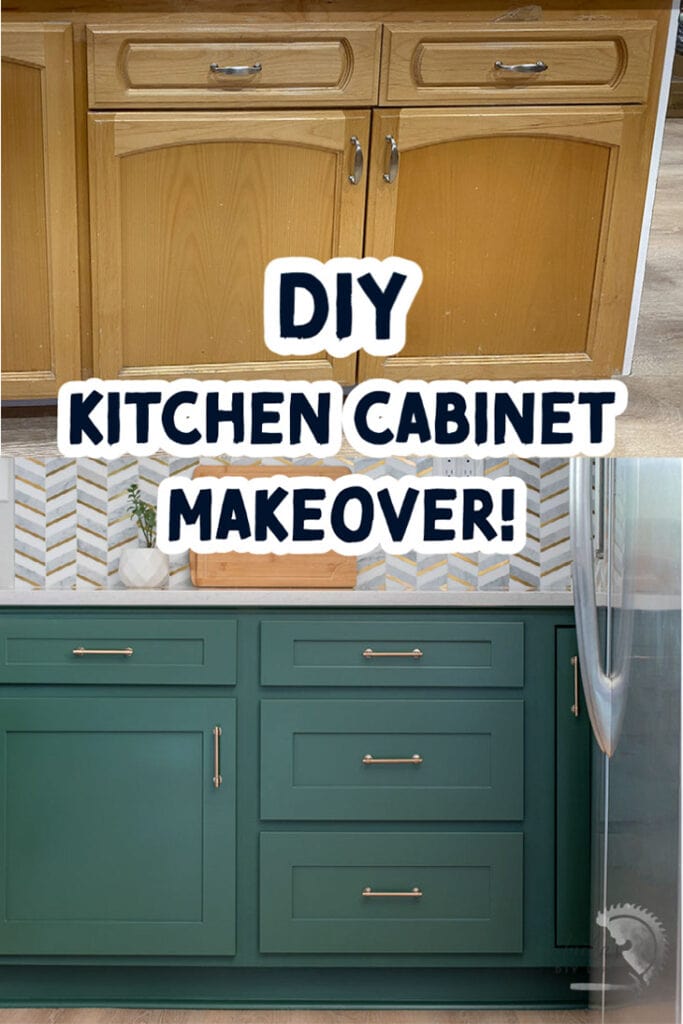
How to Reface Kitchen Cabinets : Affordable Cabinet Update
Learn how to reface your kitchen cabinets for a budget-friendly upgrade. Give old kitchen cabinets brand new life with this full detailed tutorial and video.
So, you aren’t a big fan of your kitchen cabinets?
I am sure, if you could, you would simply pull them out and add brand new ones.
Unfortunately, kitchen remodels can get expensive real fast!
Do you know the #1 reason for that?
Cabinets.
They are the most expensive part of any kitchen remodel.
When we first got quotes for the kitchen remodel, the majority of the $$$ were going towards new cabinets!
One quote was for $50K and $35K of that was for cabinets! Insane!
Do you know – instead of spending money ripping out perfectly good cabinets, you can easily replace the cabinet doors and completely upgrade the look of the entire kitchen!
***This post is sponsored by Nieu Cabinet Doors. Thank you for supporting the brands that help me bring you new projects***
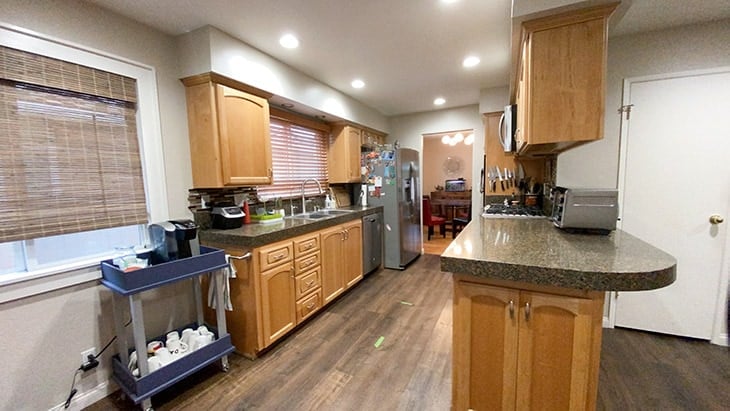
To recap, this is what my kitchen started out as.
You can check out more before pictures and the mood board here.
I had maple veneered cabinets.
At the time of writing this,
- we added new off-the-shelf cabinets to extend the countertops and create more counter space.
- Added new countertops.
- changed the flooring
It was time to change the color of the cabinets to give the entire kitchen new life!
What Is Cabinet Refacing?
Cabinet refacing means giving old cabinets a “new face“. It involves three basic steps:
- Removing the old doors and drawers
- Giving the existing frame a new look with either paint or veneer.
- Adding all-new replacement doors and drawers for a completely updated custom look.
Cabinet refacing is a great way to save time and most importantly – money.
There are multiple ways you can ass new life to existing cabinet face frames –
- Applying veneer trimmings
- Painting it.
I decided to go with painting.
The main reasons I decided to go with refacing –
- Existing cabinet boxes were sturdy.
- There were multiple styles of kitchen cabinets and doors.
- The old doors were scratched up and damaged
- The design and color of the old doors were just not my styles.
- It was easy to paint and replace the doors
- It was budget-friendly compared to installing all-new cabinets.
Then came the decision – to make the cabinet doors or not.
After years of building furniture, I am perfectly capable of building the doors but there were 33 doors and drawer fronts!
That is way more than I had the time or patience for – and it would have taken me weeks to make them all.
You can easily find vendors that manufacture cabinet doors to your specifications.
Where to Buy Cabinet Doors
During my search to find a place that makes cabinet doors, I found Nieu Cabinet Doors.
They manufacture cabinet doors in a multitude of styles and colors. They are made of MDF and are of excellent quality.
In fact, here are all the options you can get –
- drawer boxes,
- hinges
- drawer slides
- floating shelves
…basically everything you need to completely update your kitchen.
I started by ordering a sample kit that came with a mini door in the style of my choice and a set of MDF color swatches. The sample is very reasonable at $25.

Once you make your selection and place the order, they ship everything right to your doorstep ready to be installed.
- You remove old doors.
- Paint the cabinet frames
- Install new doors.
Not comfortable with installing it yourself?
If you feel that installing new cabinet doors is a bit above your DIY level, you can still look into ordering them, and then hiring a local contractor to install them.
You will still save a ton of money over buying all new cabinets.
However, if you are ready to get your hands dirty and get it done yourself, I have you covered.
Here are all the details you need to know to install them.
Spoiler – it’s not that hard!
How to Order New Cabinet Doors
The process of ordering is very straightforward.
Nieu Cabinet Doors have a lot of resources online including a style quiz to help you figure out exactly what and how to order.
The basic steps are:
- Choose the door style. I got the Shaker doors.
- Pick your color.
All the colors are Sherwin-Williams colors so you can easily paint the cabinet boxes to match. - Measure pre-existing cabinet doors and drawer fronts and enter the dimensions on the website.
They have detailed how-to videos for every cabinet style to guide you. - You can then select many other options like :
- bores for the hinges
- drawer boxes
- drawer slides, etc.
Note – If you need a different color than what is offered in the catalog, you can order any Sherwin Williams paint color for a small additional fee.
That’s it!
Now you can start painting the cabinet boxes while you wait for your doors to arrive.
Video Tutorial
I have a full video tutorial showing you step-by-step how to reface the laminate and unfinished wood cabinets PLUS a detailed tutorial of how to install the doors and drawer fronts from Nieu Cabinet Doors.
How to Paint Cabinets
I had two types of cabinets in my kitchen and they each needed a slightly different preparation method.
- The new unfinished wood cabinets – These could be primed to seal the wood and then painted
- The old laminate cabinets – The laminate needed to be deglossed and roughed up before priming and painting.
Material Needed
- TSP
- Liquid Sandpaper
- SW ExtremeBond Primer
- Paint in the color of your choice. I used SW Emerald paint in Rock Garden for the lower cabinets and Alabaster for the upper cabinets.
- Paint tray
- 1/4″ nap roller
- Paintbrush. This one is my favorite.
- Painter’s tape
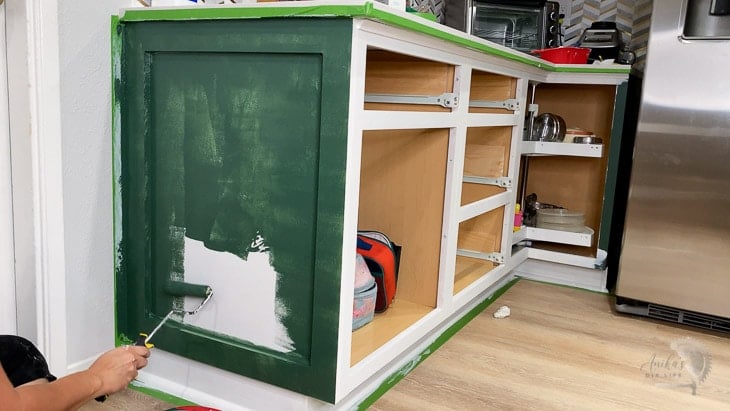
Step 1 – Prep
As with any project, prep is the most important. If you do not prepare the cabinets well, the results will be inferior.
It can feel like a long process but take your time and make sure you don’t skip any steps.
- Remove all the doors and drawers. Be sure to label them so you know exactly where they go when it is time to put the corresponding doors back.
- Clean all the dirt and grime off of the old cabinets with denatured alcohol or a TSP solution using some shop rags and rinse with sponge and clean water.
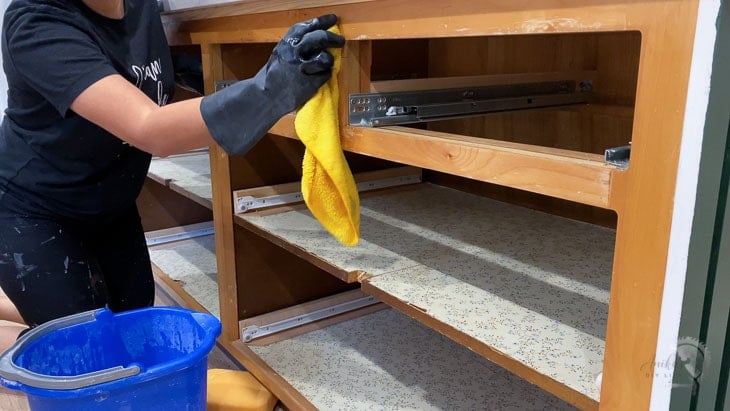
- Use liquid sandpaper to remove the gloss from cabinets if they have an old finish. Liquid sandpaper needs to be left to dry for 5 minutes for it to work effectively. You can also sand but I prefer creating as little dust as possible.
- Tape off the walls, floor, appliances, and around the cabinets.
- Fill in the old hinge holes with wood putty using a utility knife. We will not be using these. We will use new holes for the best strength.
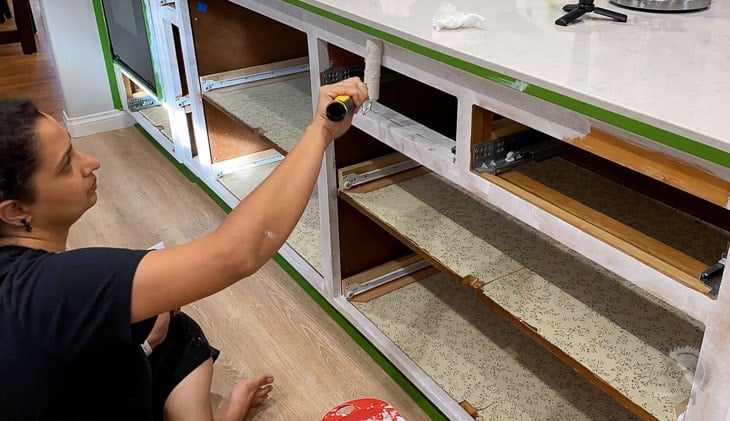
Step 2 – Primer
The primer you use will depend on the type of cabinets. For the unfinished wood cabinet, a wood sealing primer works well.
For the laminate, I used SW extreme bond primer which sticks well to any surface. This is important, especially on laminate or veneer. If not properly primed, the paint will eventually peel off.
- Using a brush, cut in on the edges and use the roller to roll on the primer on the cabinet face frame.
- Once the first coat is dried, lightly sand to smooth the coat. In case of the unfinished wood, it may need a little more elbow grease to knock down the raised grain.
- Apply a second coat of primer.
Step 3 – Paint
- Paint by cutting in along the edges and rolling in the paint.
- Paint additional coats as needed. I needed a total of 3 coats to get the best coverage and rich color.
That’s it! The cabinet boxes are painted!
Pro-tip – Be sure to remove the painter’s tape before the paint dries!
Once the paint has dried and cured, you can go ahead and attach the doors and the drawer fronts.
Installing New Cabinet Doors
All you need to install new cabinet doors is:
- Drill
- hinges
- A straight edge like a strip of plywood or a level.
- A small clamp.
I got my cabinet doors with hinge bores and re-used my old soft close hinges.
For tips and tricks on how to install the doors and drawer fronts, be sure to watch the video.
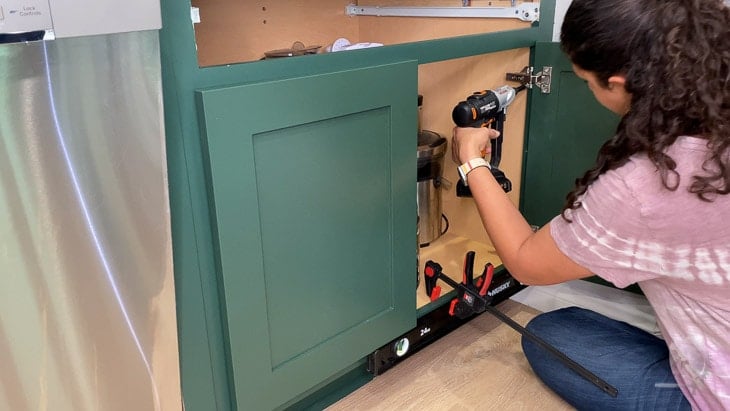
IMPORTANT – Do not re-use the screw holes in the cabinet frame for the hinges. Nieu Cabinet Doors automatically offsets the hinges to avoid this but you can let them know depending on your situation where you would like the hinge bores.
Lazy Susan cabinet – I have a Lazy Susan corner cabinet. Nieu Cabinet doors were able to easily send me doors to assemble my corner cabinet door.
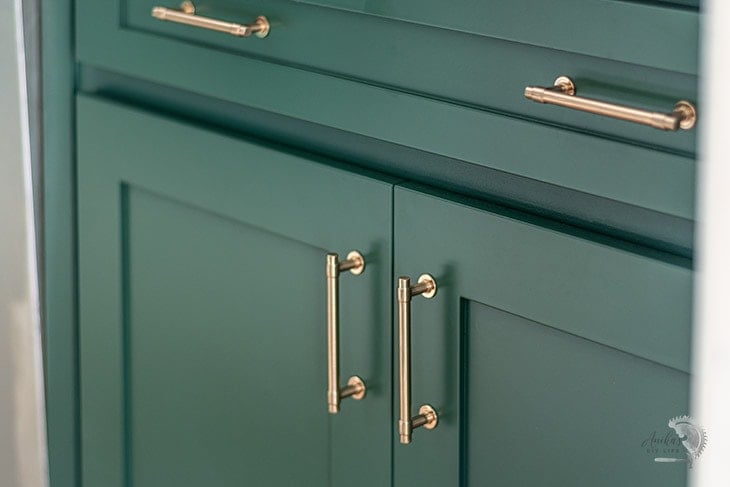
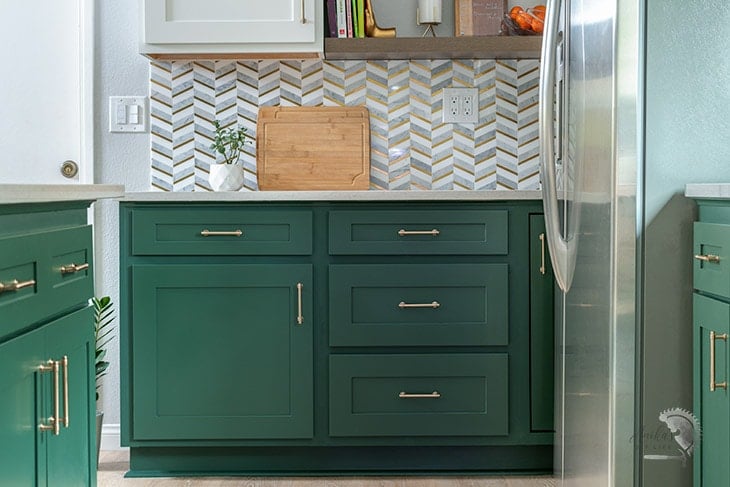
The hardware brought everything to life! These are the Fransisco pulls in Champagne Brass. I got a combination of 3″, 4″ and 5″ pulls for different sized cabinets and drawers.
Installing Drawer Fronts
Installing the drawer fronts is super easy :
- Make the holes for the drawer pulls
- Use those holes to attach temporary screws
- Add permanent screws from the inside.
- Remove temporary screws and add the drawer pulls.
They attach with screws from the inside. I explain exactly how to do that and make sure the faces are aligned in the video.
One side of the kitchen is done!
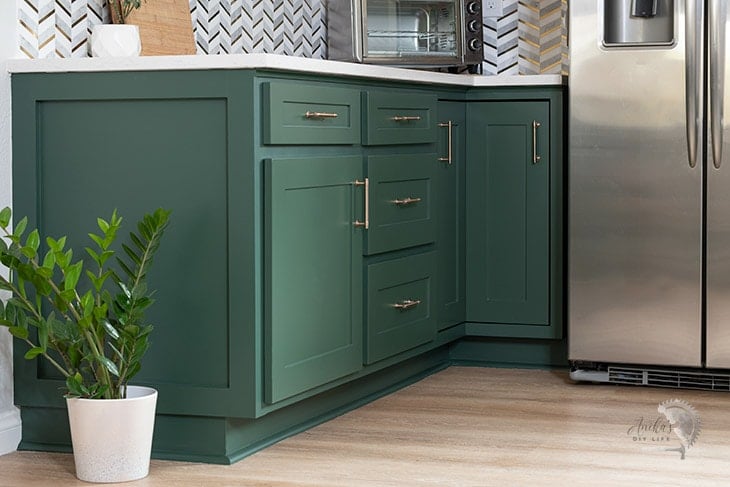
For comparison, this is what it looked like when we started. Yes, it didn’t exist!
I have one more major project to go and then a bunch of small touch-ups before I can call this kitchen done!
I leave you with a gorgeous view of the cabients!
Check out the full reveal here!
Other Projects in This Kitchen
- DIY Wood Slat Island Trim
- How to install backsplash without mortar
- How to install vinyl plank flooring
You Might Also Like
- How to stain cabinets using gel stain
- Small bathroom remodel on a budget
- Master bedroom makeover with board and batten
- How to Make Shaker Cabinet Doors – A Simple Tutorial
Anika's goal is to inspire and empower beginners with woodworking, DIY, home improvement, and home decor ideas.
She wants everyone to unlock their creative potential and experience the feeling that comes with making something. Nothing feels better better than seeing something and saying "I can make that!"


I love the colour, it’s gorgeous! I painted my cabinets black and I love them but the salesperson said I didn’t need to seal them, not true! The paint has chipped around the handles on the cabinets we use the most and looks awful. I will probably repaint them but refacing is what I’d prefer. If you don’t mind, can you give me a ballpark figure of what it cost you to reface your cupboards? You have more then me but at least it would give me an idea. I can’t wait for the reveal, I’m sure it is going to be stunning!
Hi Giselle,
I fear you might be right, I did end up scratching a few areas while adding the doors and I assumed the paint hadn’t cured long enough. I will wait and watch and update this post with time if things change. The refacing for 33 doors and drawer fronts cost about $3000 (including freight). I did go with custom colors too so that was more than what it would typically be.
Excellent video with details. Can you please list the detail on which paint did you use, manufacture, type etc. thanks
Thanks! I have added the details under the Materials section.