Kitchen Backsplash Using Musselbound Tile Mat
Learn how to install a mosaic kitchen backsplash using the MusselBound Adhesive Tile Mat. It is a great way for beginners to get started with tiling!

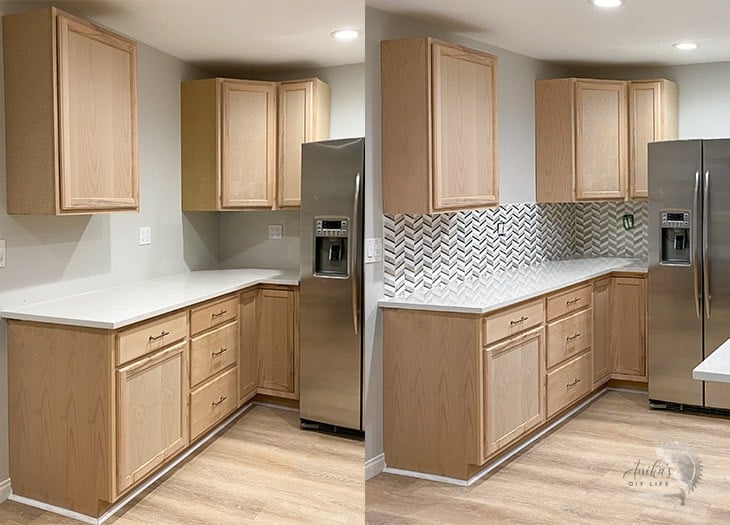
The kitchen backsplash is in! Just installing the backsplash feels like it my vision for the kitchen is starting to come alive!
I picked a gorgeous gold and marble mosaic and I think it is going to pair amazingly with the green I have in mind for the cabinets (which I can’t wait to paint!) Check out the complete kitchen before and remodel plan here.
I had never tiled before and I asked my friend Joanie Sprague to help teach and guide me. She’s got a wealth of knowledge about everything DIY – she was a carpenter on Trading Spaces AND a contestant in America’s Next Top Model. In other words, she is a rockstar!

We decided to try a product called MusselBound Adhesive Tile Mat to install the tile. Neither of us had used it before but we had seen a lot of our peers using it and raving about it. So, we decided to give it a go! Read on to find out how to install and the pros and cons.
Table of Contents
- Material required
- How to install the backsplash video
- How do you install MusselBound Adhesive Tile Mat
- How to install mosaic tile
- How to Grout
- MusselBound FAQs
***All opinions are my own. This is not a sponsored project.***
Material Needed –
- MusselBound Adhesive Tile Mat
- Tile of your choice. I used this gorgeous mosaic tile.
- Utility knife
- Wet saw (You can rent one easily from a home improvement store)
- Grout (premixed, non-sanded if you have glass or metal tile). This is the one I used.
- Grout float
- Putty knife
- Bucket for water
- Large sponge
- Hair Dryer
- Paper Towels
Installing the Backsplash (Video)
As always, I have a full detailed video showing you how we installed the tile and all the details about using the MusselBound Tile Mat. Watch it for lots of tips and tricks from Joanie herself.
How Do You Install Musselbound Adhesive Tile Mat
Step 1 – Clean Up
It is very important to clean up the wall and the space where you will be installing the tile mat. There should be no dust or grease etc. Also, vacuum up around the wall so there is no debris or dust.
Step 2 – Apply the Adhesive Tile Mat
- Start at the top where you want to start the tile and roll the tile mat down to the bottom (like a wallpaper). Do not press down firmly yet. Just gently attach.
- Cut off using a straight edge and utility knife.
- You can reposition it gently and remove any bubbles as needed.
- Press the tile mat for 5 seconds to activate the adhesive.

Note – We tried to cut strips of 18″ before applying but it was a lot harder to manage the sticky mat and position it. It was a lot easier to roll it down the wall.
How to Install Mosaic Tile
Once all the MusselBound was attached to the wall, it was time for the tile!
I picked a mosaic tile with marble and gold. The mosaic tile has a mat at the back that adheres well to the MusselBound Tile Mat.
Step 1 – Prepare Mosaic for Installation
- Arrange the tiles to test for the final arrangement.
We found it easier to simply cut off the bottom of the mosaic to achieve a straight line that we could place directly. This cut down the total number of small cuts we had to make to fill up the gaps at the bottom and made the entire process a lot faster.
Step 2 – Cut the Tile
- Using a wet saw, cut the tile to fit in your space.

To cut around outlets, mark the area you need to cut and slowly cut it out on the tile saw (watch the video for details).
Step 3 – Dry the Tile
- Dry the tile completely using towels and a hair dryer before attaching it to the mat.
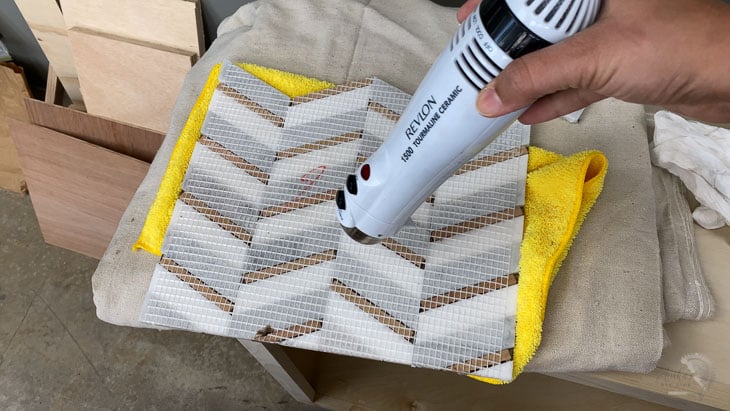
This is important – if you cut the tile on a wet saw (which you should), it will be wet. This cannot be directly applied to the adhesive mat.
Step 4 – Apply Tile to Mat
- Remove the liner of the mat to expose the adhesive surface and gently place the tile.
- You can reposition it if you like. Once you are happy with the placement, press it down firmly and hold for 5 seconds.
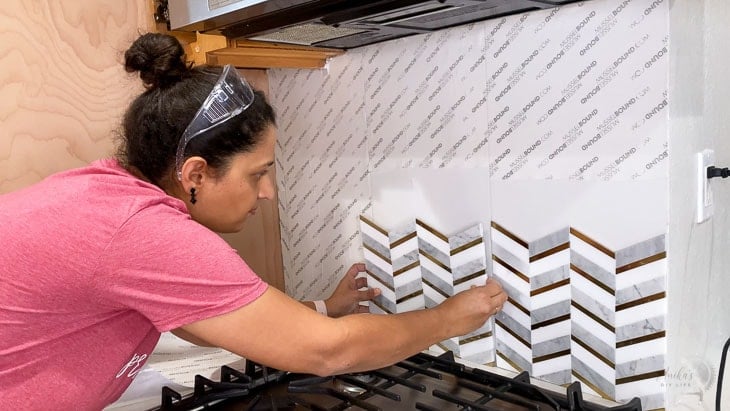
And we are ready to grout!
How to Grout
While I am no expert, here are a few basic things I have learned from Joanie and from this project.
Which Grout to Use
Picking the right grout is very important. Grouts come in two varieties – non-sanded and sanded. You can feel the difference in texture by touching.
For tile with glass, metal etc, you want to use non-sanded grout so it doesn’t scratch the surfaces. My tile had metal and very thin spaces between tile, so I went with unsanded.
We tried finding premixed grout but were unsuccessful. Finally, we picked up this grout which was easy to mix by just adding water per instructions and mixing to creamy peanut butter-like consistency.
Step 1 – Apply Grout
- Load grout on the tip of the grout float using the putty knife and smeared on the tile.
- Gently push it around to fill all the gaps. End at a 45-degree angle stroke.

Step 2 – Wipe Down
- Allow to dry for 5-10 minutes and use a damp sponge to clean any extra grout
- Let sit for another 10-15 minutes – you will see a haze form. Clean this up with a clean damp sponge.
- If haze appears again after a few hours, clean with a damp sponge.
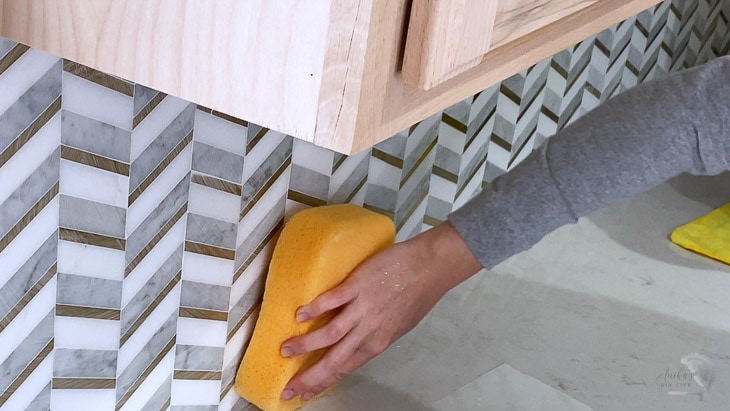
Be sure to watch the video to see the techniques to add the grout into the seams between the cabinet or counter and tile.
Replace outlets using spacers to lift them up to the tile level and add covers.
And DONE!
I am so in love with the backsplash tile! Wait till you see it with the painted cabinets and new hardware!

As a first-time tiling experience, it was not bad at all! MusselBound definitely made it easy!
Check out all the projects in my kitchen remodel here.
Musselbound FAQs
Let’s dive into the details of the MusselBound adhesive tile mat.
Can You Use It on a Textured Wall?
Yes, you can use it on slightly textured walls. I have orange peel texture and the MusselBound adhesive tile mat worked really well. According to the manufacturer, you could even apply it over pre-existing tile!
Can You Readjust Tiles Once You Put Them On?
When you first place the tiles on, do so gently and you can reposition the tiles as needed. Once you are happy with the tile placement, you can go ahead and press it in for 5 seconds to activate the glue. This is when the adhesive becomes strong and permanent.
How Strong Is Musselbound?
It is VERY strong! When we applied the tile, we tried to pull it off with all our might and it wouldn’t come off. In fact, I tried to take off a section a couple of hours later because I have made an error in the cut and couldn’t! The tile started breaking but it wouldn’t pull off of the wall!
Is Musselbound Waterproof?
The adhesive mat itself is waterproof. However, the seams are not for obvious reasons. MusselBound sells a separate waterproofing tape for this purpose.
Pros and Cons of Musselbound
First, let’s talk about the pros –
- It was really easy to install.
- Zero mess!
- Flexible work-time – you can install it on the wall and remove only enough liner to expose the mat as you need.
Cons –
- The most important is the price. Each roll of 15 sq ft is about $25-30 which is pretty steep compared to the cost of a bag of mastic.
- You have to completely dry the tiles before putting it on the mat which makes it a little bit of a longer process. If using smaller tiles like a subway tile, it might be ok where you only have to cut a small number of tiles on the perimeter. In our case, we had to cut and dry every single tile to fit.
Even though I feel like I sort of cheated by going the route of MusselBound over the traditional mastic, I am glad we did because it made the entire process so much faster.
If you have any other questions, take a look at the MusselBound page which has a lot of details and information.
Before I leave, here is a little backsplash before and after of the kitchen. Can’t wait to show you the rest of the kitchen!!
Other Home Improvement Projects You Might Enjoy –
- How to refinish cabinets without sanding using gel stain
- How to replace a kitchen faucet for newbies
- How to install Vinyl Plank Flooring
Anika's goal is to inspire and empower beginners with woodworking, DIY, home improvement, and home decor ideas.
She wants everyone to unlock their creative potential and experience the feeling that comes with making something. Nothing feels better better than seeing something and saying "I can make that!"


An adhesive tile mate makes these awesome designs so much easier! Good luck with the rest of your project, looking forward to following along!