How to Make a Wooden DIY Kitchen Drawer Organizer
Learn how to build a custom wood DIY kitchen drawer organizer. Perfectly sized-compartments, easy assembly, and a professional finish help keep your utensils neat and organized!

Let’s be honest—kitchen drawers can get messy fast. Between utensils, gadgets, and random tools, it’s easy for everything to turn into a jumbled mess.
Store-bought organizers can help, but they never seem to fit quite right or hold everything you need. They’re often too small, leaving awkward gaps in the drawer, or they don’t have the right compartments for your unique mix of tools and gadgets. Sometimes, you end up sacrificing functionality to make something pre-made work—and let’s face it, that’s frustrating!
That’s exactly why I decided to build my own DIY kitchen drawer organizer—and it’s been a total game-changer.
Before I made this, my kitchen drawers were a bit of a disaster. The silverware drawer wasn’t “too bad” but you can see the mismatched organizers that I tried to use and make work.

But the other drawer of random tools was a total disaster.

Using just a few materials, like 1/4″ oak hobby boards and some basic tools, I built a custom organizer that fits my drawer perfectly and keeps everything neatly in its place.
The best part is that it is removable, so if your needs change in the future, you can easily take it out and switch things up.
It took me about an hour to build. It’s affordable and beginner-friendly, and it is incredibly satisfying to see how much better my drawers look now.
***This post contains referral or affiliate links. It is a way for this site to earn advertising fees by advertising or linking to certain products and/or services. Please read my full disclosure here ***
Materials Needed
- 1/4″ oak hobby boards (2.5″ wide). I used oak because it is durable and won’t get scratched.
- Wood glue
- 1-1/4″ Pin nails
- Sandpaper (optional for smoothing edges)
- Top coat (polyurethane or similar) – to protect the wood and make it easy to wipe. I used this one.
Tools Needed
- Miter saw (or a miter box)
- Pin nailer
- Measuring tape
- Clamps (optional but recommended)
How to Make the DIY Wood Drawer Organizer
Before you start building your organizer, take everything out of the drawer. Sort through your utensils and tools.
Toss or donate anything you don’t use anymore to make space for the tools and gadgets you actually reach for. Do you really need that lone spoon or the rusty pizza cutter hiding in the back? Probably not.
Step 1: Measure and Plan
The first step is to measure your drawer and plan out the layout of the compartments. This will make sure the organizer fits perfectly and meets your specific needs.
- Use a measuring tape to measure the inside dimensions of your drawer. Be precise—an organizer that’s even slightly off can shift around or not fit.
- Subtract 1/8 inch from the width and length measurements to give a little wiggle room when inserting the organizer into the drawer.
- Lay out your utensils and tools directly in the drawer to visualize the space they’ll take up. I have seen people use painter’s tape, but I am not a fan of that because painter’s tape is very wide and can be misleading.

Step 2: Cut the Boards

See how to use a miter saw here.
See how to use a miter box here.
If you’re building compartments of varying sizes, cut all pieces for one section at a time to keep things easy to reproduce and track.
- Lightly sand the cut edges with fine-grit sandpaper to remove any splinters or rough spots.
- Before assembling, test the fit of the pieces by placing them in the drawer. Adjust as needed.
TIP: If you’re unsure about a measurement, cut slightly longer; you can always trim down, but you can’t add wood back.
Step 3: Assemble
- Apply a thin line of wood glue along the edges where the boards will meet.
- Use a speed square to make sure that all the boards are perpendicular.

- Hold the pieces together and use a pin nailer to secure them. Pin nails are perfect for this because they leave small, almost invisible holes and hold the boards together as the wood glue dries.

NOTE: Be mindful of the alignment when using the pin nailer to avoid the nails coming out the sides.
I found it easiest to start by aligning the top of the boards and securing it with a pin nail. Then, flip the piece over so the bottom edge is now at the top, and add a pin nail there for extra stability. This makes sure everything stays straight and secure during assembly.
If you don’t have a pin nailer, you can use instant-dry glue to assemble the boards. Just keep in mind that this type of glue sets very quickly, so you won’t have much time to adjust or fix any alignment issues. Be extra careful to position the boards correctly before pressing them together!
- If any parts of the organizer feel unstable or don’t stay in place while drying, use clamps to hold them tightly together while the glue dries. Be careful not to overtighten, as it can warp the wood.

Wood glue typically takes 20-30 minutes to set, but for maximum strength, let it cure for at least 24 hours. Check the label on your glue for specific drying times.
Step 5: Seal the Wood
- Use a foam brush or brush to apply a couple of thin, even coats of the top coat. I used this top coat.

A good top coat protects the wood from moisture, stains, and daily wear and tear, especially in a kitchen drawer. It also gives the wood a smooth, wipeable finish that makes cleaning up spills or crumbs easy.
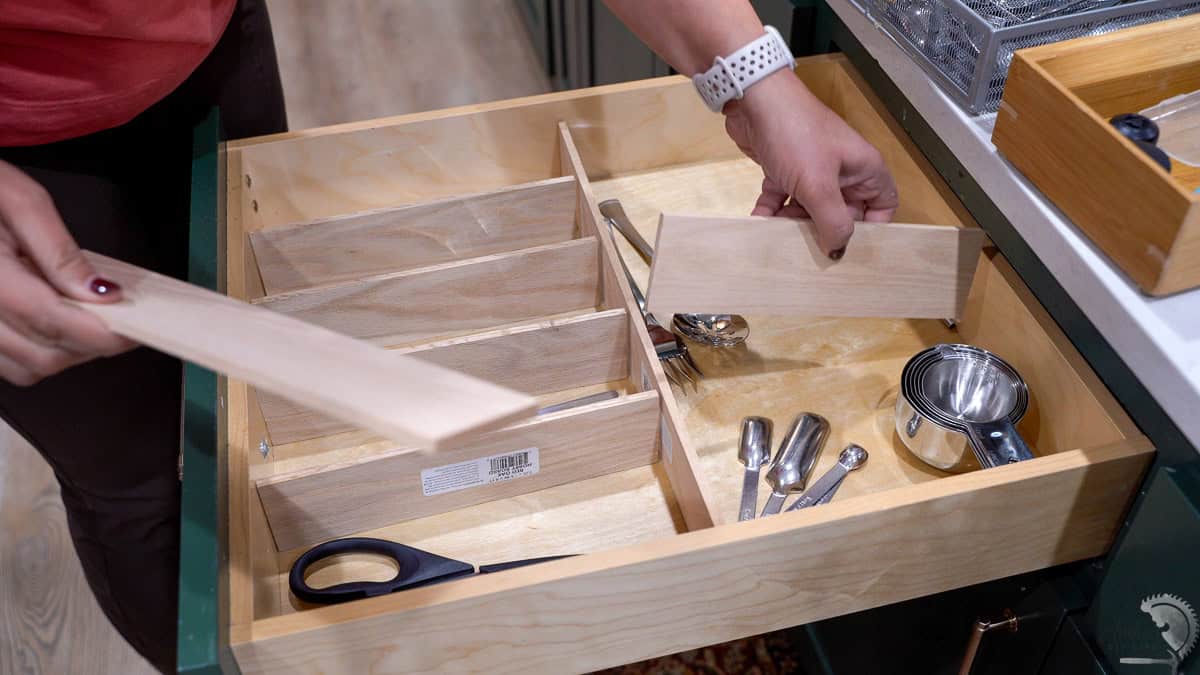
Once the top coat has cured (see the label for this), it is time to put it all together.
I built one for my silverware drawer.

And I built one for the “random tools” drawer.

There’s nothing quite like the feeling of opening a drawer and seeing everything perfectly in its place. No more digging around for that one missing spatula or dealing with jumbled utensils—it’s all right there, neatly organized and easy to find.

The custom-made organizer doesn’t just make your drawer functional—it gives it a polished, professional look that store-bought mix-and-match organizers just can’t match.
See how I redid my entire kitchen from an old 80’s look to a more functional and fun version.
I am in the process of redoing a bunch of organization in my kitchen, so stay tuned for the next few projects!
You might also like:


Anika's goal is to inspire and empower beginners with woodworking, DIY, home improvement, and home decor ideas.
She wants everyone to unlock their creative potential and experience the feeling that comes with making something. Nothing feels better better than seeing something and saying "I can make that!"