DIY Lego Table With Storage for Small Spaces
Learn how to make a DIY Lego Table with Storage and folding sides with the detailed tutorial and plans. This table is perfect for small spaces.
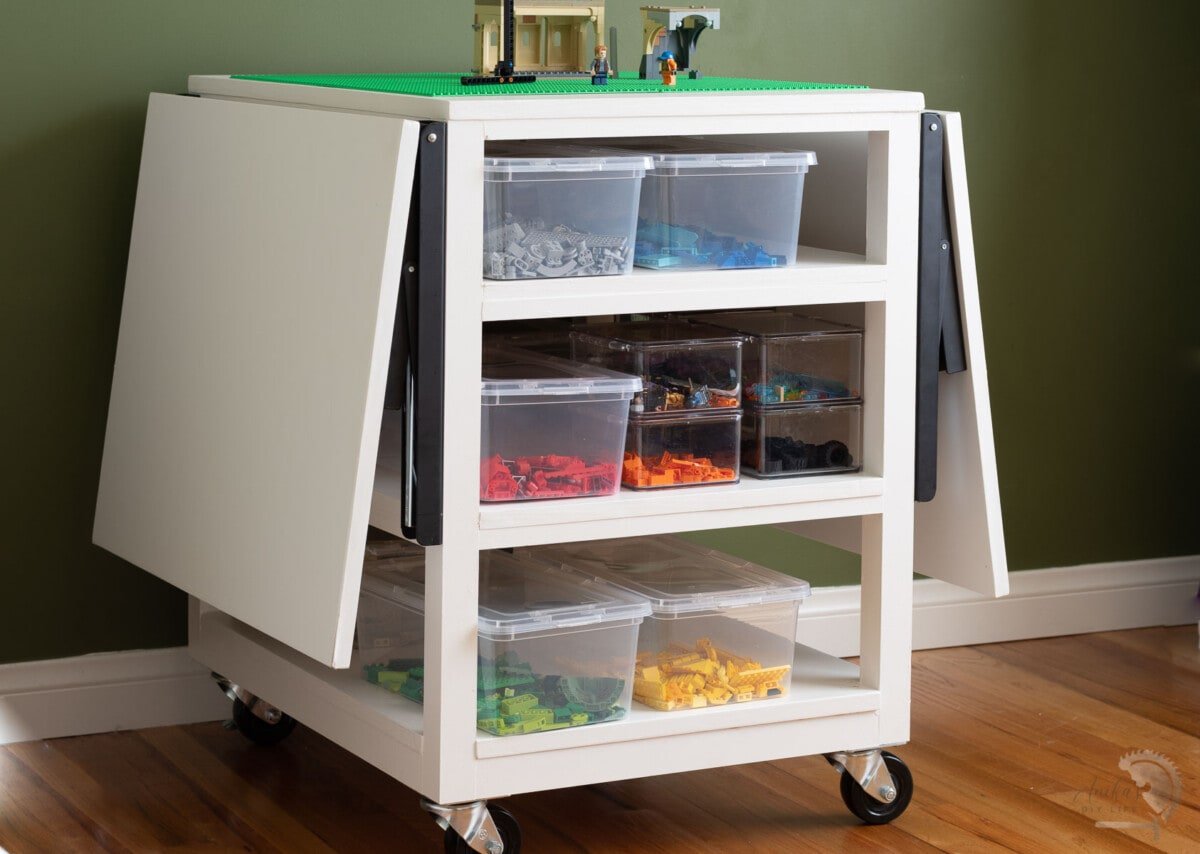
I have been slowly working my way through (re)organizing my son’s room to accommodate his changing tastes as he grows.
I built him a rotating bookshelf a few months ago to conquer the piles of books. The next pile that needs to be addressed is his Legos.
Lego Storage
Up until now, we have always stored Legos by sets. This worked wonderfully with my daughter because she is careful not to mix sets.
But my son is the exact opposite. Now we have sets that have mixed or missing pieces, and everything is a bit of a mess which is keeping him from building.
Plus, if he has access to all the Legos easily, I am quite sure it will spark more creativity.
So, let’s give the legos a whole new life and home!
***This post is sponsored by The Home Depot as part of the #THDProSpective program. Thank you for supporting the brands that help me bring you new projects.***
DIY Lego Storage Cart
I wanted this Lego table to be large enough to use and easy enough to get out of the way when needed.
Features of the Lego storage cart:
- Has storage and can hold up to 12 shoebox-sized bins
- Has casters to move it around
- It has folding extensions on two sides, allowing triple the work surface when needed.
- Standard desk height which means an additional chair can easily convert it to a desk.
- Built with plywood and dimensional lumber.

Material Needed
- Lumber per the plans – plywood, 2×2 and 1×2
- Diablo 12″ 100-Tooth Ultimate Polished Finish Circular Saw Blade
- Diablo 7 1/4″ 60-Tooth Fine Finish Circular Saw Blade
- Diablo 5 in. SandNet Coated Assorted Discs
- Diablo Top and bottom cut jigsaw blades
- Swivel Casters
- Fold-down table brackets
- 1 ¼″ pocket hole screws
- wood glue
- wood filler
- 1 1/4″ finish screws.
- Stain or primer and paint per your choice
- Lego base plates
- E6000 adhesive
Tools Needed
- Miter saw
- Circular saw
- Random orbital sander
- Jigsaw
- Power drill
- Pocket hole jig. I used this one.
Printable Plans for the Lego Storage Cart
As always, I have printable plans with detailed drawings and step-by-step instructions available for you. Click the button below to have them sent directly to your email.
How to Build
Step 1: Make the Cuts
Make all the cuts in the plywood and dimensional lumber per the plans.
Cutting plywood
To keep this build simple using basic tools, I cut down all the plywood using a circular saw.
A circular saw cuts in the up-stroke leading the top surface to be splintered. It is often recommended to place the good side down, but that can make getting the right measurements a little bit complicated.
The key to getting the perfect cut on plywood with no tear-out on either side is using a blade with the right number of teeth.
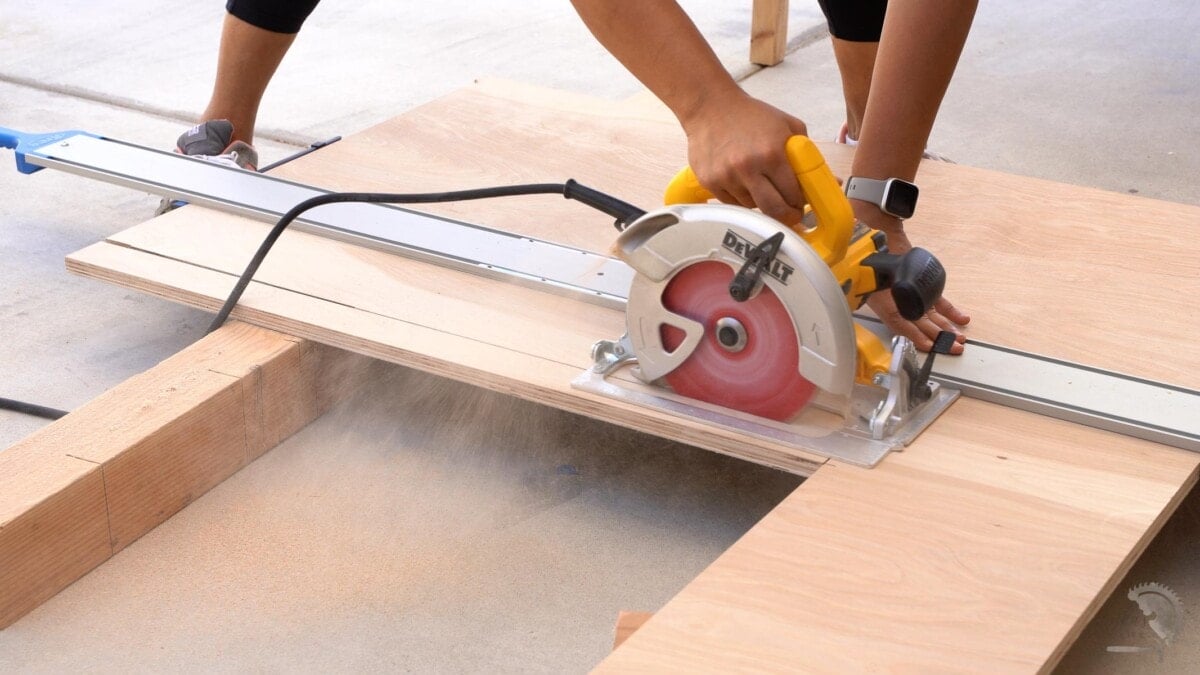
I used the Diablo 7 1/4″ 60-Tooth Fine Finish Circular Saw Blade in my circular saw for a nice clean cut on both faces of the plywood.
- It can also be used to crosscut oak, pine, melamine, and delicate molding!
- It has a thin laser cut kerf which helps with fast, durable, and clean cuts.
- It has laser-cut heat expansion slots that lead to a true straight cut.
- The tri-metal shock-resistant brazing and hardened steel body help with longer life and durability.
Cutting dimensional lumber
While a circular saw works perfectly to cut dimensional lumber as well, I like using a miter saw because it gives me better precision and control.
Dimensional lumber can also suffer from small amounts of splintering and tear-outs on the cuts if the right blade isn’t used. I almost always have to use a sanding block to clean up the cut.

BUT the Diablo 12″ 100-Tooth Ultimate Polished Finish Circular Saw Blade is absolutely insanely amazing! It works perfectly for fine molding, hardwoods, softwoods, veneered plywood, melamine, and more.
Not only does it cut with butter, but the cut surface is also super smooth – like it has been sanded by 220 Grit!

It also has ultra-thin kerf for less wasted material and smooth performance and stabilizer vents to trap noise and vibration for precise and clean cuts.
Step 2: Sand and Prepare the Boards
- Sand faces of the boards before assembly starting with 80 grit down to 220 grit using a random orbital sander and Diablo 5 in. SandNet Coated Assorted Discs.
- Cut 1.5″ squares out of the corners of the shelf using a jigsaw.

- Apply edge banding to the edges of all the plywood.
Edge banding is a thin plywood veneer with hot melt glue. This can be applied using a household iron. The extra overhang can be sanded off for a seamless look.
Sandnet coated sanding discs
I have recently started using the Diablo 5 in. SandNet Coated Assorted Discs, and I am a huge fan.
They have a much longer life due to the net design, but even better, they can be cleaned with a vacuum or washed and reused!

I was able to sand all the boards using 2 SandNet Coated discs (one 180 Grit and one 220 Grit).
While applying edge-banding to the plywood, sanding discs get gummy and dirty much faster because of the adhesive. I used three 120 grit discs and rotated through them, washing them in between. Each of the discs was washed and used twice. That’s 3 discs instead of 6 or more that would have been used otherwise.

Step 3: Make Pocket Holes
- Make the pocket holes in 2×2 boards per the plans with the Kreg Jig at the 1 1/2″ setting.
- Make the pocket holes in 1×2 boards with the Kreg Jig at 3/4″ setting.
See more about how to use a pocket hole jig.

Step 4: Build the Structure
The structure is pretty straightforward to build.
- Start by attaching the 2×2 boards to form the legs and the base using pocket hole screws and wood glue.

- Add the plywood shelf and attach to the base using wood glue and finish nails.

- Attach the next level of 1×2 boards followed by another plywood shelf.
- Repeat until all 3 shelves are in.
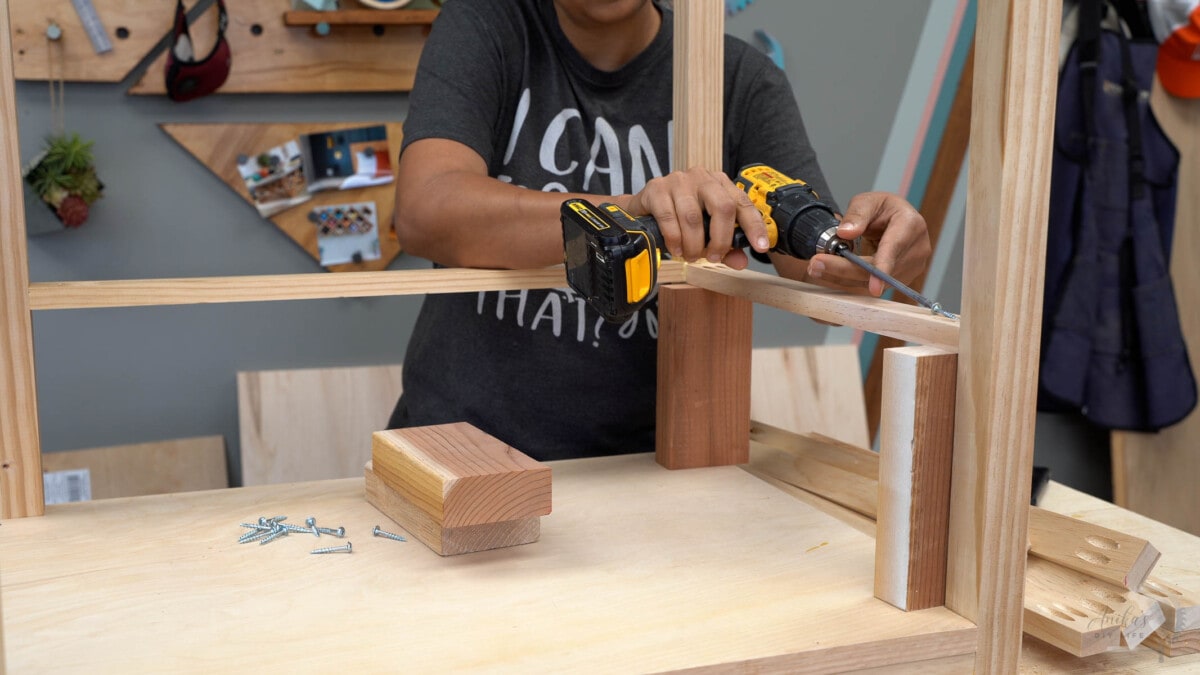
Tip: Cut up a few scrap 2×4 or similar boards to the shelf spacing to use as spacers to support the aprons. This ensures that all the aprons are even.
Step 5: Add the Top
- Attach the top plywood using countersunk screws from underneath. I like using these finish screws.
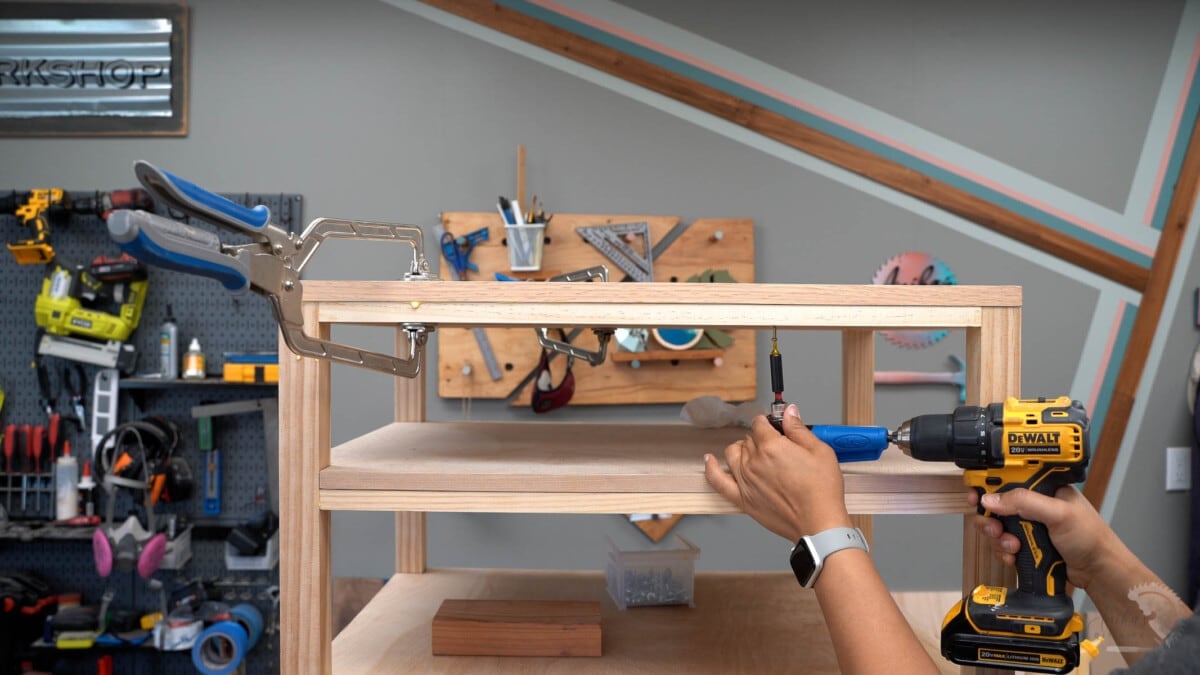
You can also use finish nails from the top, but they must be filled. Instead, I used a right-angle driver and added a few finish screws.
Step 6: Paint or Stain
This is the perfect time to paint or stain the cart and the two wings in the color of your choice.
Be sure to look at my guide to painting unfinished wood before painting it.
Step 7: Add the Hardware
- Add heavy duty casters to the bottom of the table.

I added 2 locking swivel casters and two regular swivel casters.
- Add the folding table brackets per the instructions using 1 1/4″ screws to attach to the 2×2 sides and 3/4″ screws to attach to the plywood top.

That’s it!
We added Lego plates to the top and loaded the cart with the Lego bins using E6000 adhesive. You could also add the Lego plates on the folding sides, but we opted not to, so they can be used for more than just building Legos – like crafting or doing puzzles.

When the kids want to build Legos, they can simply move the Lego table to the middle of the room, open the sides to make a huge area and build.
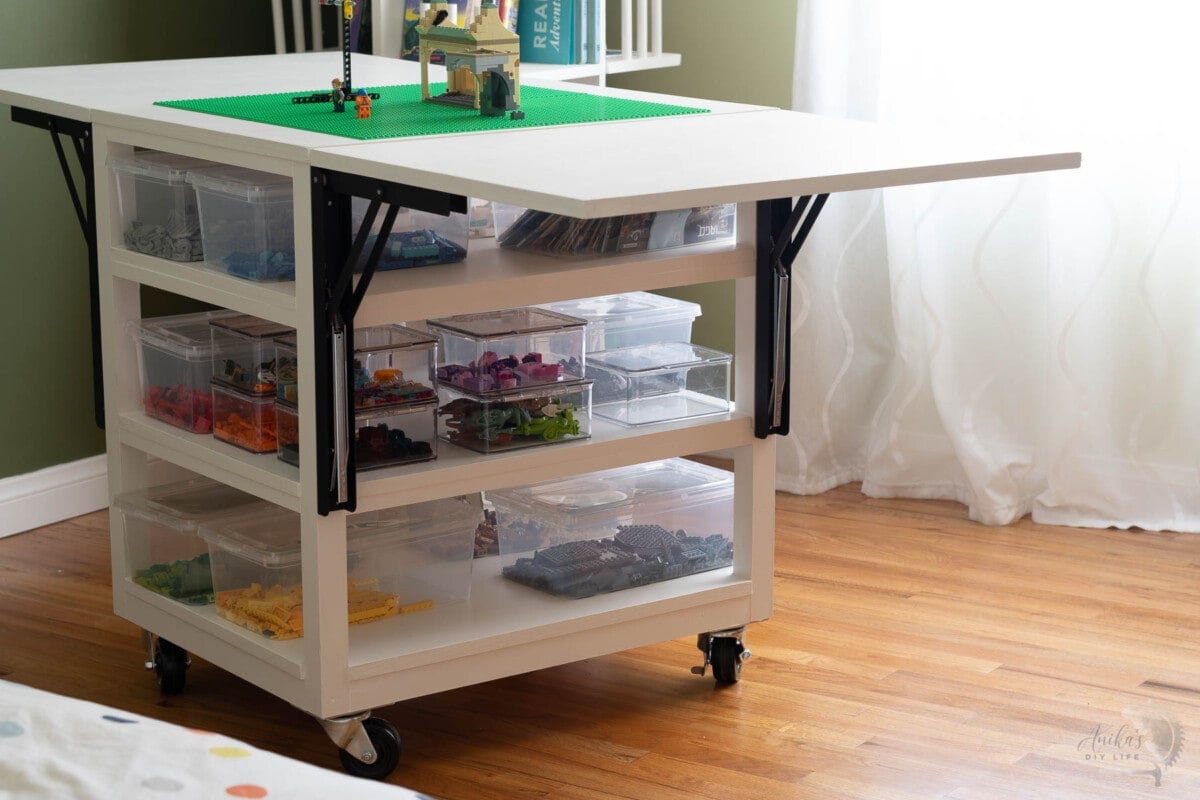
No more explosion of Legos on the floor… or so I think. We will find out 🙂
Printable Plans for the Lego Storage Cart
As always, I have printable plans with detailed drawings and step-by-step instructions available for you. Click the button below to have them sent directly to your email.
More Lego Ideas:
- If you want a smaller quick Lego building area, here is how you can easily convert a folding table to a Lego table.
- If you have space for a larger table, check out this large Lego table hack using Ikea pieces.
- Need to have a Lego-themed party? Here are some fun ideas.
You might also like:

Anika's goal is to inspire and empower beginners with woodworking, DIY, home improvement, and home decor ideas.
She wants everyone to unlock their creative potential and experience the feeling that comes with making something. Nothing feels better better than seeing something and saying "I can make that!"





Can’t get the plans when I click on the button. Have tried other ways to get the plans online, but was unable to. I LOVE this little cart!
Hi Maj, There was a slight technical difficulty for a couple of hours. The forms are working now. Please try again. Thanks!