Easy 3-Drawer DIY Dresser
Build a simple 3-drawer DIY dresser with these detailed plans and tutorial. It makes a great project for a beginner woodworker.

Building a DIY dresser is a great project for beginner woodworkers. It helps understand the basic concepts – building boxes because 90% of woodworking is all about building boxes and a dresser is just a few boxes inside a box.
Building this dresser will help you understand the concepts of square, aligning, and installing drawers.
I collaborated with Tylynn from Bitterroot DIY for this dresser. I designed and drew up the plans and she built it!
The great thing about this project is that:
- it uses basic plywood and lumber available at the home improvement store
- uses basic power tools – a drill, miter saw, circular saw, nail gun
- can be customized with paint or stain to match your decor
AND if you need a larger dresser, be sure to check out the matching DIY 5-drawer dresser.
***This post contains referral or affiliate links. It is a way for this site to earn advertising fees by advertising or linking to certain products and/or services. Please read my full disclosure here ***
Material Needed
- Lumber per the plans
- 1¼” finish nails
- Wood glue
- 1¼” pocket hole screws
- 2½” pocket hole screws
- 2″ wood screws
- Kreg Rip-Cut Guide (optional but highly recommended)
- Kreg straight edge guide or homemade guide.
- Edge banding
- 14″ drawer slides
- Right-angle clamp
Tools Needed
- Power Drill
- Circular saw
- Miter saw
- Nail gun
- Pocket hole jig.I used Kreg 720. See which Kreg Jig is right for you.
- Iron (for the edge banding)
Plans for the DIY Dresser
This simple dresser uses basic boards and plywood, which you should be able to buy easily from your local home improvement store. You can get the plans by clicking the button below
How to Build the Dresser
When you build this dresser, be sure to use an anti-tip kit to keep is safe and attached to the wall.

Tylynn has the step by step pictures of her building the dresser. I outline the process below.
Step 1 – Make Cuts
Cut the boards and the plywood per the plans.
See my tutorial on how to use a miter saw to accurately cut boards.
Cutting plywood –
I like to have larger sheets cut down to a reasonable size at the store (most stores will do that for you). Usually, it is to get it to fit in the car because they aren’t very accurate at the store.
At home, I use my circular saw with a Kreg Jig rip cut or a homemade straight edge jig to make smaller more accurate cuts. More details on that coming soon.
Of course, if you have a table saw, you can totally use that!
Step 2 – Build Sides
Make pocket holes in the plywood and and attach to the 2×2 legs using pocket hole screws and wood glue to build the two sides.
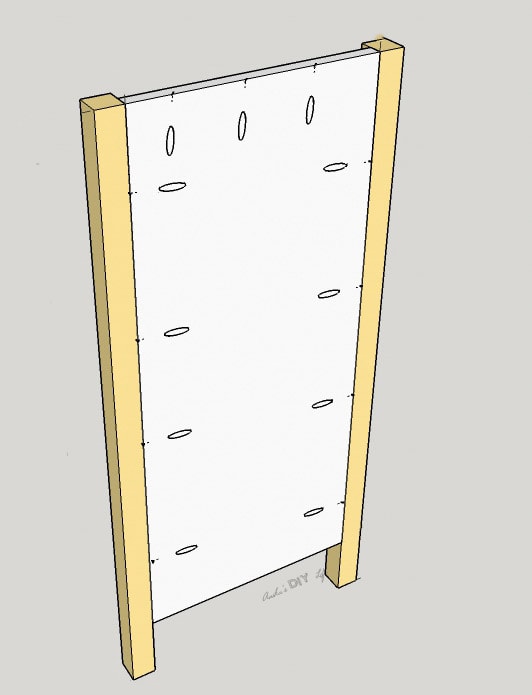
Attach trim to the sides using wood glue and finish nails.
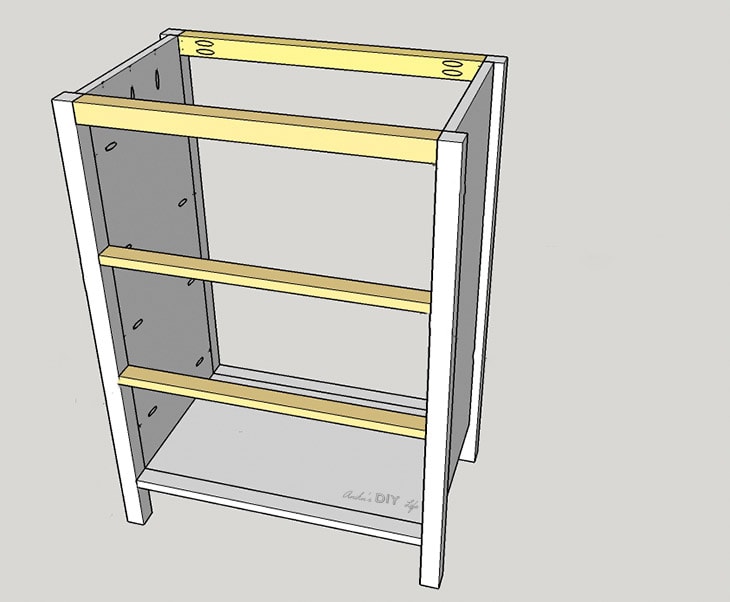
Step 3 – Add Bottom
Build bottom using plywood and 1×2 and attach to both the sides.

Step 4 – Add Rails and Dividers
Attach the 1×2 rails and drawer dividers between the two sides to build the carcass of the dresser.
Step 5 – Build the Drawers
Build the three drawers as per the plans and install them.
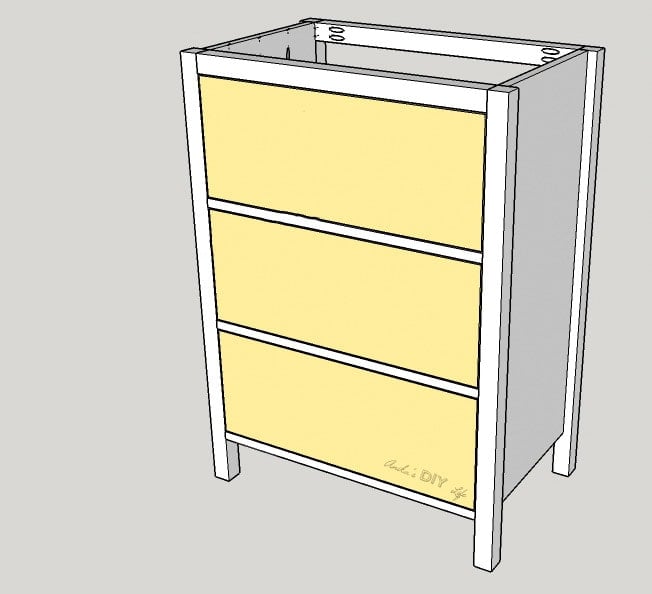
Nervous about building drawers? Take a look at my guide to building drawers for beginners.
Step 6 – Build and Install Top
Build the top using plywood and 1×2 boards and install by attaching with pocket hole screws and wood glue.
Of course, the top is installed with the drawers removed.
Step 7 – Finish
Paint or stain the dresser in the color of your choice.
If you decided to paint it, be sure to check out my guide to painting unfinished pine furniture to get long lasting results.
That’s it!
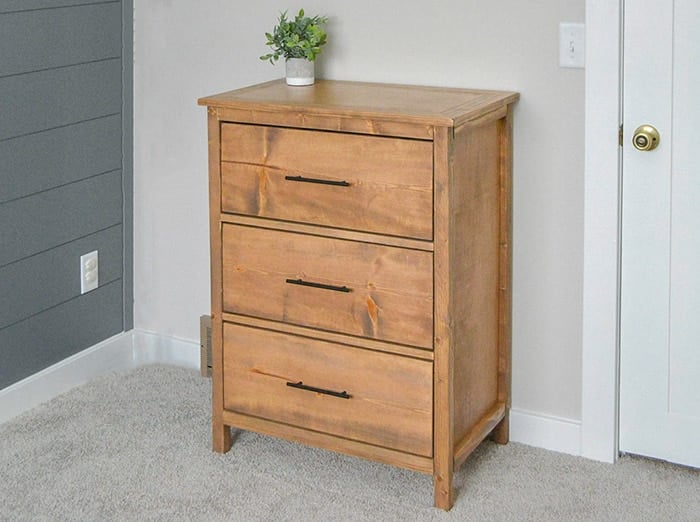
Tylynn did an amazing job on this dresser.
I love the stain color she picked too!
Be sure to visit Tylynn’s blog, where she shows you all the steps to build this dresser and shares many more pictures.
If you are ready to build the dresser, get the plans to build it below!
Plans for the DIY Dresser
You can get the plans by clicking the button below
Thanks to Tylynn for collaborating on this project. Stop by Tylynn’s blog for all the building details and tips!
Happy building!
More Like This Simple Dresser


Anika's goal is to inspire and empower beginners with woodworking, DIY, home improvement, and home decor ideas.
She wants everyone to unlock their creative potential and experience the feeling that comes with making something. Nothing feels better better than seeing something and saying "I can make that!"


I love this. Thank you so much for sharing the plans with us. I have one question though, what are the finished dimensions of the dresser? I was trying to figure it out using the cutting chart, but I’m not doing a good job of it. LOL Thank you again for sharing this.
Hi Carol! The finished dimensions are 28 1/2″ x 17 3/4″ and 38″ high. The finished dimensions are shown on the first page of the plans. Let me know if you have any other questions!
Shouldn’t this be called a chest of drawers? I was taught that a dresser was called a dresser because it always has a mirror in which you may see how you look in what clothing you’ve picked out.
Ah! I didn’t even think about that!
LOL LOVE ALL THE TIME YOU PUT INTO HELPING THOSE OF US JUST STARTING OUT.
YOU ROCK!!!
I love everything about this dresser! It looks like it came from an expensive furniture store!