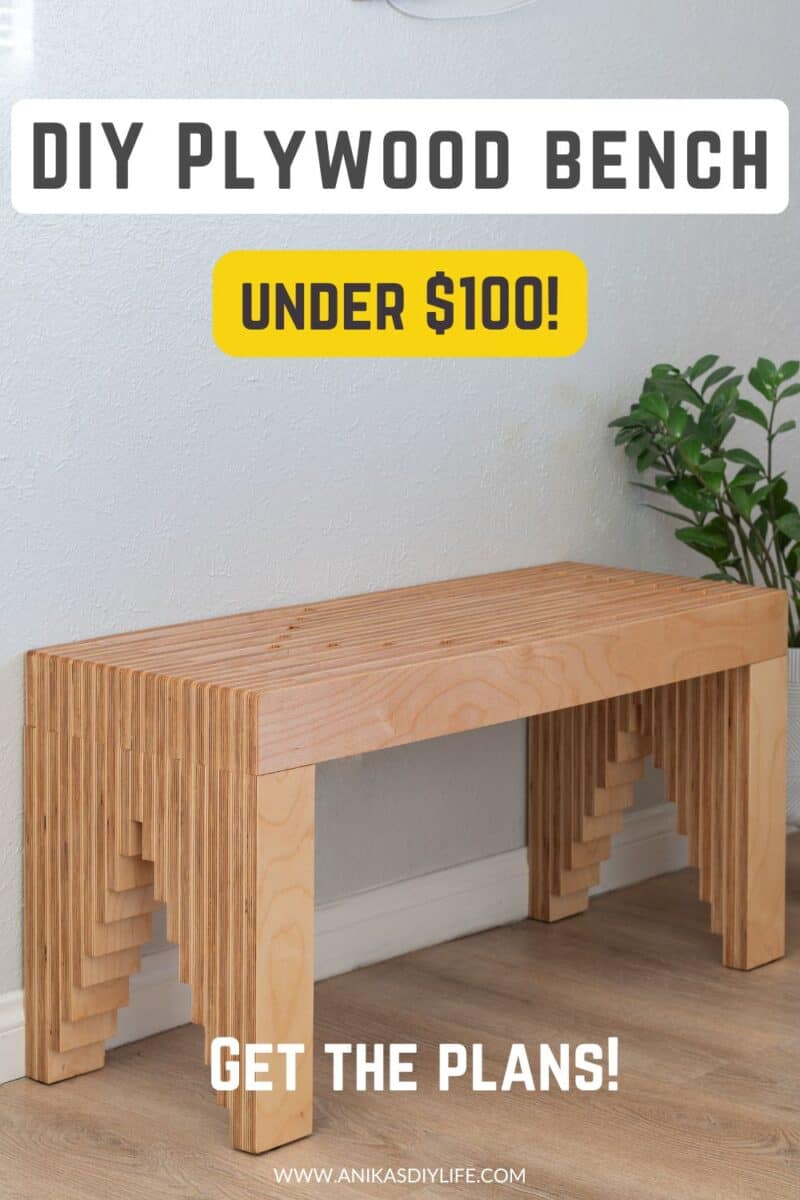
How to Build a Modern DIY Plywood Bench
Learn how to build a Modern DIY Plywood Bench and create a stunning stacked plywood design with exposed edges with this step-by-step guide.
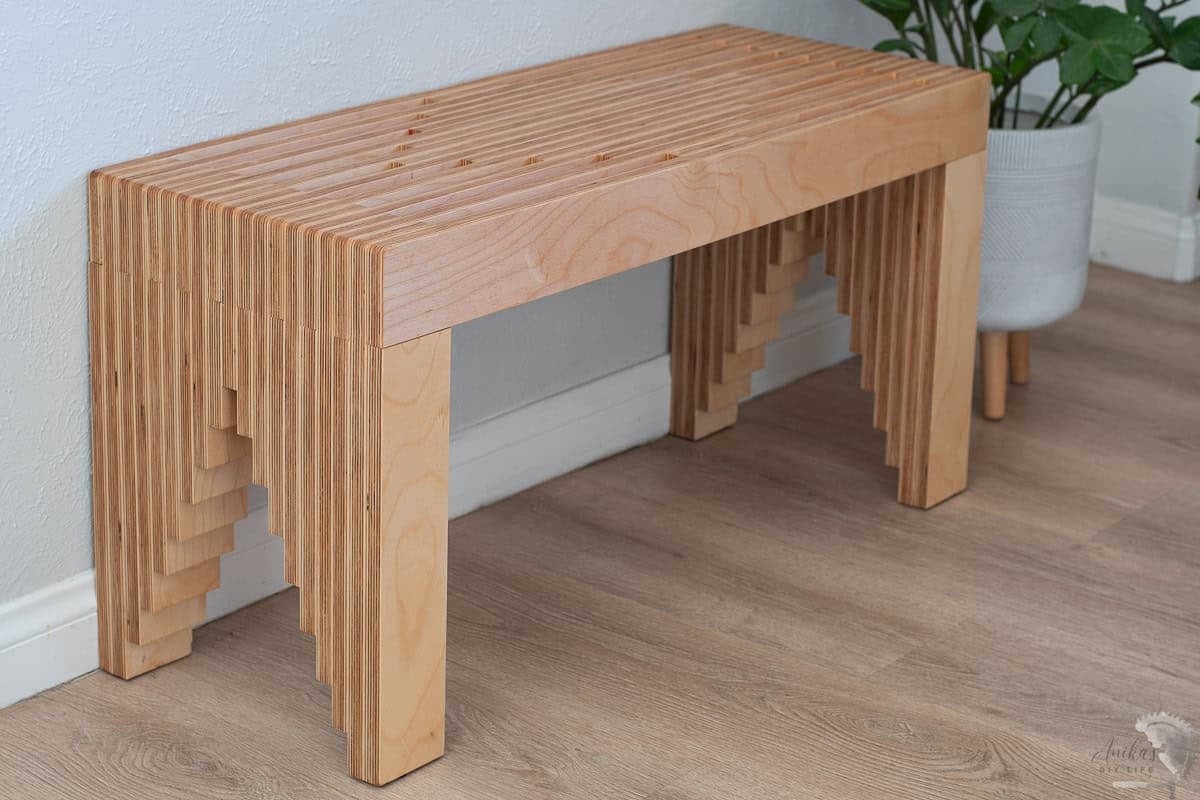
I have had a vision for this bench for over a year. I bought a single sheet of Baltic Birch plywood a long time ago, intending to turn it into something modern and cool. Finally, I stopped putting it off and turned that vision into reality.
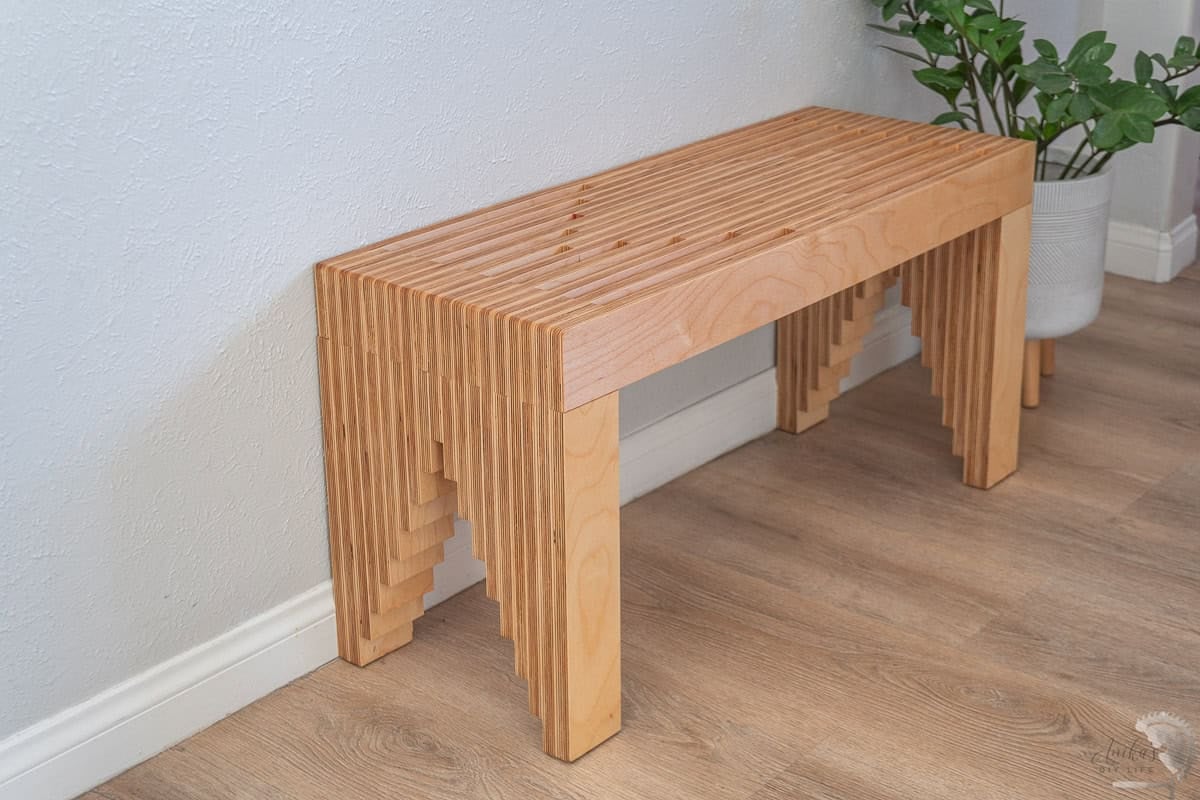
The best part? This entire high-end looking bench was built using one single 5×5 sheet of plywood and cost under $100 to make.
If you think you need a massive workshop or a fancy table saw to build designer furniture, this project is going to prove you wrong. I built this using a circular saw, a miter saw, and a nail gun. Instead of using complex joinery (like tenons or dovetails), we are simply cutting the plywood into strips and stacking them layer by layer.
***This post contains referral or affiliate links. It is a way for this site to earn advertising fees by advertising or linking to certain products and/or services. Please read my full disclosure here ***
Material Needed
- ¾” sheet plywood (I highly recommend Baltic birch plywood for best results)
- Wood glue
- Rip-cut
- 1 ¼” brad nails
- Sandpaper in various grit
- Glue roller
- Clamps
- Finish and top coat of your choice. I used boiled linseed oil.
Tools Needed
- Circular saw. What I used in this project | Beginner Option
- Miter saw. What I use | Beginner Option
- Nail Gun. What I use | Beginner Option
- Sander – What I use – I have had this since 2015 and still going strong!
- Router with round-over bit(optional)
Plans for the Plywood Bench
You can get the detailed step-by-step schematics, including the cut list and diagrams in the detailed plans by clicking the button below.
How to Build
As always, I have the detailed video of the build for you below. The written step by step tutorial follows below.
Step 1: Cut Down the Plywood
- Cut the plywood into strips.
I cut the plywood sheet down into 3 ½” strips using my circular saw with a Rip cut jig.
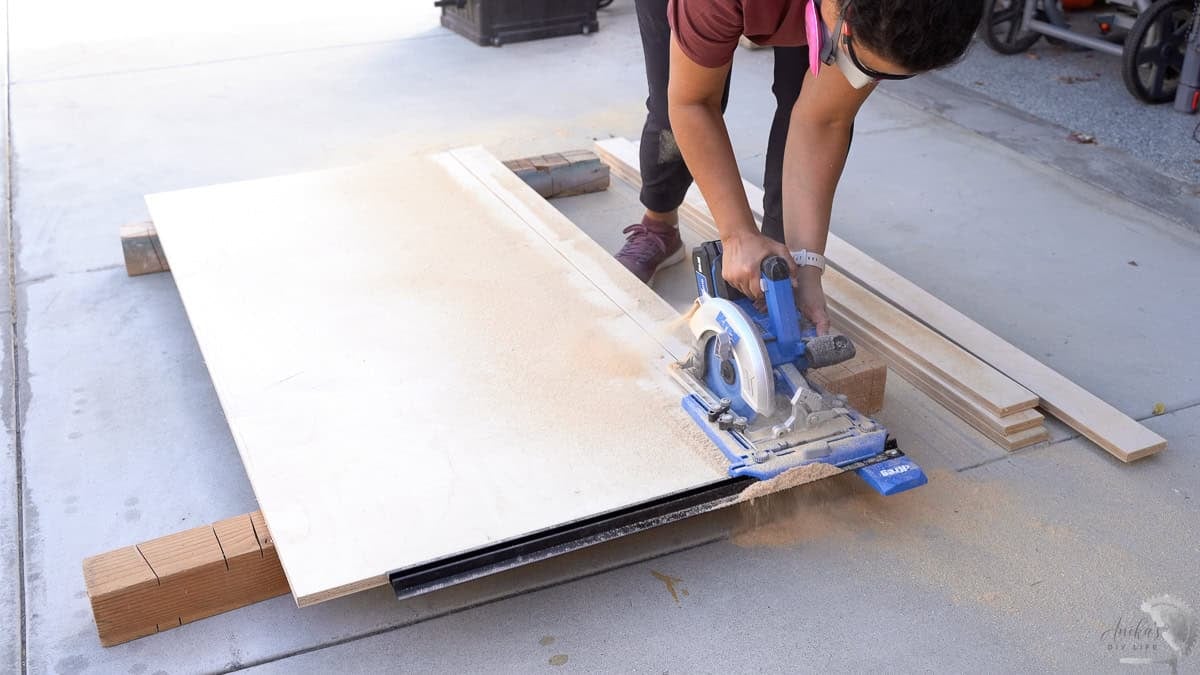
Note: I specifically chose 3 ½ inch width so that if you don’t want to use plywood, you can actually replicate this bench using standard dimensional lumber (like 2×4 or 1x4s).
- Cut down the strips into the smaller components.
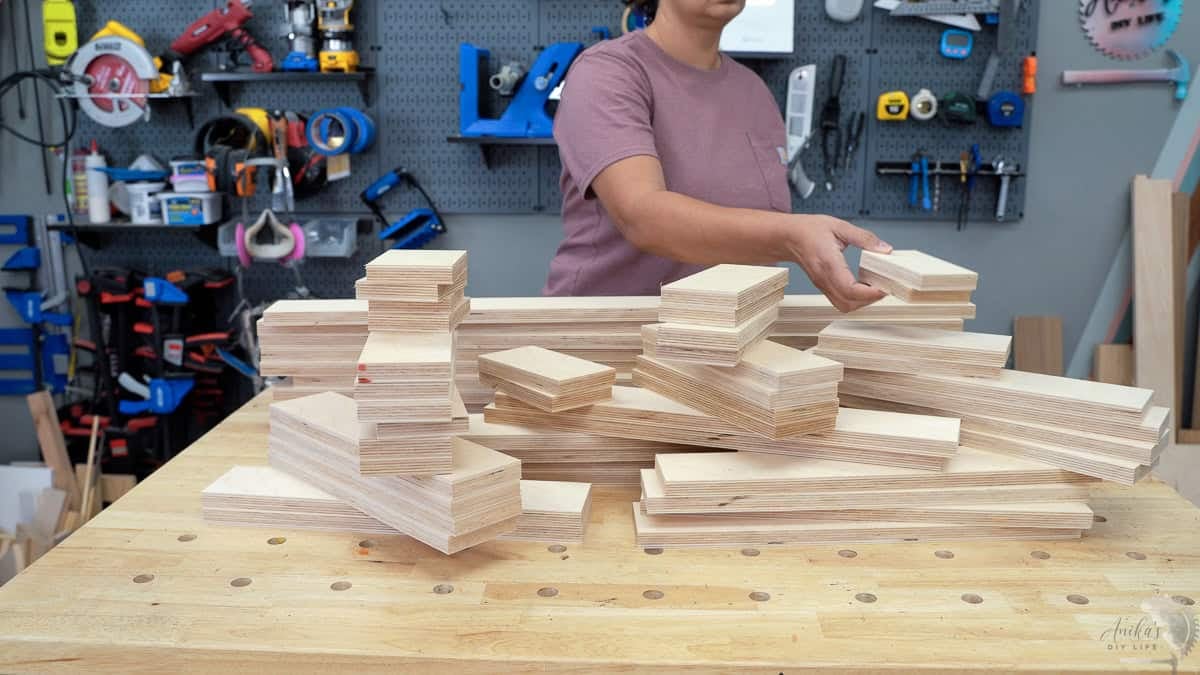
There are a lot of cuts involved, and many of them are very close in size but slightly different. I cannot stress this enough: Label your pieces! It is crucial to keep track so you don’t mess up the alignment later.
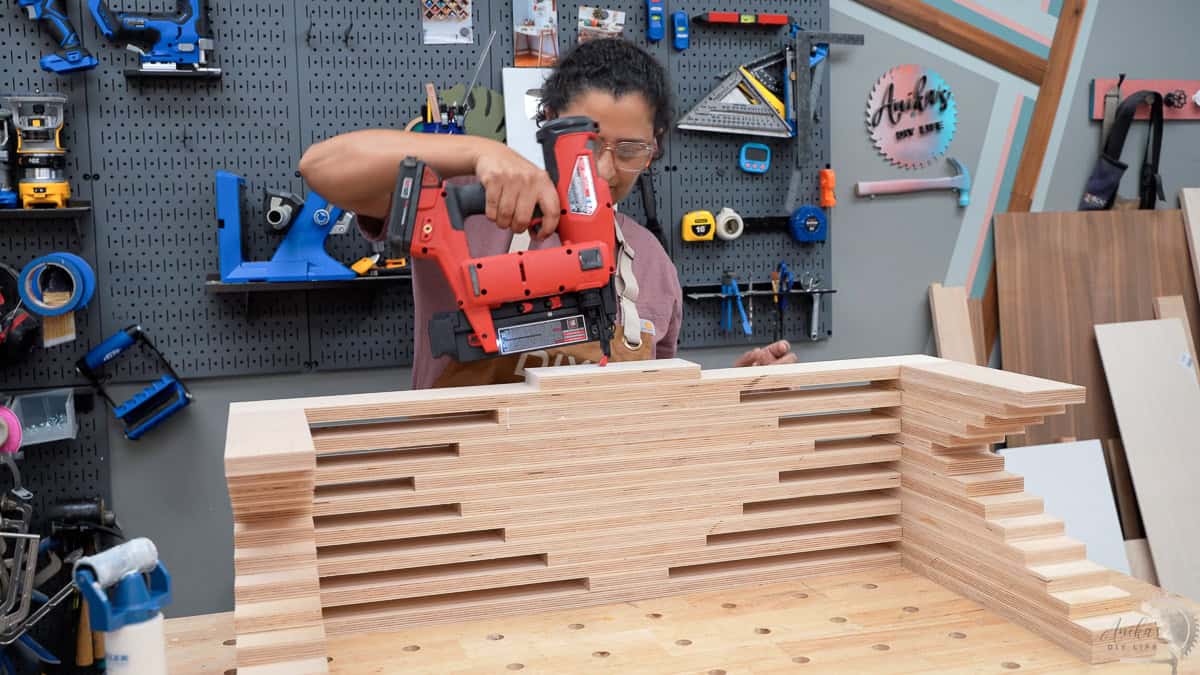
Step 2: Glue, Nail, Repeat
This is where the “meditative” work begins. The assembly is a repetitive process of applying glue, aligning the board, and nailing it to the previous layer.
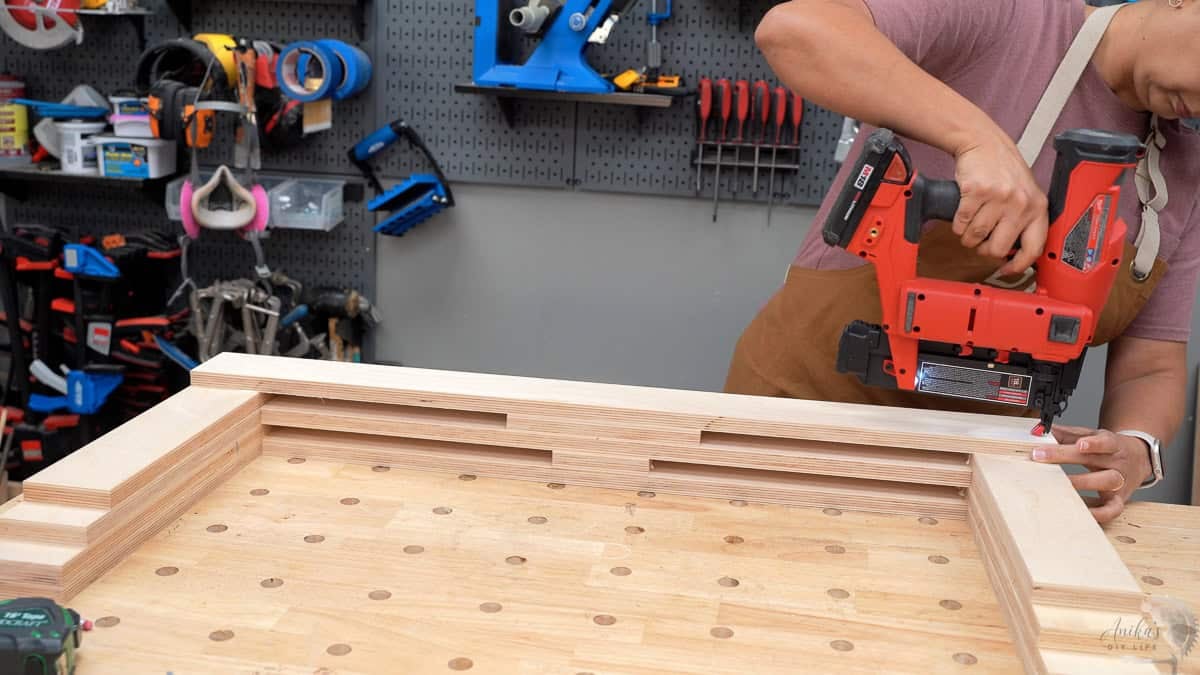
Important tips:
- Accuracy is Key: Your saw blade needs to be perfectly 90 degrees. If your cuts aren’t perpendicular, you will have a lot of unevenness to fix later.
- Wipe the Glue: You must wipe away glue squeeze-out as you build. Once the layers are stacked, it is nearly impossible to reach into those tight slats to clean it up.
Step 5: The Final Layer
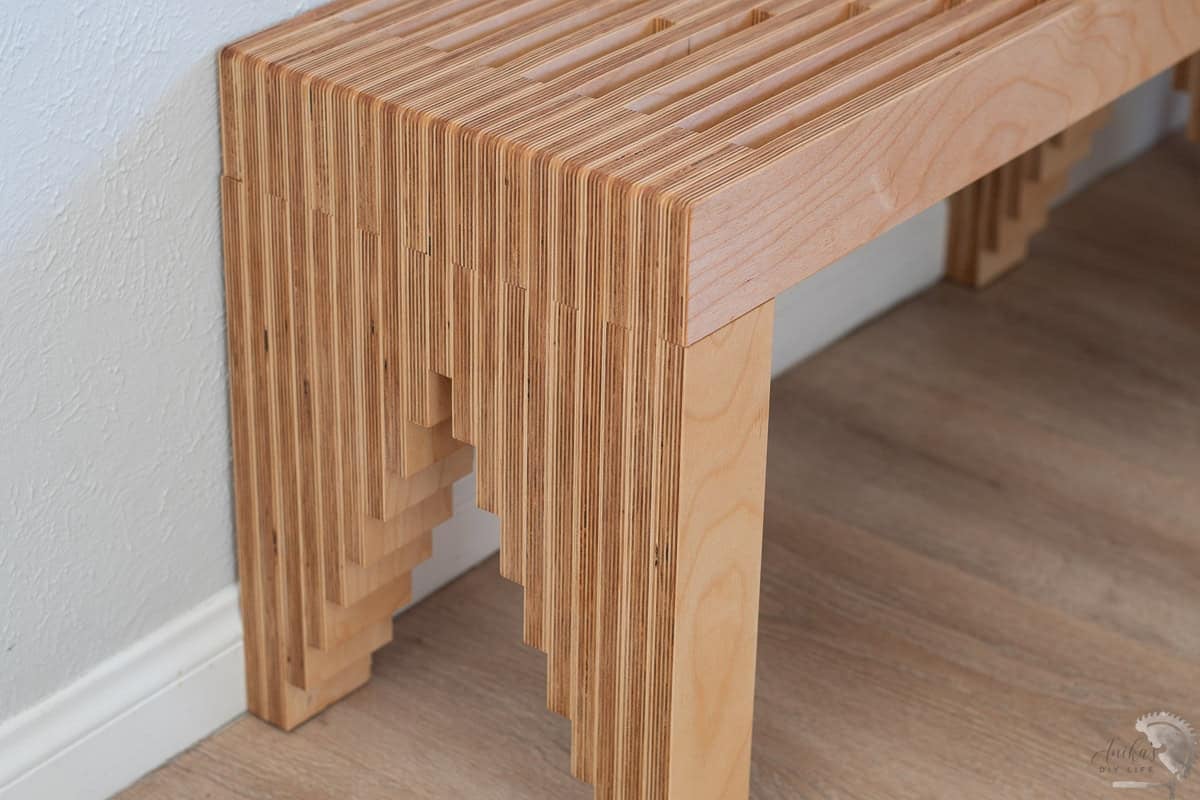
For the very last outer layer, I did not want nail holes visible. Instead of nailing this piece, I applied glue and clamped it heavily overnight. For the internal layers, the nails act as clamps, but for this “show” face, you want it clean.
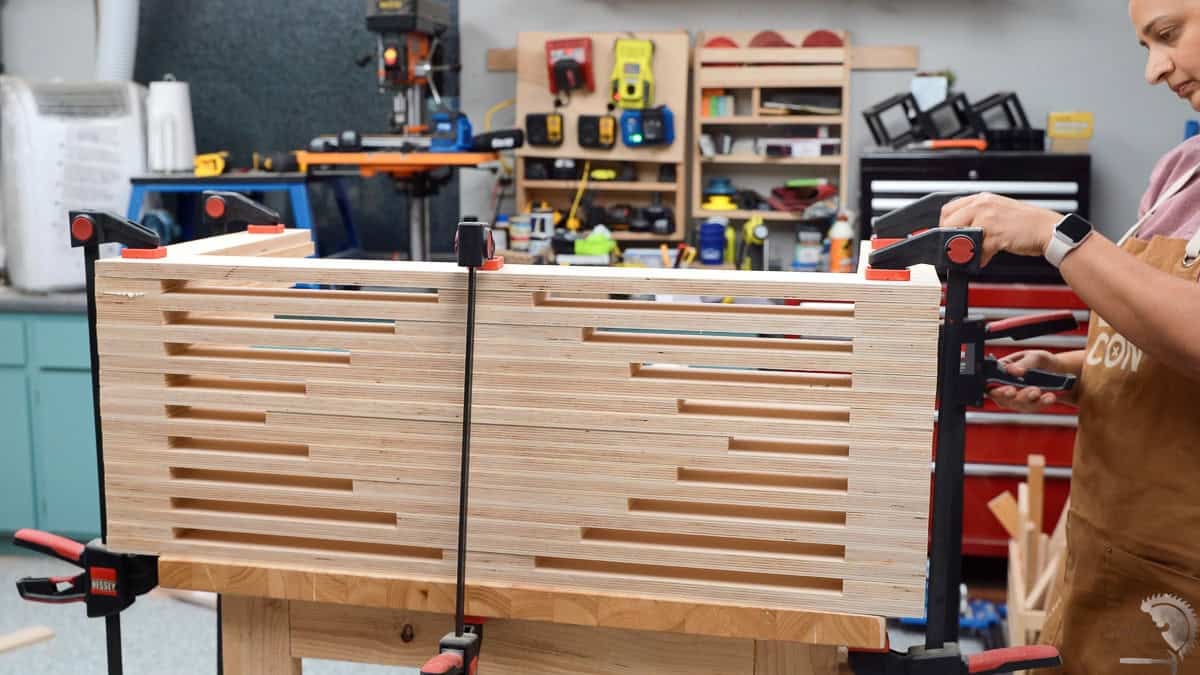
Alternatively, you can still use nails to speed up the process and make that the back of the bench and hide it. Your choice.
Step 6: Sanding and Finishing
- Sand down the entire bench smooth.
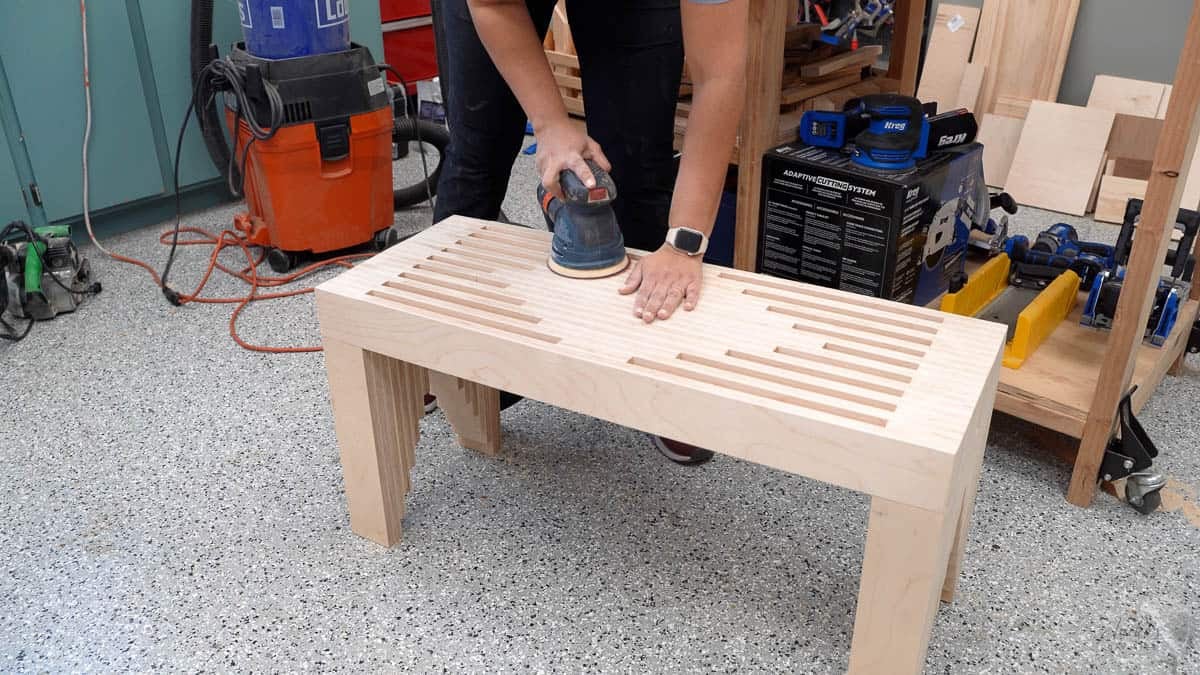
Despite trying my hardest to keep things aligned, there was some unevenness.
- I used a belt sander to speed up leveling the sides.
- I finished with the random orbital sander, going from 80 to 150 to 220 grit.
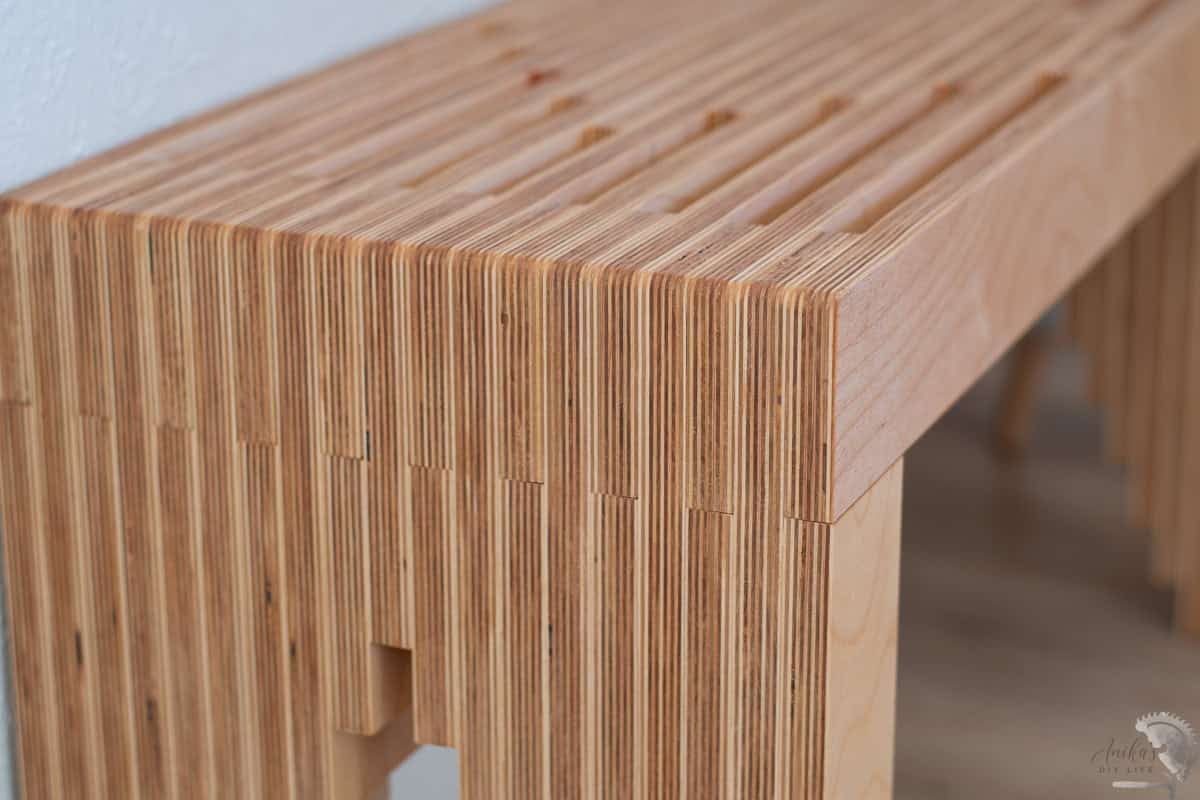
- For the edges – I used a router to round over the edges, but you can also just sand them by hand to soften the sharp corners. Just be careful to not create uneven edges.
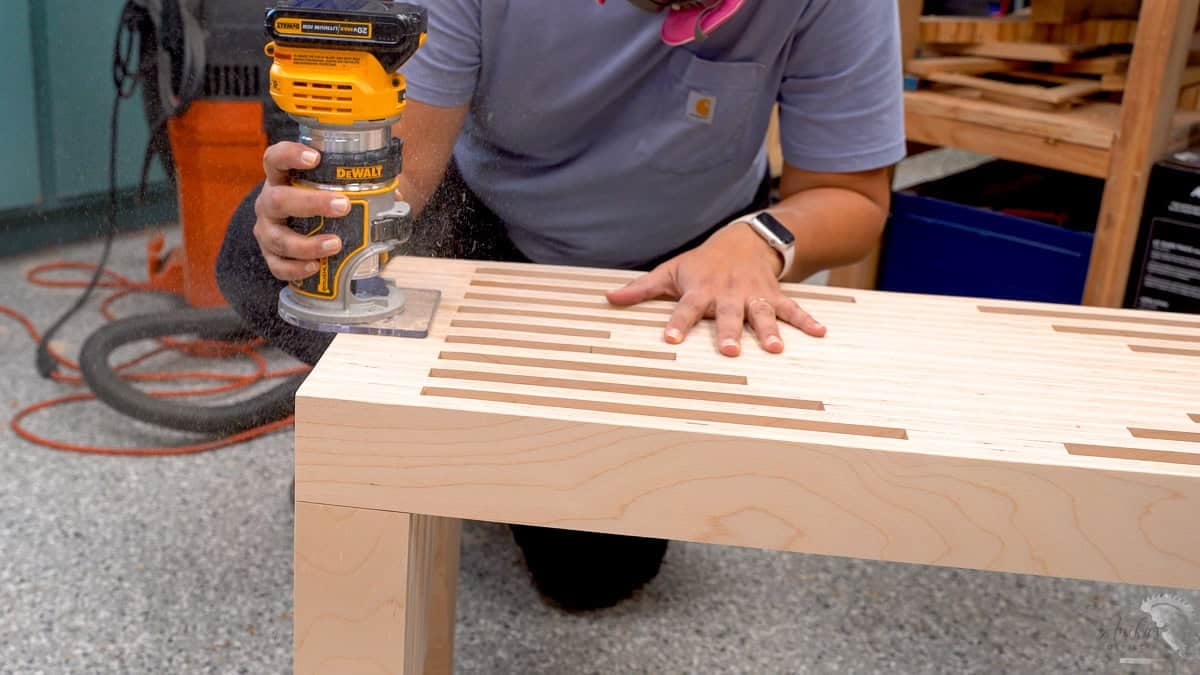
For the finish, I used Boiled Linseed Oil. It soaks into the wood, protects it, and makes those plywood layers pop beautifully.
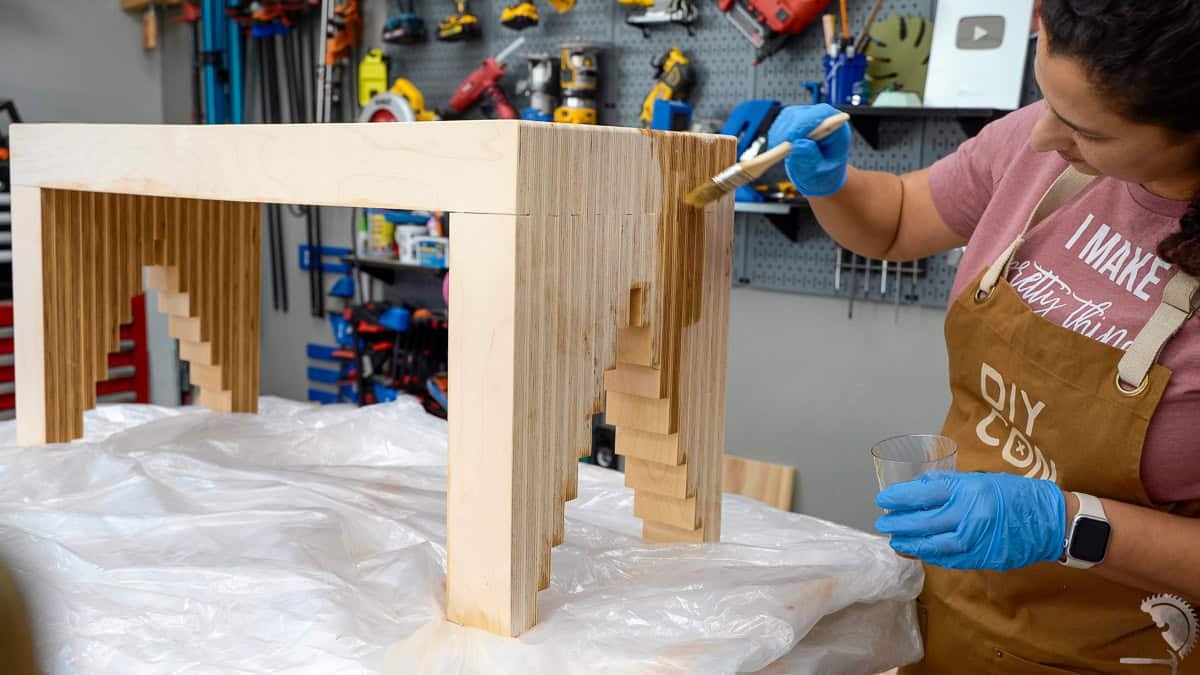
I am SO happy with how this turned out.
Can you believe how easy it was to make?! It took me 2 full days. And it’s under $100.
I put it in my entryway, and I literally can’t stop looking at the pattern, so I will leave you with a few close-up pictures of the bench!
You might also like:


Anika's goal is to inspire and empower beginners with woodworking, DIY, home improvement, and home decor ideas.
She wants everyone to unlock their creative potential and experience the feeling that comes with making something. Nothing feels better better than seeing something and saying "I can make that!"


You are amazing!!! I love your work and I cannot wait to try one of the projects.