9 DIY Ideas for a Garage Laundry Room Makeover
If you’ve got a garage laundry room and you’re struggling to make it look nice and function efficiently, here are some awesome ideas.
One of my most significant frustrations with our home has been the laundry “room.” I call it room, but it’s just a corner of the garage with hookups for the washer and dryer, the water softener, and the tankless water heater. All these had been retrofitted over time, which meant all the plumbing was on the outside, leaving a huge, unsightly mess!

It is right next to my main workshop wall – the wall you see behind me in almost every video. Every time I film, I have to ensure that the area is not in view so you don’t see any mess!
Two of the five homes we have lived in have had the laundry. Of course, that includes our current home.
Why Is the Laundry in the Garage?
Laundry in the garage is common in California – especially in older houses. It might be because the weather is pretty mild, and you can do things like laundry in the garage almost year-round. Older homes had a no-frills approach; you could add hookups where it was most convenient. Plus, it is a lot less hassle if there is a water leak.
***This post contains referral or affiliate links. It is a way for this site to earn advertising fees by advertising or linking to certain products and/or services. Please read my full disclosure here ***
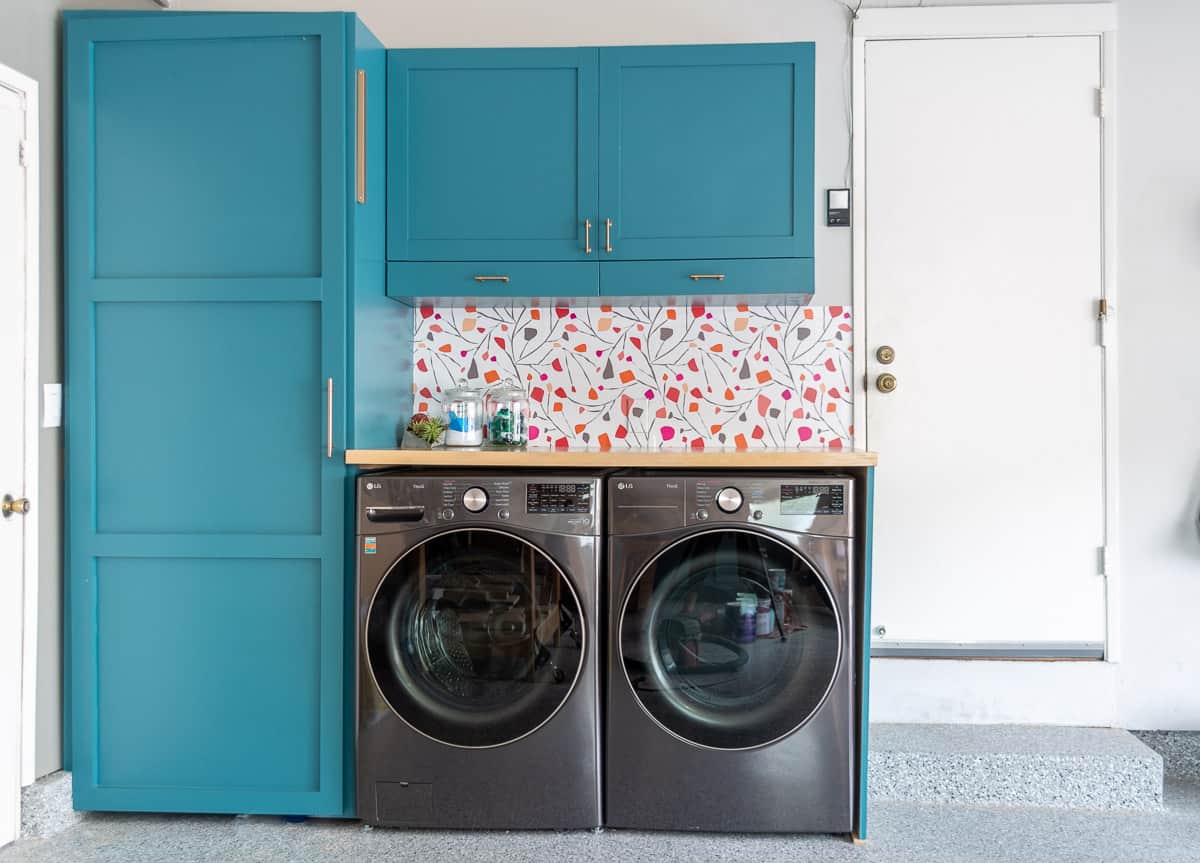
Garage Laundry Room Ideas
Having the laundry space in the garage usually results in a very industrial, inefficient, and essential space. But just because the laundry “room” is in the garage, it does not need to be boring. You can easily make it look nice.
The first step is to take care of any plumbing and cosmetic issues. You may or may not need this. In our case, we definitely needed it given that the plumbing was outside the wall.
Clean up the Plumbing

This is not always possible, and you might now even need this. The plan started with us evaluating if we could move the plumbing into the wall. But ultimately, we decided to move the water softener’s location and the water heater to the house’s exterior.
I was so excited about this because it opened up the entire wall space!
We hired out this entire process because it involved moving the water lines and gas lines, and we wanted everything to be done to code because this is most important.
Once the water lines and gas lines were rerouted, we also had an electrician come in and move a few electrical outlets. Some of the outlets were extremely old and scray-looking :).
Fix Up Drywall

Once the electrician and plumber were done, it was time to fix up the wall.
It was my first time installing drywall, and although it wasn’t too hard, it was very dusty, boring, and SO long! I am pretty sure I will do everything it takes not to have to do this again 🙂
After the mud and tape, primer, and paint, I had a blank wall to build out the laundry room of my dreams!
Well, not my “dreams,” but the best possible space I could achieve with the constraints.
My goal with this laundry area was to make it look like it was NOT in the garage. When looking at it by itself, I wanted the laundry room design to look like a regular one.
Plus, having a nice laundry area makes it feel much less of a chore.
To that effect, I built out a bunch of features. Here is everything that went into the garage laundry room makeover
Enclosure for Water Softener

I built a surround for the water softener. It is a cabinet built to go around the softener. The cabinet was a little tricky to build and install. It was designed to be a narrow top cabinet that would go on top of the softener with one very long side that went to the garage floor.
I attached a bunch of 2×4 cleats on the back that were then attached to the studs in the garage wall.
I built a face frame on the front to accommodate a large door that encloses the entire water softener cabinet.
In the end, it looks like a large cabinet with a massive door and has a shelf with storage space at the top.
DIY Storage Cabinet

The storage cabinet over the washer and dryer was a straightforward build. It is a box with door dividers and the “bottom drawers.” This storage cabinet is excellent for all the laundry supplies like detergent, stain removers, dryer balls, and fabric softeners. It adds plenty of storage. You can even store cleaning supplies in there.
I have the full tutorial on how to build and install top cabinets coming very soon.
DIY Shaker Doors
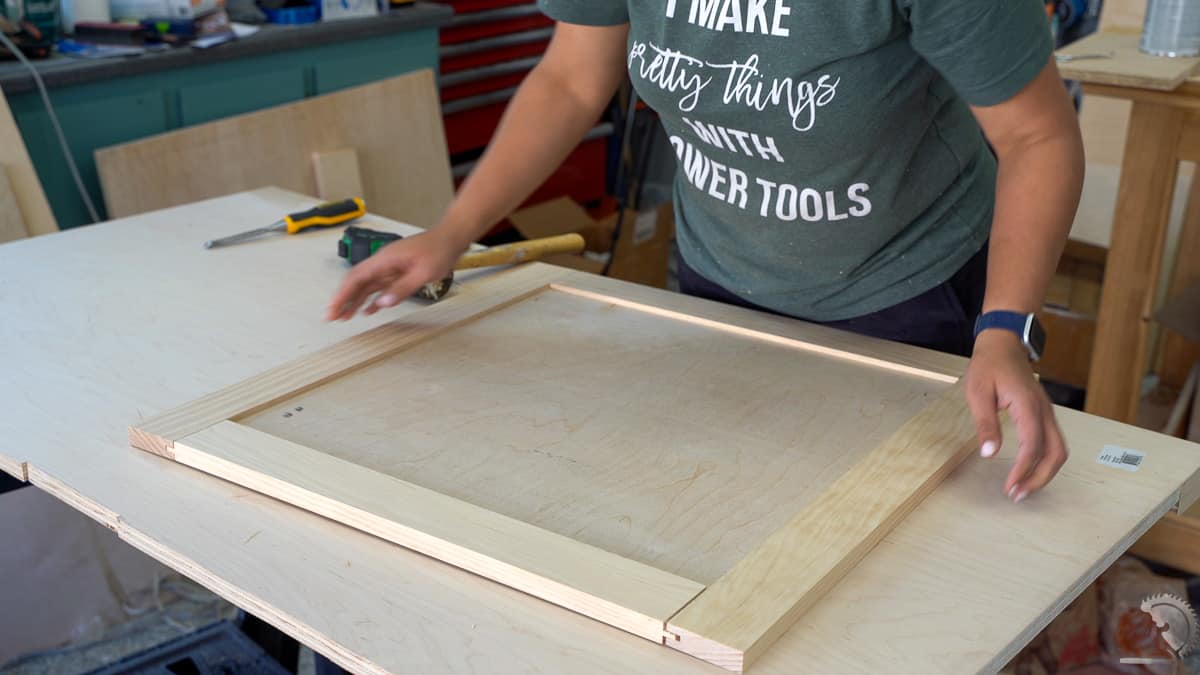
Since the cabinets were custom-sized to fit in my space, I built the doors for them myself. Here is a complete overview of how to build shaker-style doors, including a calculator you can use to customize the dimensions.
DIY Pull Out Drying Racks
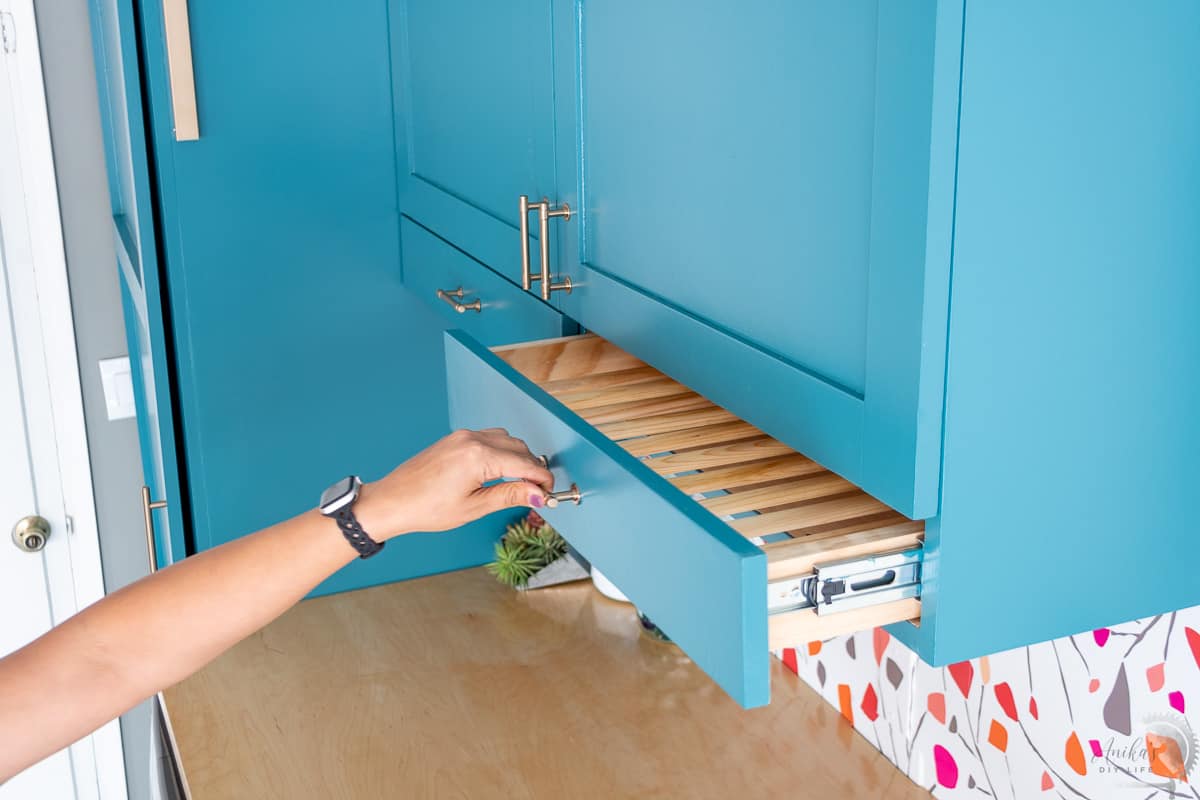
This has to be one of my favorite features. I added the pull-out drying racks to flat dry or hung up clothing that cannot go in the dryer. It is a super easy build and pretty much like a regular drawer, except that the bottom is replaced by dowel rods.
These are great for small spaces and give you enough room to hang 7-10 pieces of clothing.
Here is a complete tutorial on how to make the pull-out drying racks.
Plywood Countertop
A countertop over the laundry appliances was at the top of my requirements when I thought about redoing the laundry. It makes a great spot to hold detergent and accessories while allowing me to fold clothes.

The countertop can be any material and can be bought off the shelf, but I wanted a wood countertop, and the cheapest and easiest-to-build option was to build one using plywood.
Here is a full tutorial on how to build the plywood countertop.
Wallpaper Backsplash

I wanted a little quirk and a splash of color, so I decided to go with a colorful patterned wallpaper at the back as a backsplash. This is removable wallpaper and was incredibly easy to apply. It can also be removed easily when needed.
Retractable Clothes Hanger
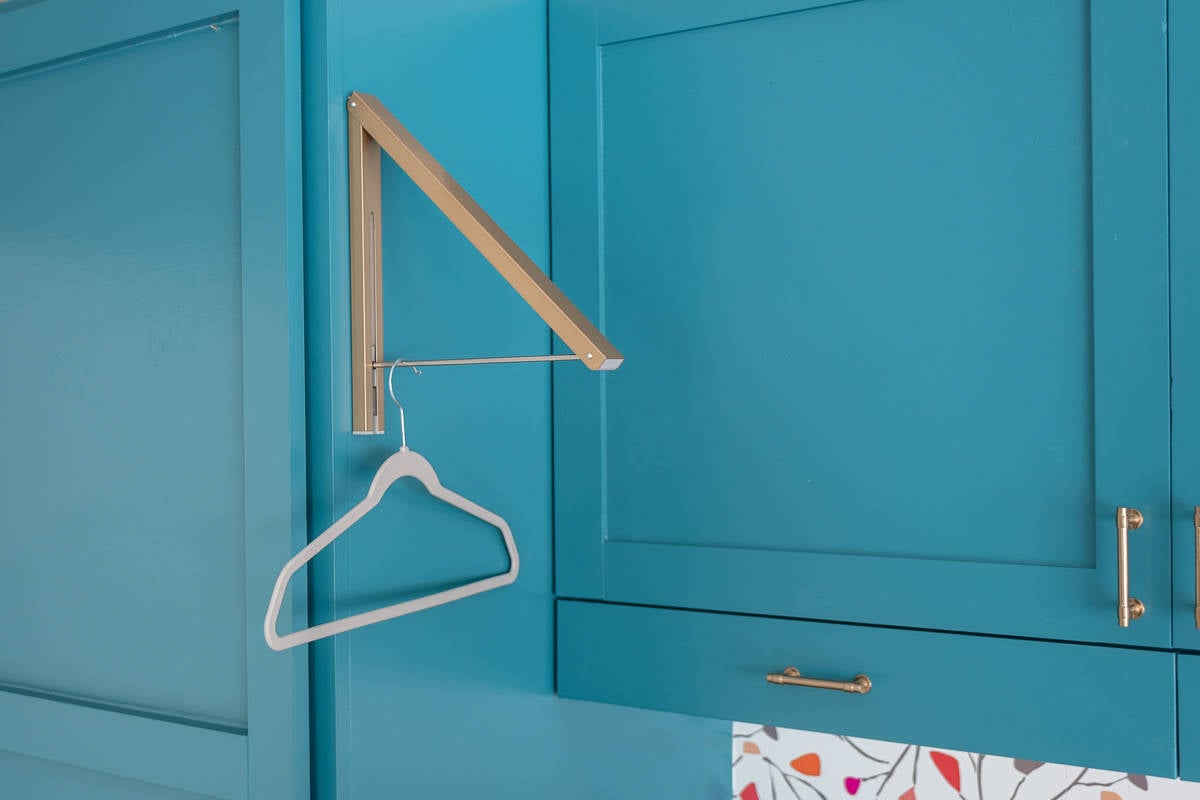
With the pullout drying racks being close enough to the countertop, I can’t hang anything longer than a shirt.
Usually, we use the outdoor drying rack to hang clothes. Since we live in California, we can use it all year round. But I added a small retractable clothes hangar for the occasional times that we can’t.
I love that I found the gold to match the cabinet hardware.
A Utility Sink
This is one of the things I wish we could have added. Since there is existing plumbing, it is pretty easy to add a utility sink if there is space. We went back and forth about this. A utility sink would have been great to have to not only soak and clean laundry but also for me to be able to wash my paintbrushes and hands. But given the space constraints, it would have meant a stacked washer and dryer, and I wanted the countertop more than the utility sink.
An Ironing Board
This would make a great addition as well. It would have been the dream, and I would have completed the laundry, but unfortunately, there was no space for it.
Conclusion
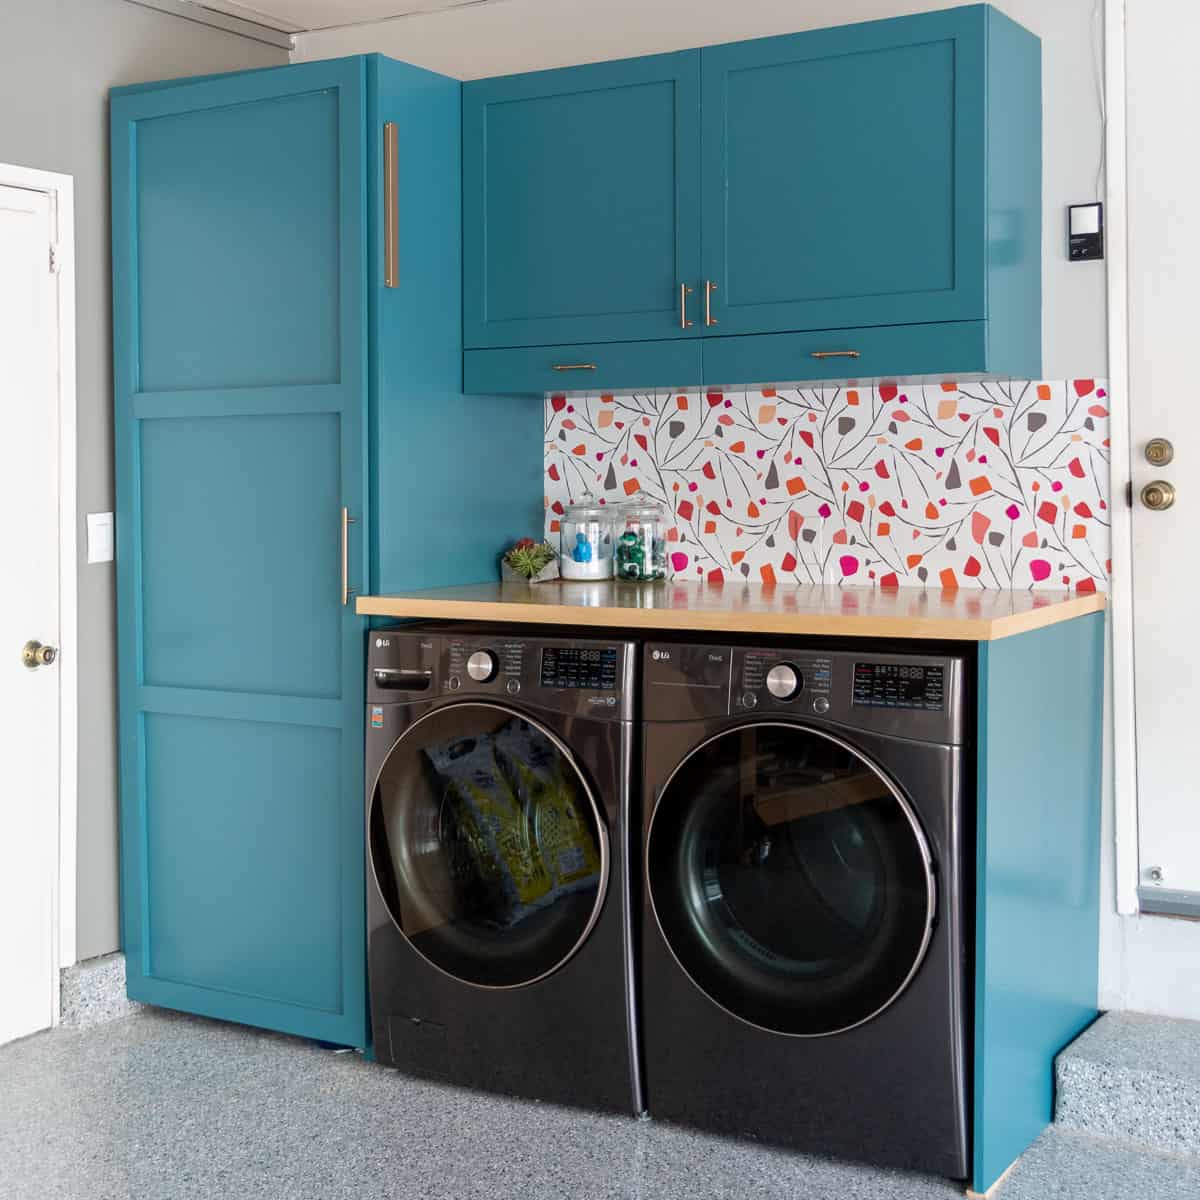
I can’t explain how thrilled I am to have completed this makeover. It took a whole month, but I love the space. The paint color combined with the wallpaper and the wood tone of the countertop look amazing. Plus, all the added storage makes it so functional.
Laundry days are now so much fun!
Anika's goal is to inspire and empower beginners with woodworking, DIY, home improvement, and home decor ideas.
She wants everyone to unlock their creative potential and experience the feeling that comes with making something. Nothing feels better better than seeing something and saying "I can make that!"