How to Build a DIY Table Saw Stand for Small Shops
Learn how to build a compact DIY table saw stand with folding outfeed table and extension wing with a step-by-step tutorial, video, and plans.

About 5 years ago, when I first got my table saw, I had built a table saw stand. It worked out really well. It had a folding outfeed table and a shelf underneath. It was easy to move around and had a pretty small footprint which worked wonderfully for my small workshop.
However, after using it for five years, I realized that the design could be improved in more than one way:
- The folding leg brackets worked great, but they were starting to get pretty tight, and I would need a mallet (or hammer) to open them.
- To counteract the uneven ground in my garage and driveway, I added adjustable feet, which were really awesome for leveling the outfeed table to the saw but took a lot of time.
- The saw sat level with the outfeed table, meaning there was no place for the miter gauge to go when I made a crosscut. This meant raising the saw every time I needed to make crosscuts, which, let’s be honest, was not super safe.

With all of this in mind, I designed the new and improved Table Saw Stand.
Since building this old table saw stand, I have discovered folding table brackets that I used in the Lego table and the planer stand. I thought they would be perfect for helping take care of any issues with the outfeed table and leveling.
In addition to that, I was able to:
- add an extension wing to support large sheets of plywood
- add grooves for the miter gauge
- add a drawer for storage
- reduce the footprint by about 5″.
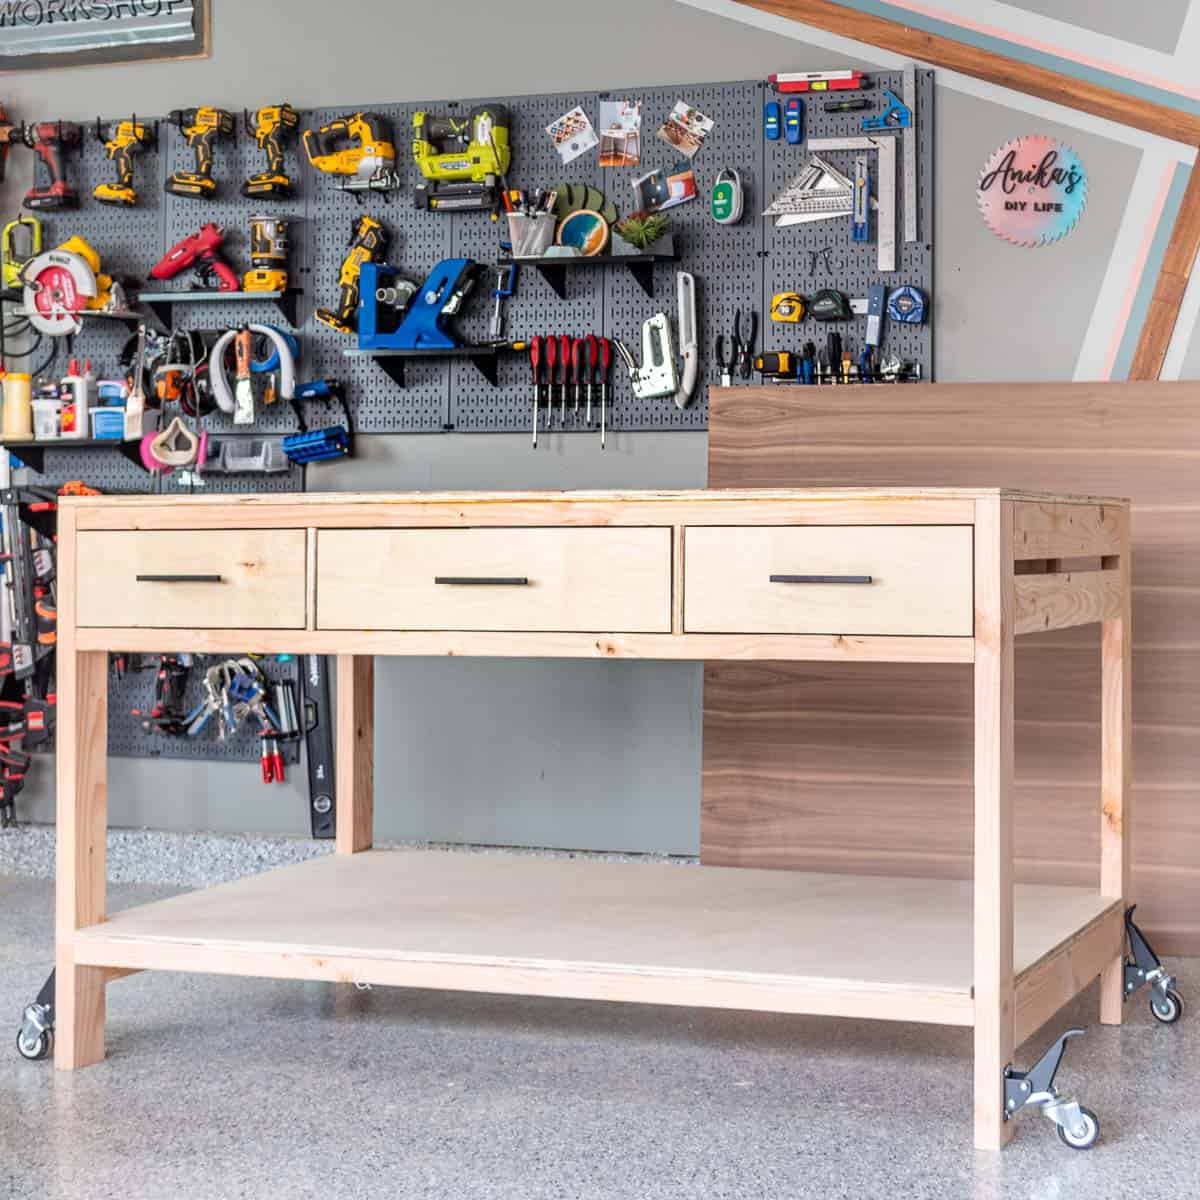
Meet Table Saw Stand 2.0

***This post contains referral or affiliate links. It is a way for this site to earn advertising fees by advertising or linking to certain products and/or services. Please read my full disclosure here ***
Material Needed
- Lumber per the plans
- Folding Table brackets
- Drawer slides
- ½” Straight cut router bit
- Kreg Rip cut (optional but recommended)
- Straight edge Guide (optional but recommended)
- Kreg Jig (See my full guide on how to use a Kreg Jig for beginners)
- 2½” pocket hole screws
- Face clamps and right angle clamps
- Pull for drawer
- Dropdown casters
Tools Needed
How to build
As always, I have the full, detailed video for you. It is great to see me build the table saw stand so you can see all the small details. The step-by-step instructions are below.
Step 1: Make the cuts
- Make the cuts per the cut list.
- Make pocket holes as shown in the plans. The pocket holes in 2×4 boards are made with the pocket hole jig and drill bit collar set to 1 ½”. See more about how to use a pocket hole jig here.

I decided to take apart the old table saw stand (because obviously, I will not be needing it anymore) and reuse as much material as possible – the best way to stay budget-friendly and keep things out of landfills. I was able to use up all the 2×4 boards and the plywood!
Step 2: Build the frame
- Start with the bottom frame of the table saw stand by attaching the 2x4s using 2-½” pocket hole screws and wood glue.

A couple of things to note:
- The orientation of the legs are different on each side of the lag frame. This is to accommodate the built in extension wing of the table saw (you will see later)
- One of the legs is shorter than the other 3 for the open end of the stand.
Step 3: Add the bottom shelf
- Cut out the corners of the shelf using a jigsaw. Keep the orientation of the 2x4s in mind.
- Add in the bottom-most shelf and attach using countersunk screws.

- Attach the casters. This is a great time to turn the stand on its side and attach the casters.

These drop-down casters are my favorites for workshop furniture. I like that when they are disengaged, the entire stand sits on the ground. This makes it as stable as possible. When the casters are engaged, the entire stand lifts up and the stand rolls smoothly.
Step 4: Build and install the drawer
- Attach the front apron that will go below the drawer using wood glue and 2 ½” pocket hole screws.

The best way to make sure it is attached at the right height is to clamp a scrap board to support it as you attach.
- Build the drawer using 3/4″ plywood or 1×6 boards. I cut my plywood 7″ wide but now realize that it is a little too deep. I think 5½” or a 1×6 board will work perfectly.
- Install the drawer slides onto the 2×4 sides and add the drawer box.

See how to build and install drawers here.
Step 5: Add the top shelf
- Attach the front and back aprons using wood glue and 2½” pocket hole screws.
- Cut out the three corners of the top shelf using a jigsaw. Keep the orientation of the 2x4s in mind.

Clearly I got carried away and cut out all 4 sides :). Don’t do that. I tried to glue and attach the cut off in place so it doesn’t look too bad.
- Attach the shelf in place using wood glue and countersunk screws.
Step 6: Attach the top supports
- Attach the 2×4 back support at the top of the stand using wood glue and 2½” pocket hole screws.
- Attach the 2×6 side support using wood glue and 2½” pocket hole screws. This is a 2×6 instead of a 2×4 because we need surface area to attach the folding table brackets later.

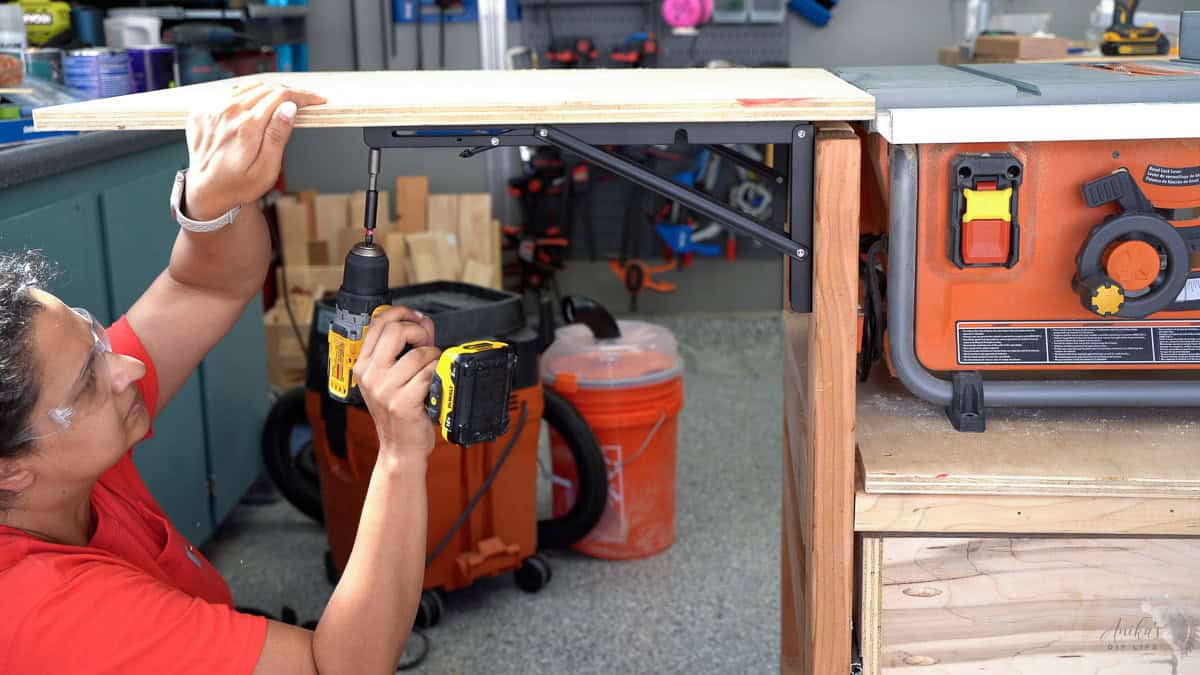
Step 7: Attach the folding outfeed table
- This is a good time to test the height of the stand and the table saw. Place the table saw on the stand and make sure that the top of the table saw is about 3/4″ higher than the top of the back and side supports. If not, adjust the stand accordingly.

- Use a scrap piece of plywood to determine the height at which you need to attach the outfeed table brackets.
- Attach the plywood for the outfeed table temporarily in place using only 2 screws.
Now we need to make the miter slots in the outfeed table.
- Measure and mark the exact location and width of the miter slots.

- Remove the outfeed table and route out the miter slots. I used a 1/4″ straight cut bit but I could have used a wider one too. The key is to use a straight edge to guide you. I routed 12″ long channels.

See more about how to use a router.
- Once the channels are routed, attach the outfeed table to the brackets.
Step 8: Attach the extension wing
The extension wing goes on the right side of the table saw stand level with the table saw similar to the outfeed table.
This is where using a 2×6 instead of a 2×4 comes handy because that gives you enough surface to add at least 2 screws on the brackets.
I found that the 2 screws were enough to get a strong extension wing but if you want, you can also drill a hole into the bracket and add a third screw.
Step 9: Finishing touches
- Add the drawer front. I decided to use a simple pull. It is a pull style I have used on all of my workshop furniture where ever there are drawers. If you like, you can also make a cut out on the drawer front.

- You can apply polyacrylic coats on the extension wing and the outfeed table to help plywood glide easily.
That is it!
That’s the all new table saw stand. It is nice and compact and SO much easier to set up.

My cross cut sled fits perfectly in the bottom shelf.

The drawer is perfect for holding push blocks, push sticks, feather board, wrenches, and any other table saw accessories I might need at hand.

I am very excited to start using it for the next few projects I have planned.

Plans for the compact table saw stand
Important – This stand is designed for my height. I am 5’9″. Be sure to adjust the height so the table saw is at your waist height for you.
Table Saw Safety Accessories
You might also like:


Anika's goal is to inspire and empower beginners with woodworking, DIY, home improvement, and home decor ideas.
She wants everyone to unlock their creative potential and experience the feeling that comes with making something. Nothing feels better better than seeing something and saying "I can make that!"


