$100 Kids Rental Bathroom Makeover: Before, After, and Temporary DIY Tips
Transform a rental bathroom for under $100! See this 100% temporary, landlord-friendly before-and-after featuring contact paper counters, a DIY mirror frame, and easy decor hacks.
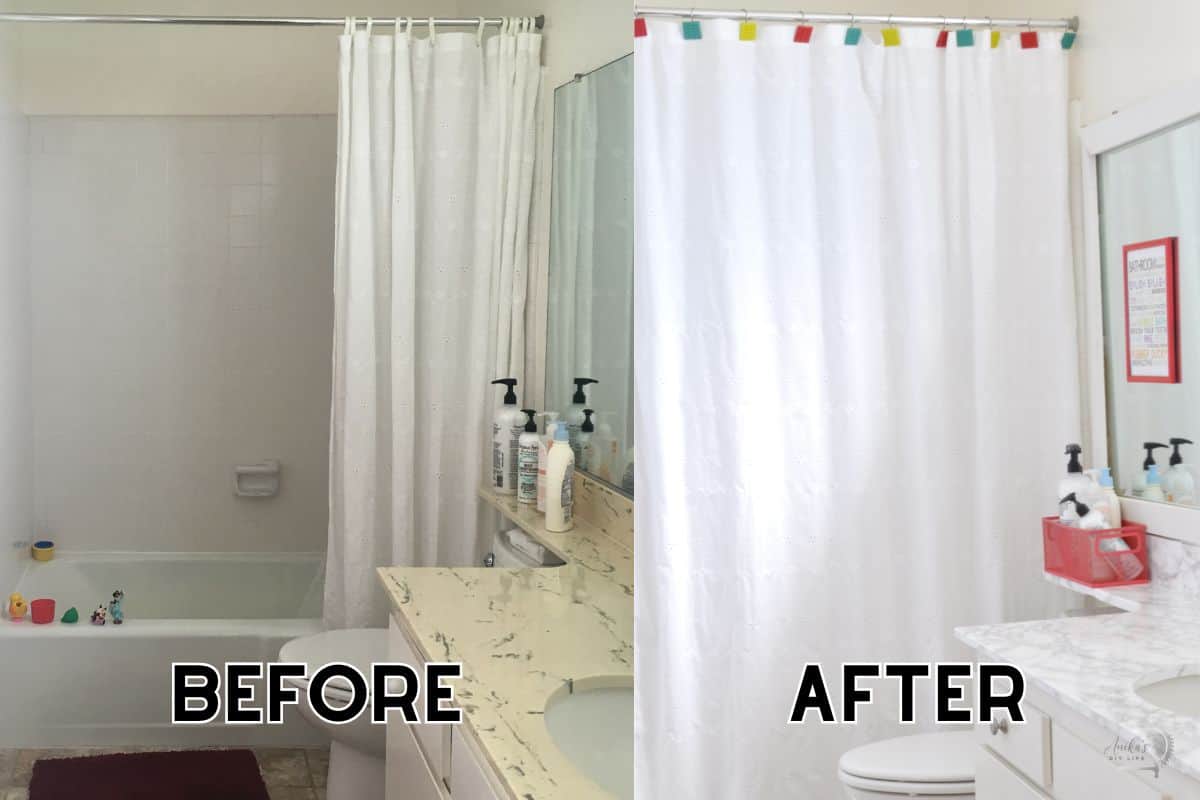
Can you actually transform a dated rental bathroom for under $100? And can you do it without losing your security deposit?
When we moved into our rental, the kids’ bathroom was stuck in the 60s. Think yellow countertops, pink blinds, and a dented towel bar.
I took on the $100 Room Makeover Challenge (what my blogging friends and I call the “Champagne room on a Kool-Aid budget” challenge) to see if I could create a fun, colorful space that is 100% temporary and removable.
Guess what? I did it for $101.03 and only made two tiny nail holes in the entire room!
The Rental Bathroom “Before”
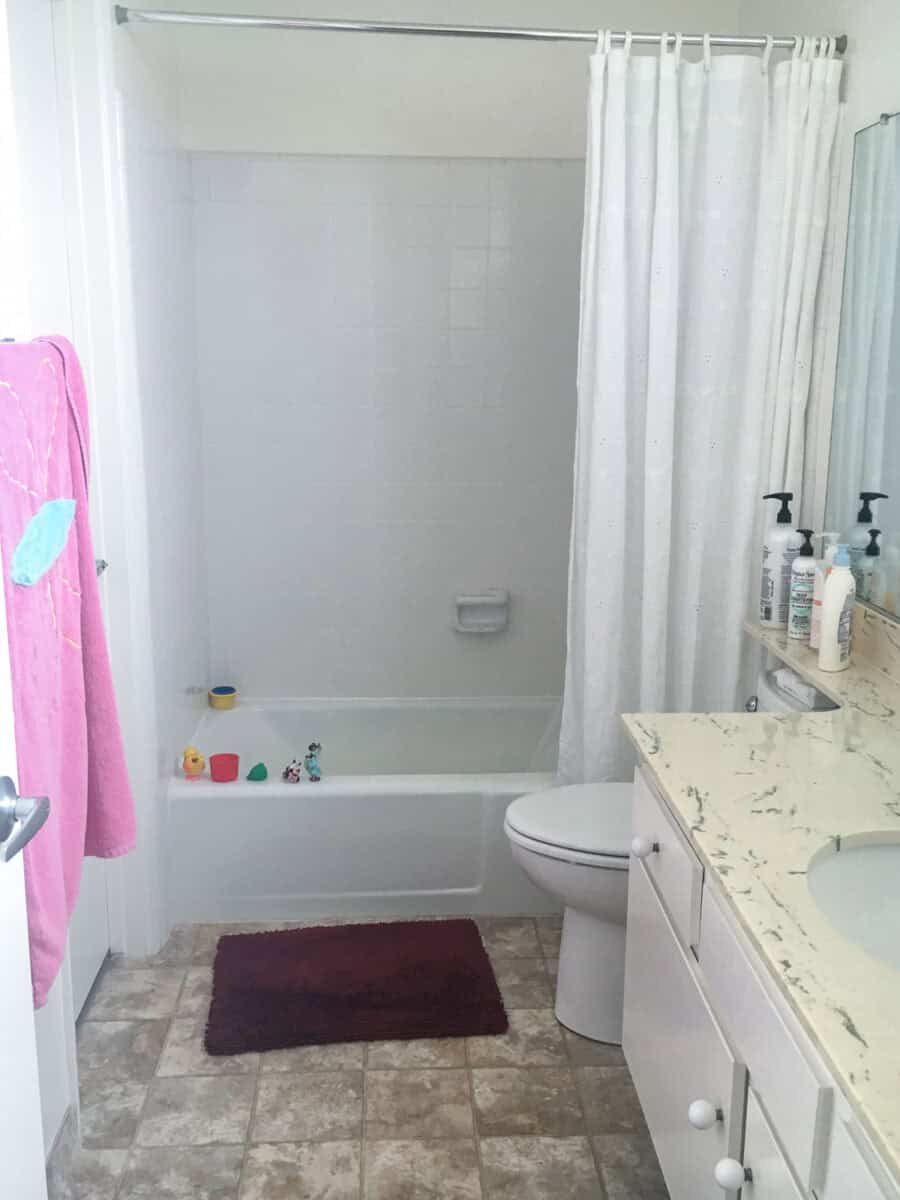
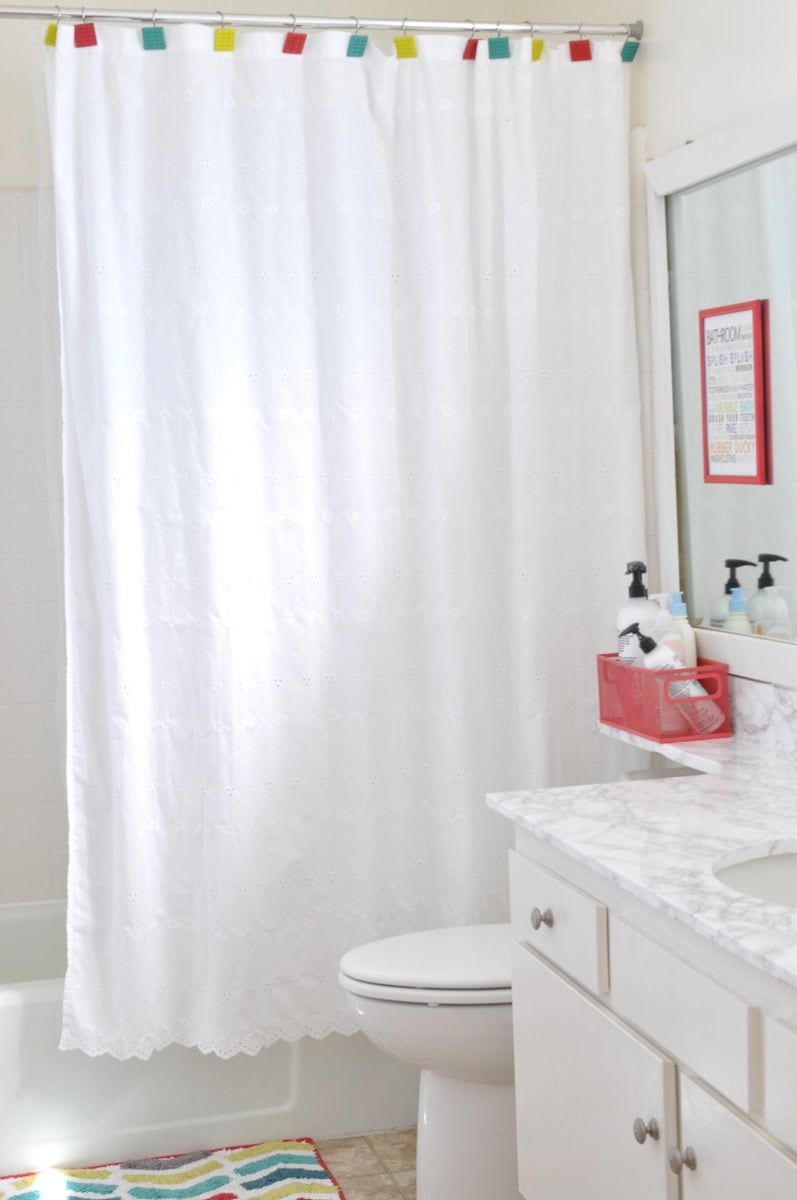
The bathroom was a long, hallway-style space that felt plain and outdated. While the previous tenants left a cute white shower curtain, everything else needed help:
- The Countertop: A very 1960s yellow laminate.
- The Window: Pink blinds that were impossible to remove without leaving giant holes.
- The Lighting: Basic globe fixtures that lacked character.
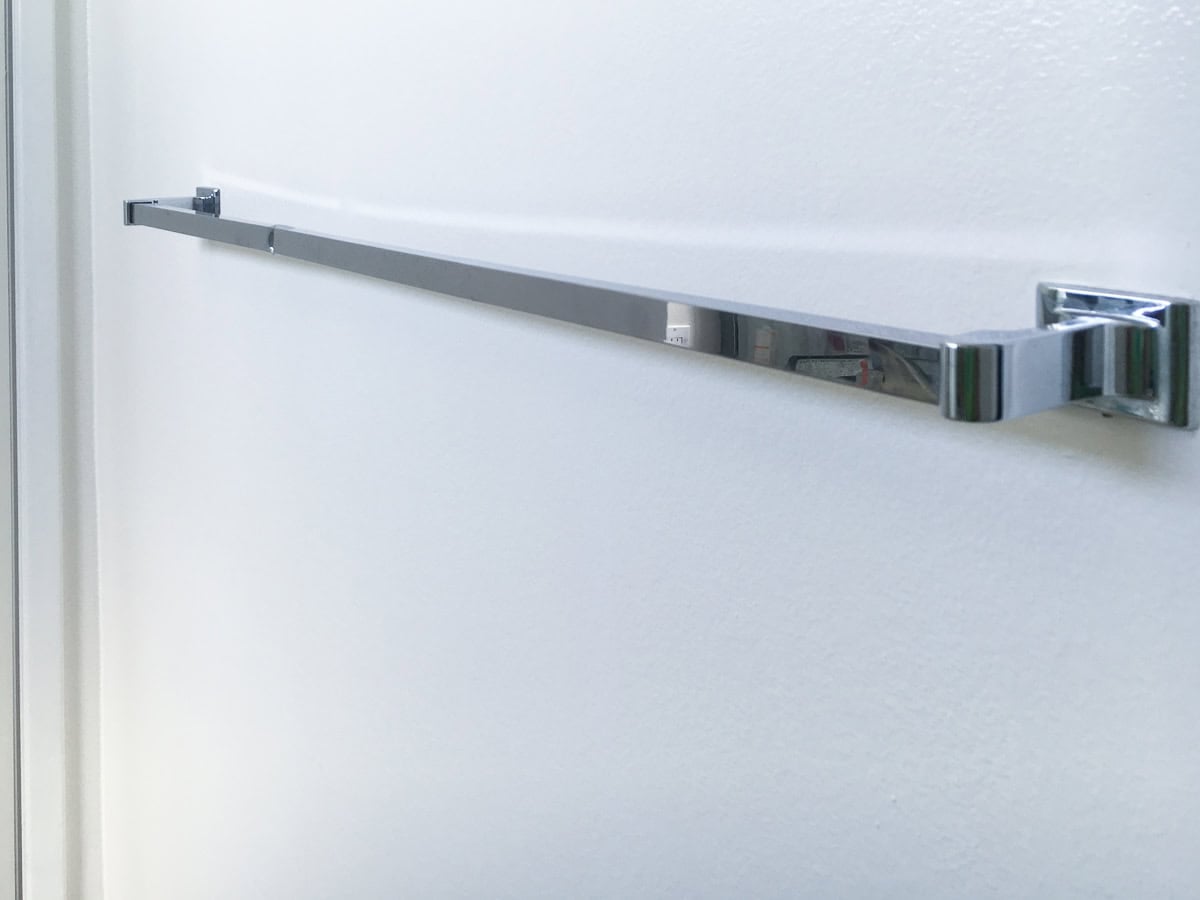
- The Towel Bar: Dented and poorly placed behind the door.
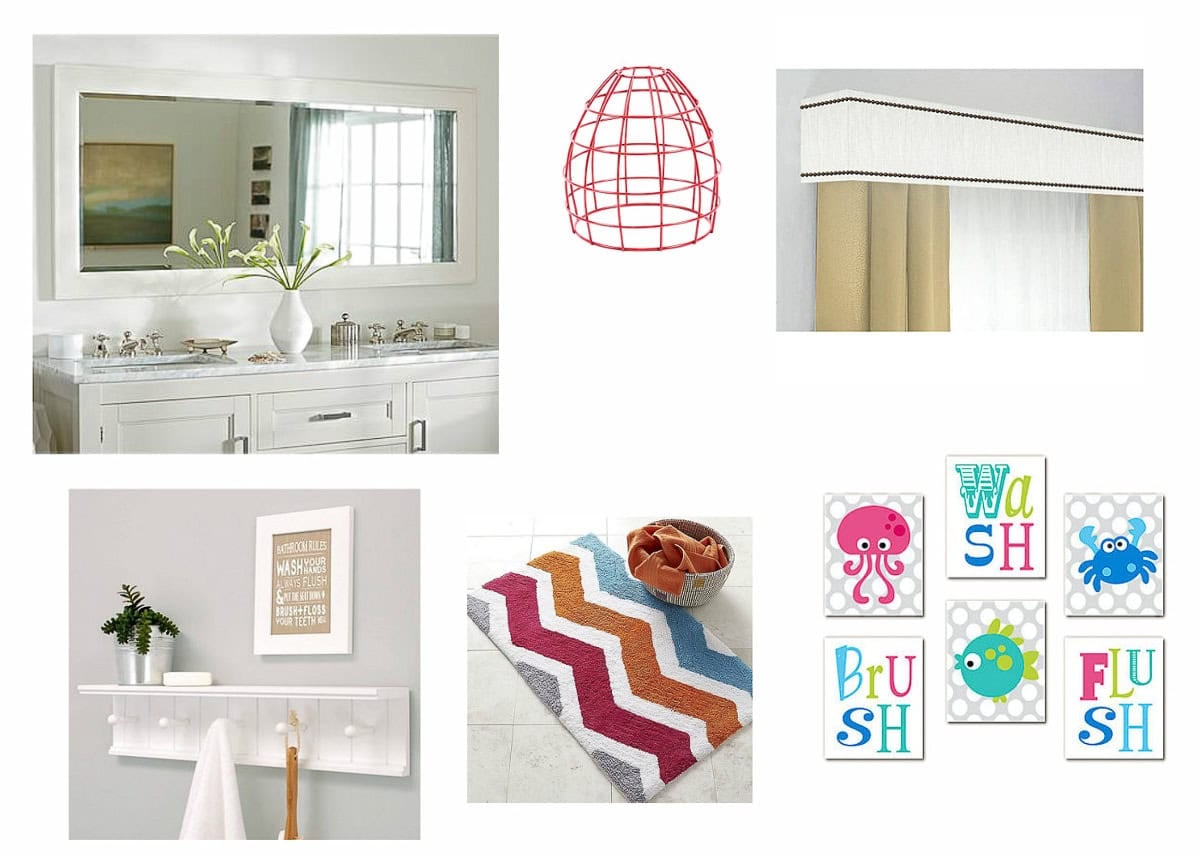
My goal was to add color and personality while keeping every single project “landlord-friendly.” So I made a moodboard of what I really wanted it to look like.
***This post contains referral or affiliate links. It is a way for this site to earn advertising fees by advertising or linking to certain products and/or services. Please read my full disclosure here ***
5 Temporary DIY Projects for a Rental Bathroom
Here is how I tackled the transformation while staying on budget. The color scheme was set when I found the perfect chevron rug. (similar rug). I also found matching shower curtain hooks, and they were just the right amount of color to hold the pretty white shower curtain.
1. Marble Contact Paper Countertops
This was the biggest game-changer! I covered the yellow laminate with marble contact paper. It completely fooled my landlord and held up beautifully for nearly a year.
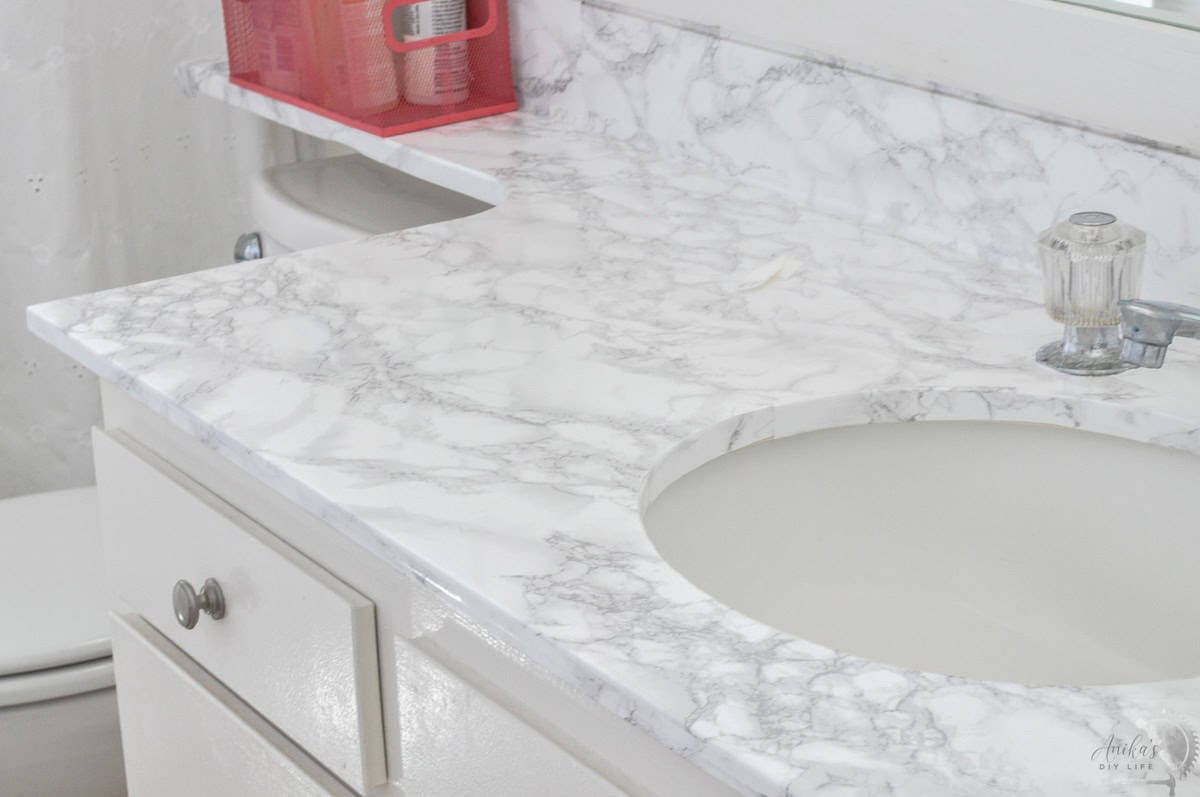
- Cost: $20
- The Hack: Use a credit card to smooth out bubbles and a hairdryer to wrap the edges tightly.
- Full Tutorial: How to makeover a countertop with contact paper
2. DIY Wood Window Valance (The Only 2 Nails!)
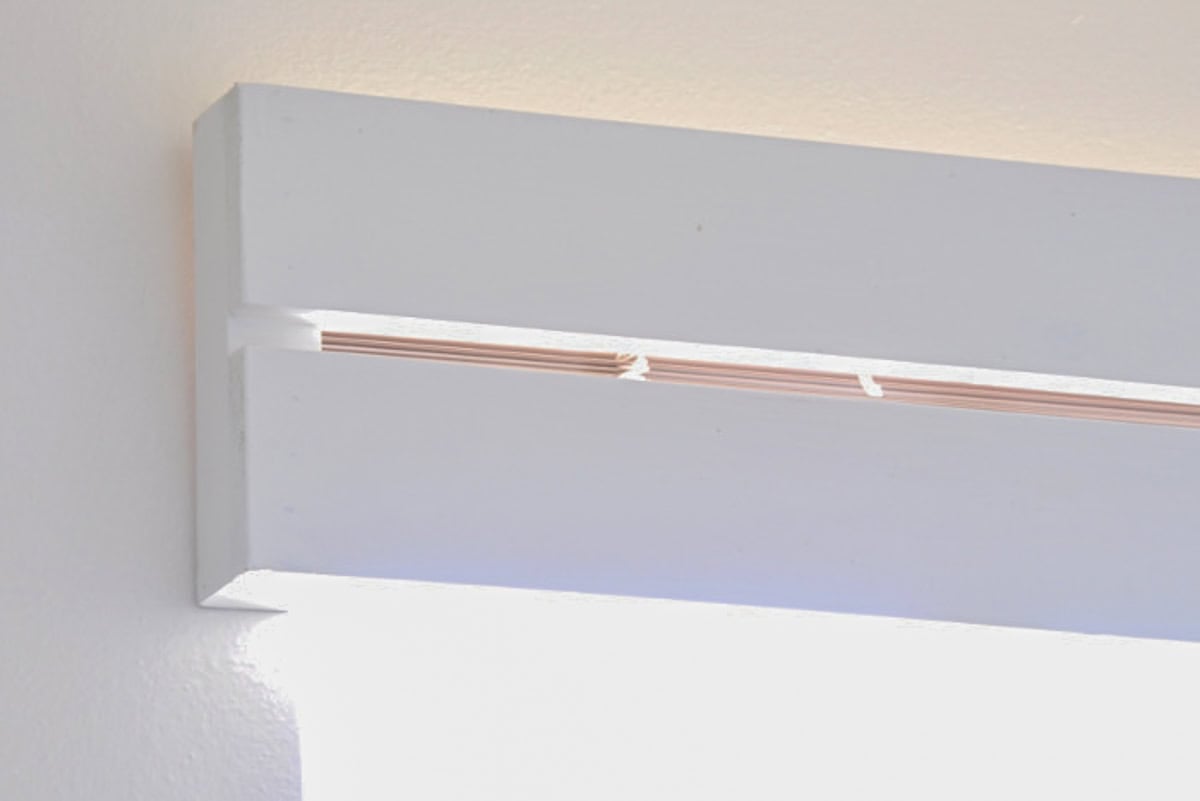
To hide those pink blinds, I built a simple wood valance. This is the only place I used nails. Just two tiny ones to hold it up. It adds a high-end custom look for less than $3.
- Full Tutorial: How to Make a Wood Valance
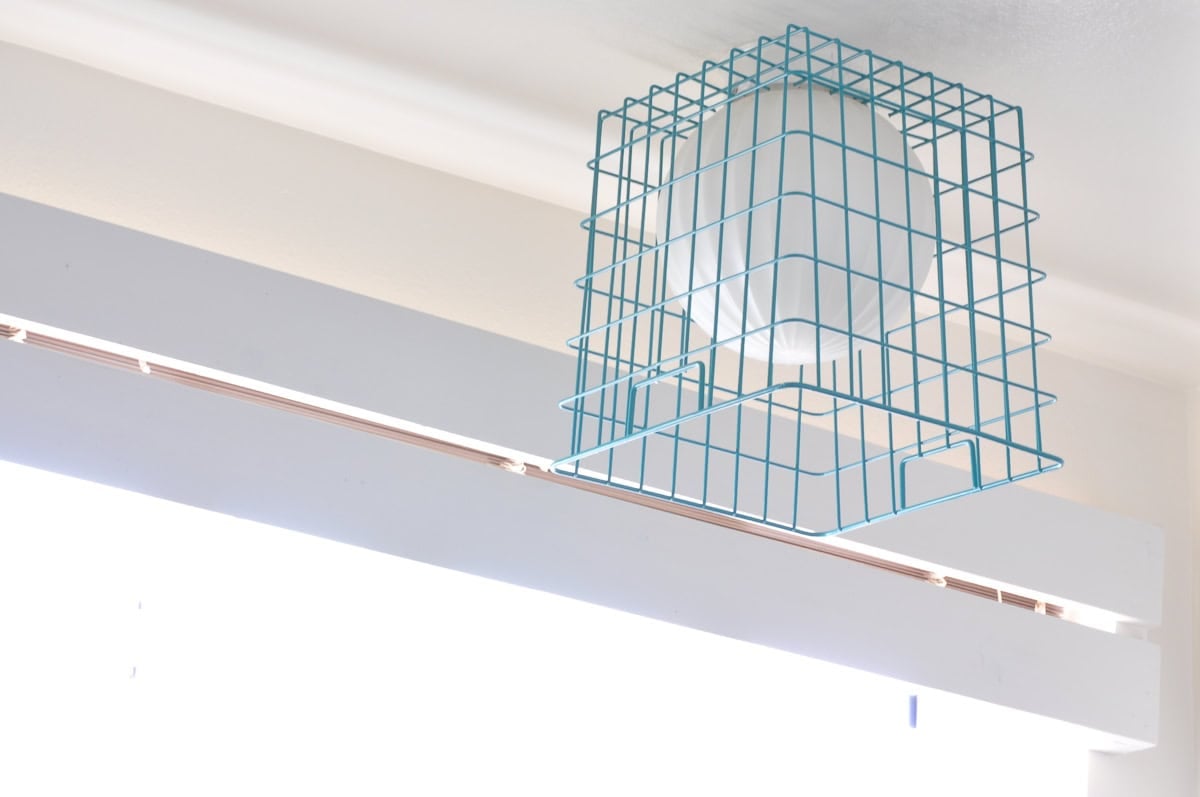
3. DIY Wire Basket Lampshade (3-Step Update)
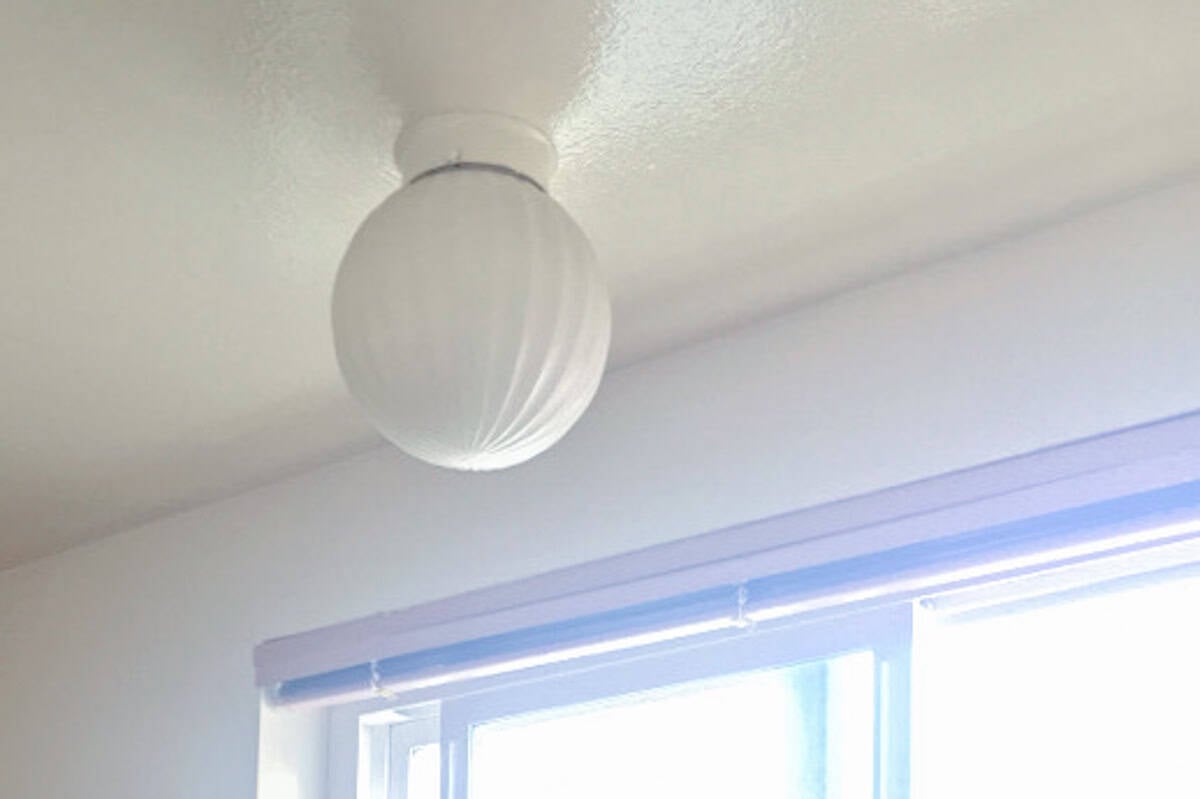
The original light fixture was a dated 1960s globe. It wasn’t “terrible,” but it didn’t match the new modern vibe I was going for. I could have changed the light fixture, but in the spirit of keeping it under $100 and easy for anyone to reproduce, I decided to build a “cage” that fits right over the existing light.
Materials Needed:
- A wire storage basket (I used a wire cube piece) similar basket
- Bolt cutters or heavy-duty wire cutters
How to make it:
- Measure and Mark: Remove the original globe lampshade from the socket. Hold your wire basket up to the light fixture and mark exactly where you need to create an opening for the light socket to pass through.
- Cut the Opening: Use bolt cutters to snip the wire along your marks. I suggest doing this bit by bit to ensure the hole is just large enough for the socket but small enough for the basket to hang securely.
- Install: Place the wire basket over the light fixture, then screw the original glass globe back into place. The glass globe acts as a “stopper,” holding the wire basket securely against the ceiling fixture.
Cost: $9.99
The Result: A modern, industrial-style fixture that covers the old globe without any electrical work!
4. DIY Custom Mirror Frame (No-Nail Method)
Huge, builder-grade mirrors are a staple in rentals, but they often feel unfinished. I wanted to give this mirror a custom, “built-in” look without drilling into the wall or damaging the glass.
I used standard 1×3 boards to create a chunky, modern frame.
Here is how to do it:
- Measure & Cut: Measure the outside dimensions of your mirror. Using a miter saw or a miter box, cut your 1×3 boards to size at 45-degree angles. This creates those clean, professional-looking “picture frame” corners.
See how to use a miter saw.
See how to use a miter box. - Paint: I painted mine a crisp white to match the new shelf and window valance.
- The Rental Hack: Instead of nails or heavy construction adhesive, I used 3M Command Strips to attach the boards directly to the face of the mirror.
Cost: $11.25
It’s lightweight, looks like a custom carpentry job, and when it’s time to move, the boards (and the adhesive) pop right off, leaving zero residue on the glass!
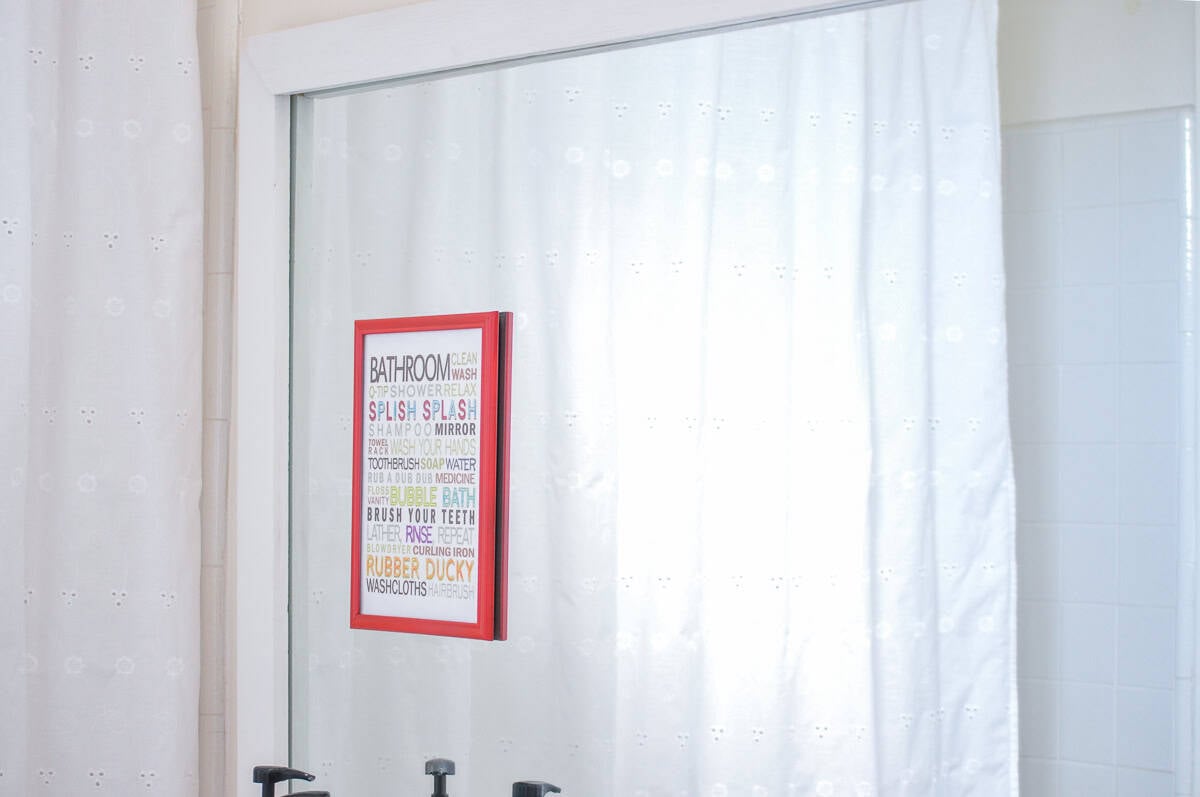
The mirror is huge, so I put some bathroom subway art in a spray-painted dollar store frame. I found the free printable art online a few years ago. Sorry, I don’t have the source for you.
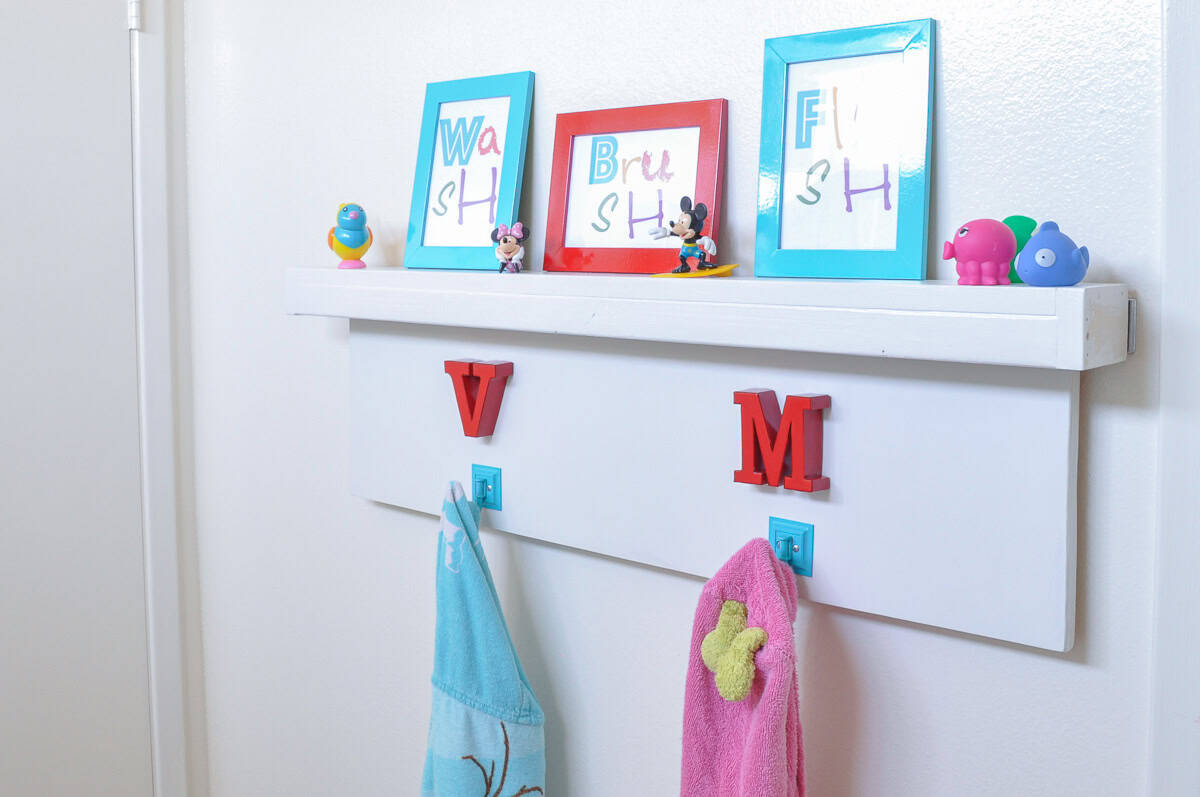
5. The “Hidden” Towel Hook Shelf
Towel bars are where towels go to die (or at least fall on the floor). I wanted hooks for the kids, but I didn’t want to leave holes in the wall.
The Solution: I built a custom shelf that slides right over the existing towel bar! It uses the bar as an anchor, so there’s zero damage to the walls.
Get the Full Build Details: DIY Towel Hook Shelf Tutorial
My kids are so excited that they have their initials and can now hang up the towel by themselves!
The $100 Budget Breakdown
I managed to stay almost exactly on track! Here is where every penny went:
| Item | Cost |
|---|---|
| Bath Rugs (Walmart) | $27.92 |
| Shower Hooks | $6.96 |
| Toiletries Organizer | $4.99 |
| DIY Shelf & Hooks (Lumber/Hardware) | $7.92 |
| Cabinet knobs | $9.12 |
| Contact Paper | $20.00 |
| DIY Mirror Frame | $11.25 |
| DIY Wood Valance | $2.88 |
| Wire Basket | $9.99 |
| Grand Total | $101.03 |
So, I am $1.03 over budget… I blame it on all the many 3M command strips I had to use to hold the frame in place.
By mixing bright reds and blues with the clean white of the DIY frames and shelf, the bathroom finally feels like a space meant for kids.
My favorite part? My son walked in and said, “I love the new counter and see there is a shelf for all my toys!” When a toddler notices the countertop, you know the DIY was a success.
More Rental-Friendly Ideas


Anika's goal is to inspire and empower beginners with woodworking, DIY, home improvement, and home decor ideas.
She wants everyone to unlock their creative potential and experience the feeling that comes with making something. Nothing feels better better than seeing something and saying "I can make that!"


Very clean looking bathroom and certainly updated. thanks for sharing
This is seriously impressive. That marble contact paper looks like the real thing! Well done.
Hi Katy! Yes, I am still amazed at how awesome that contact paper is. It even fooled the landlord 🙂
Now this looks better 🙂
Anika, I am in complete agreement with all the praise for this room. Very clever! I am curious as to how long the contact paper will last in, not only a bathroom, but a kids’ bathroom. My experience is that it is not the most durable of surfaces. Did you protect it with some sort of coating? I hope so because this room is unreal in how much creativity went into it and it would be a shame if you worked that hard and it didn’t last out your lease! Absolutely one of my favorite bathroom makeovers ever! Great job!
Hi Fayelen, Thank you! I did not add any coating on top and it lasted really well. We left the place about 11 months after the makeover and I took the contact paper off. I have an update on the countertops – https://www.anikasdiylife.com/marble-contact-paper-countertop-10-months-later/
I also took the contact paper off live on Facebook. There is a link to that video in the above post too.