DIY Faux Apothecary Media Cabinet
Share this post:
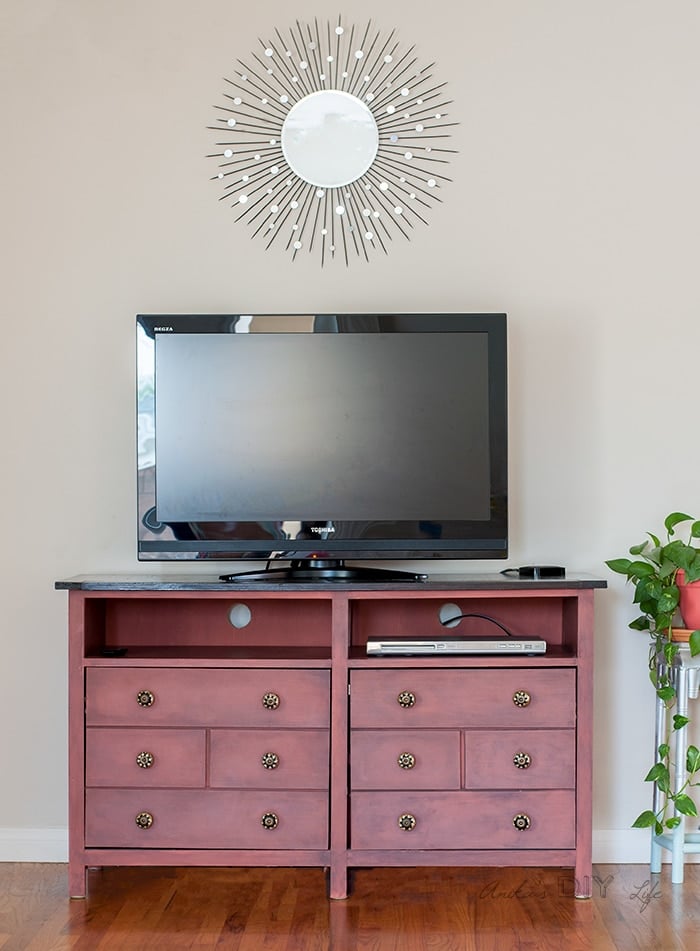
Build this apothecary media cabinet based on free plans. A simple modification and painting technique gives this media console its unique character!
 A few days ago, my friend asked me when I was going to share my DIY apothecary media cabinet on the blog. I said – “but I made this so long ago, I don’t even have the step by step pictures.” That got me thinking too… I HAVE to share this with you! Its a project really close to my heart! I mean all my projects are, but this one is especially close… more on that in a bit.
So, here is my DIY (Faux) Apothecary Media Cabinet. I modified the original and free plans for the Benchmark Media Console from the amazing Ana White. And yes… I guess I kinda have a thing for Red 😉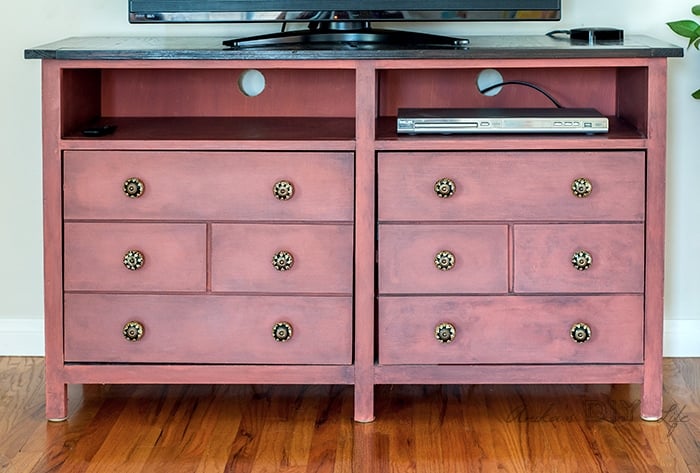
Let’s talk a bit about the history of this beauty and why it is so important to me. This was my first major woodworking project. I had only built one little kids table before this and done a really simple green makeover of my little shelf. But that is NOT the only reason – the week I bought all the lumber for the project, I found out I was pregnant with my second child. I started building the console but the combination of morning all day sickness, a full-time job and a 3-year-old toddler made it a reeeeeally long project. I am so glad I didn’t give up on it and finally completed it when I was 7 month’s pregnant… whew! So this media console is kinda like my middle child 🙂
***This post contains affiliate or referral links. It is a way for this site to earn advertising fees by advertising or linking to certain products and/or services. Please read my full disclosure here ***
Materials Needed for DIY Apothecary Media Console –
- Lumber per the list provided by Ana White in her plans for the frame
- 3/4″ plywood for the doors
- 1/4″ thick Balsa wood – 5.5″ wide.
- Miter Saw
- Kreg Jig and 1 1/4 pocket hole screws
- Brad nailer and 1 1/4″ finish nails. I didn’t have a brad nailer so I just used a hammer 🙂
- Knobs – Mine are from Hobby Lobby
- 4 Euro style hinges
How to build your own Apothecary cabinet –
- First – build the frame exactly per the plans all the way to step 10 (in the plans).
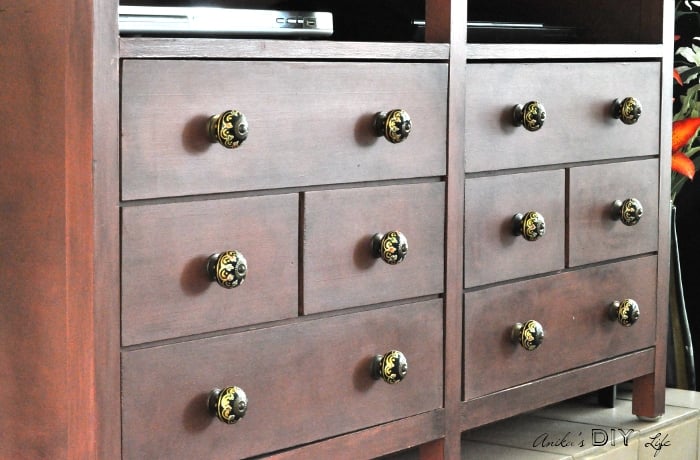
- For the doors, cut 3/4″ plywood to size and the balsa wood to the sizes needed to create the Faux Apothecary drawers. Use wood glue and 5/8″ finish nails to attach them.
- Mark the centers and positions for the knobs and attached them.

- Attach the doors to the body using the hinges.
- Make one hole each on the top back side for the wires. I used a 2″ hole saw for this.
- That’s it!

Paint/ Finish of the Apothecary Media Console –
- For the Body, it was painted using home made chalk style paint from my favorite recipe that I have used many times since. The color is Burnt earth by Bher. For the Glaze – I mixed black craft paint with tintable glaze and wiped it on. To seal everything – I wiped on Furniture wax and buffed it. Imagine a VERY pregnant lady laying on the floor wiping on the wax… well I digress… and sorry for leaving you with that picture but I couldn’t resist 😉
- For the top – It was stained in Kona and finished with 3 layers of gloss Poly.

It is not perfect – the doors are a little misaligned but I learned so much from the whole process! I still love it as much as I did the first day it was born done 🙂 What do you think about my Faux Apothecary Media Console?
Oh and those knobs…. I am crushing on those even today!

A Few More DIY Apothecary Cabinets You Might Enjoy –
Anika's goal is to inspire and empower beginners with woodworking, DIY, home improvement, and home decor ideas.
She wants everyone to unlock their creative potential and experience the feeling that comes with making something. Nothing feels better better than seeing something and saying "I can make that!"
- Anika Gandhi
- Anika Gandhi
- Anika Gandhi
- Anika Gandhi
- Anika Gandhi
- Anika Gandhi
- Anika Gandhi
- Anika Gandhi
- Anika Gandhi
- Anika Gandhi
- Anika Gandhi
- Anika Gandhi
- Anika Gandhi
- Anika Gandhi
- Anika Gandhi
- Anika Gandhi
- Anika Gandhi
- Anika Gandhi
- Anika Gandhi
- Anika Gandhi
- Anika Gandhi
- Anika Gandhi
- Anika Gandhi
- Anika Gandhi
- Anika Gandhi
- Anika Gandhi
- Anika Gandhi
- Anika Gandhi
- Anika Gandhi
- Anika Gandhi
- Anika Gandhi
- Anika Gandhi
- Anika Gandhi
- Anika Gandhi
- Anika Gandhi
- Anika Gandhi
- Anika Gandhi
- Anika Gandhi
- Anika Gandhi
- Anika Gandhi
- Anika Gandhi
- Anika Gandhi
- Anika Gandhi
- Anika Gandhi
- Anika Gandhi
- Anika Gandhi
- Anika Gandhi
- Anika Gandhi
- Anika Gandhi
- Anika Gandhi
- Anika Gandhi
- Anika Gandhi
- Anika Gandhi
- Anika Gandhi
- Anika Gandhi
- Anika Gandhi
- Anika Gandhi
- Anika Gandhi
- Anika Gandhi
- Anika Gandhi
- Anika Gandhi
- Anika Gandhi
- Anika Gandhi
- Anika Gandhi
- Anika Gandhi
- Anika Gandhi
- Anika Gandhi
- Anika Gandhi
- Anika Gandhi
- Anika Gandhi
- Anika Gandhi
- Anika Gandhi
- Anika Gandhi
- Anika Gandhi
- Anika Gandhi
- Anika Gandhi
- Anika Gandhi
- Anika Gandhi
- Anika Gandhi
- Anika Gandhi
- Anika Gandhi
- Anika Gandhi
- Anika Gandhi
- Anika Gandhi
- Anika Gandhi
- Anika Gandhi
- Anika Gandhi
- Anika Gandhi
- Anika Gandhi
- Anika Gandhi
- Anika Gandhi
- Anika Gandhi
- Anika Gandhi
- Anika Gandhi
- Anika Gandhi
- Anika Gandhi
- Anika Gandhi
- Anika Gandhi
- Anika Gandhi
- Anika Gandhi
- Anika Gandhi
- Anika Gandhi
- Anika Gandhi
- Anika Gandhi
- Anika Gandhi
- Anika Gandhi
- Anika Gandhi
- Anika Gandhi
- Anika Gandhi
- Anika Gandhi
- Anika Gandhi
- Anika Gandhi
- Anika Gandhi
- Anika Gandhi
- Anika Gandhi
- Anika Gandhi
- Anika Gandhi
- Anika Gandhi
- Anika Gandhi
- Anika Gandhi
- Anika Gandhi
- Anika Gandhi
- Anika Gandhi
- Anika Gandhi
- Anika Gandhi
- Anika Gandhi
- Anika Gandhi
- Anika Gandhi
- Anika Gandhi
- Anika Gandhi
- Anika Gandhi
- Anika Gandhi
- Anika Gandhi
- Anika Gandhi
- Anika Gandhi
- Anika Gandhi
- Anika Gandhi
- Anika Gandhi
- Anika Gandhi
- Anika Gandhi
- Anika Gandhi
- Anika Gandhi
- Anika Gandhi
- Anika Gandhi
- Anika Gandhi
- Anika Gandhi
- Anika Gandhi
- Anika Gandhi
- Anika Gandhi
- Anika Gandhi
- Anika Gandhi
- Anika Gandhi
- Anika Gandhi
- Anika Gandhi
- Anika Gandhi
- Anika Gandhi
- Anika Gandhi
- Anika Gandhi
- Anika Gandhi
- Anika Gandhi
- Anika Gandhi
- Anika Gandhi
- Anika Gandhi
- Anika Gandhi
- Anika Gandhi
- Anika Gandhi
- Anika Gandhi
- Anika Gandhi
- Anika Gandhi
- Anika Gandhi
- Anika Gandhi
- Anika Gandhi
- Anika Gandhi
- Anika Gandhi
- Anika Gandhi
- Anika Gandhi
- Anika Gandhi
- Anika Gandhi
- Anika Gandhi
- Anika Gandhi
- Anika Gandhi
- Anika Gandhi
- Anika Gandhi
- Anika Gandhi
- Anika Gandhi
- Anika Gandhi
- Anika Gandhi
- Anika Gandhi
- Anika Gandhi
- Anika Gandhi
- Anika Gandhi
- Anika Gandhi
- Anika Gandhi
- Anika Gandhi
- Anika Gandhi
- Anika Gandhi
- Anika Gandhi
- Anika Gandhi
- Anika Gandhi
- Anika Gandhi
- Anika Gandhi
- Anika Gandhi
- Anika Gandhi
- Anika Gandhi
- Anika Gandhi
- Anika Gandhi
- Anika Gandhi
- Anika Gandhi
- Anika Gandhi
- Anika Gandhi
- Anika Gandhi
- Anika Gandhi
- Anika Gandhi
- Anika Gandhi
- Anika Gandhi
- Anika Gandhi
- Anika Gandhi
- Anika Gandhi
- Anika Gandhi
- Anika Gandhi
- Anika Gandhi
- Anika Gandhi
- Anika Gandhi
- Anika Gandhi
- Anika Gandhi
- Anika Gandhi
- Anika Gandhi
- Anika Gandhi
- Anika Gandhi
- Anika Gandhi
- Anika Gandhi
- Anika Gandhi
- Anika Gandhi
- Anika Gandhi
- Anika Gandhi
- Anika Gandhi
- Anika Gandhi
- Anika Gandhi
- Anika Gandhi
- Anika Gandhi
- Anika Gandhi
- Anika Gandhi
- Anika Gandhi
- Anika Gandhi
- Anika Gandhi
- Anika Gandhi
- Anika Gandhi
- Anika Gandhi
- Anika Gandhi
- Anika Gandhi
- Anika Gandhi
- Anika Gandhi
- Anika Gandhi
- Anika Gandhi
- Anika Gandhi
- Anika Gandhi
- Anika Gandhi
- Anika Gandhi
- Anika Gandhi
- Anika Gandhi
- Anika Gandhi
- Anika Gandhi
- Anika Gandhi
- Anika Gandhi
- Anika Gandhi
- Anika Gandhi
- Anika Gandhi
- Anika Gandhi
- Anika Gandhi
- Anika Gandhi
- Anika Gandhi
- Anika Gandhi
- Anika Gandhi
- Anika Gandhi
- Anika Gandhi
- Anika Gandhi
- Anika Gandhi
- Anika Gandhi
- Anika Gandhi
- Anika Gandhi
- Anika Gandhi
- Anika Gandhi
- Anika Gandhi
- Anika Gandhi
- Anika Gandhi
- Anika Gandhi
- Anika Gandhi
- Anika Gandhi
- Anika Gandhi
- Anika Gandhi
- Anika Gandhi
- Anika Gandhi
- Anika Gandhi
- Anika Gandhi
- Anika Gandhi
- Anika Gandhi
- Anika Gandhi
- Anika Gandhi
- Anika Gandhi
- Anika Gandhi
- Anika Gandhi
- Anika Gandhi
- Anika Gandhi
- Anika Gandhi
- Anika Gandhi
- Anika Gandhi
- Anika Gandhi
- Anika Gandhi
- Anika Gandhi
- Anika Gandhi
- Anika Gandhi
- Anika Gandhi
- Anika Gandhi
- Anika Gandhi
- Anika Gandhi
- Anika Gandhi
- Anika Gandhi
- Anika Gandhi
- Anika Gandhi
- Anika Gandhi
- Anika Gandhi
- Anika Gandhi
- Anika Gandhi
- Anika Gandhi
- Anika Gandhi
- Anika Gandhi
- Anika Gandhi
- Anika Gandhi
- Anika Gandhi
- Anika Gandhi
- Anika Gandhi
- Anika Gandhi
- Anika Gandhi
- Anika Gandhi
- Anika Gandhi
- Anika Gandhi
- Anika Gandhi
- Anika Gandhi
- Anika Gandhi
- Anika Gandhi
- Anika Gandhi
- Anika Gandhi
- Anika Gandhi
- Anika Gandhi
- Anika Gandhi
- Anika Gandhi
- Anika Gandhi
- Anika Gandhi
- Anika Gandhi


swooning over this cabinet! You skills are off the hook! Love your site!
Thank you Carolann!!
Anika – you installed euro hinges without a drill press? WOW! I tried drilling exactly one with a Forstner bit in my drill – resulting in one very sad looking unevenly drilled mess 🙁
I ordered my drill press immediately after that. I’m making new cabinet doors for my kitchen and have a lot of hinges to install. Best $59 I ever spent. I know some people can drill those cups with a drill but I am not one of those. Kudos to you!
Hi Julie! The euro hinges I used did not need a cup and hence no Forstner bit. Take a look at the link I have to the hinge.
I have been debating on a drill press for a while. I might just get it!
Ahh I see now – the surface mounted type! A drill press makes absolutely perfect little cups with the Forstner bit (and probably drills niece straight holes as well) for the ones that require the recesses cup mount. Fun to use too.
I think your blog is one of the best I’ve seen – it matches my interests so well and is so fun to read. I don’t have a blog yet – started to make one but never published it. Hard for me to press that “publish” button since it didn’t seem perfect enough!
Yes a drill press would be great for nice straight holes. There are times when I could have totally use one. Which one do you have? I have put that on my wish list for my birthday 🙂
I am so glad you like my blog. It totally made my day (evening). I am very eager to see your blog too! Go ahead and publish it.. I dont think any of my posts are ever perfect enough…every time I read anyone, I find something and make changes… You just have to start somewhere. Let me know if you need any help with anything! I would be happy to help 🙂
Thanks so much for the encouragement! Hard to get over the need to make it perfect. I’ll send you the link when I get up my nerve 🙂
The drill press I bought is the Wen 4208. It was on sale at homedepot.com for $59. As always I read all the reviews before clicking to order it. I’ve noticed that Home Depot often has much better deals with their “online only” stock on the website. Higher margin (and sometimes lower quality) stuff is carried in the store (except at Christmas when they need to get you in the store physically so have great “loss leaders” in stock) That was when I got my kreg jig which came packaged with a free face clamp! You can get some steals if you are willing to wait a bit. With less expensive items I use ship to store since they only ship free to home if you spend $50. I am currently waiting on a order of 3 3/4″ center pulls since that’s an odd size and store stock was expensive but the website had a few styles I liked at $2 each. UPS tracking says they should arrive at my local HD Monday so I had to wait a week but saved quite a bit. And if I hate them when I see and feel them I’ll just instantly return them 🙂
That drill press looks good. Thanks for the reference! I will probably wait till black friday to see how the price goes! I love shopping online too. It makes life so much easier!
What a gorgeous piece! Thanks for sharing at Funtastic Friday.
hanks Sherry!
Hi, Anika
This turned out great. I wouldn’t not have taken on such a big challenge if I was working a full time, taking care of your 3 year old and pregnant. You are awesome! I love how it turned out and the color is beautiful. Thank you for sharing at Dishing it and Digging it link party. Have a great week.
A great job for only your second project!! I really didn’t know those were doors until you opened them… Thank you for sharing this middle child with us here at TaDa Thursday!!!
Thanks Susanne…Its a fun surprise which gets everyone all the time 🙂