DIY Mirrored Console Table for Under $150!
A DIY Mirrored console table to rival any high-end furniture. This step by step tutorial includes building, cutting mirrors and even the rustic finish.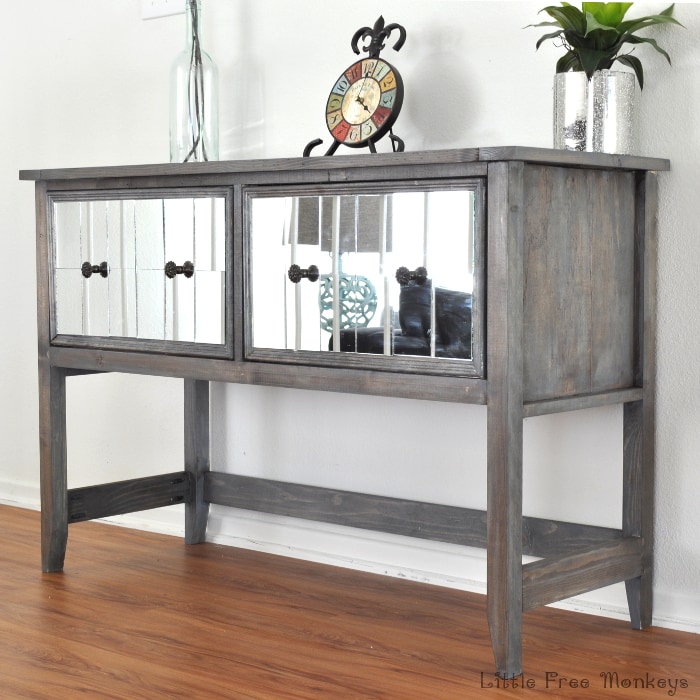
If you follow me on Instagram, you have already seen the DIY mirrored Console table I built for the IG Builder’s Challenge. I gave a full preview of it on my FB live videos – one where I shared the initial stages of the build and the other one where I gave a full reveal of the mirrored console table just an hour after putting my finishing touches to it. Here is how it turned out! I am totally in love!
I came across the IG builder’s Challenge just about a day before the deadline to enter. I thought about it long and hard and finally entered on the very last day! I am so glad I did because the furniture to be built was Ana White’s Pottery Barn inspired Bailey console table. The rule of the challenge was that we could put our own touch to the project but it should still look like the console table in the end! I was so happy that we needed to build a console table because that was something I had been thinking of building for a while and I was actually in the process of looking for designs.
Here is my inspiration piece – it is valued at over $1500!! Mine was only $125… 🙂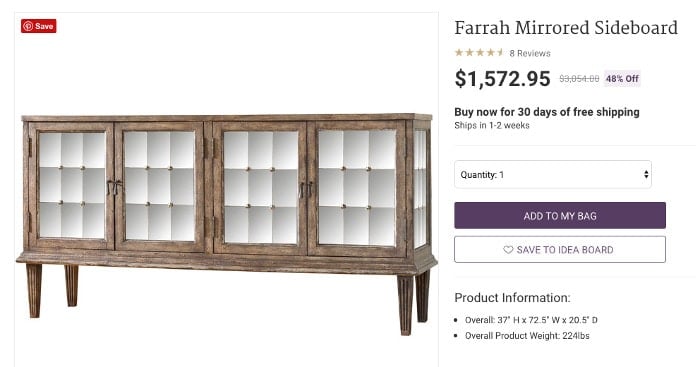
RELATED: DIY Ballard Designs inspired console table
***This post contains affiliate or referral links. It is a way for this site to earn advertising fees by advertising or linking to certain products and/or services. Please read my full disclosure here ***
Materials Needed for the DIY Mirrored Console Table –
- 3 – 2×2 @ 8 feet long
- 2 – 1×2 @ 8 feet long
- 2 – 1×2 @ 8 feet long
- 1 – 1×6 @ 12 feet long
- 1 – 1×12 @ 4 feet long
- 24” x 48” 3/4” plywood panel
- 1 – full sheet of 1/4″ thick plywood
- 1 – 1×8 @ 12 feet long
- 2 – 8′ Molding – I used this one.
- 4 knobs – I used these.
- 14″ center mount drawer slide. You could also use the euro style drawer slides like in the original plan.
- 1-1/4” and 2-1/2” pocket hole screws
- Wood glue
- Gorilla glue
- 1/8″ Mirror – I used some I already had from Ikea. You could also use this one and just remove the frame.
Tools Needed for the DIY Mirrored Console Table –
- Miter Saw
- Kreg Jig
- Kreg Face clamp and right angle Clamp
- Circular Saw
- Drill/driver set
- Glass scribe
- Glass and tile drill bit
Cut List for DIY Mirrored Console Table –
The plans called for a table 53″ wide but I cut it down to 45″ to fit my space. The measurements below indicate modified cut list for 45″ console table.
- 4 – 2×2 @ 29-1/4” (legs)
- 2 – 2×2 @ 40-1/4” (below drawer support)
- 2 – 1×2 @ 40-1/4” (above drawer support)
- 2 – 1×2 @ 11-1/2” (in between drawer support)
- 2 – 3/4” plywood @ 13” x 13-3/4” (sides)
- 1 – 1×3 @ 40-1/4” (stretcher, back)
- 4 – 1×3 @ 13” (stretcher, sides and drawer slide mount)
- 1 – 1/4” plywood @ 13-3/4” x 42-1/4”
- 4 – 1×8 @17-1/4” (drawer front and backs)
- 4 – 1×8 @ 14-1/2” (drawer sides)
- 2 – 1/4” plywood @ 18-3/4” x 14-1/2” (drawer
- bottom)
- 2 – 1×12 @ 19-1/2” long (drawer faces)
- 3 – 1×6 @ 39-7/8” (tabletop boards)
- 2 – 1×3 @ 16-1/2” (breadboard ends)
- 4 – molding – @ 19-1/2″ mitered at 45 deg long end to long end
- 4 – molding – @ 11.5″ mitered at 45 deg long end to long end

How to Make the DIY Mirrored Console Table –
Step 1 – Build the frames using pocket hole screws. It is important to have the frames be completely identical to each other. To achieve this… I built the first frame and laid the other one on top of it as I built it. Make sure all corners are square.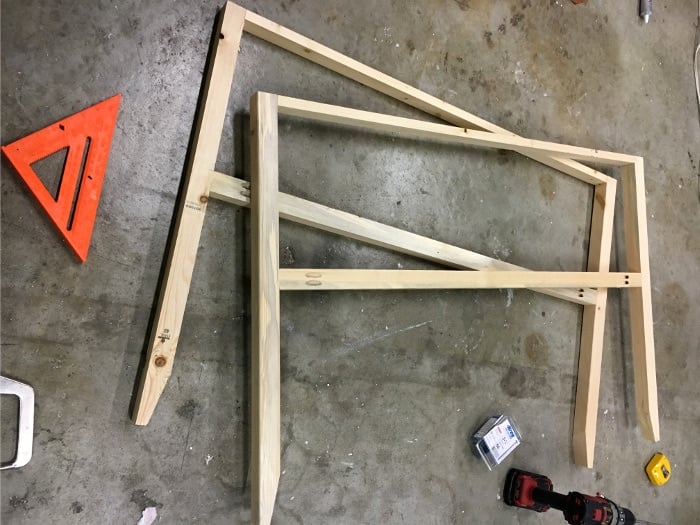
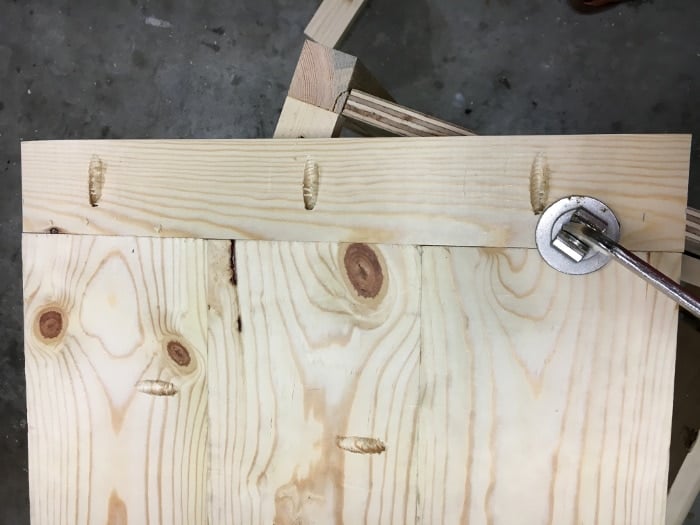
Step 2 – Attach the 3/4″ plywood sides on to one of the frames. You will need to make pocket holes on the plywoods as shown including the ones I drew by hand (which are to join the top). I forgot to make those before joining – thank god for the removable drill guide on the Kreg Jig!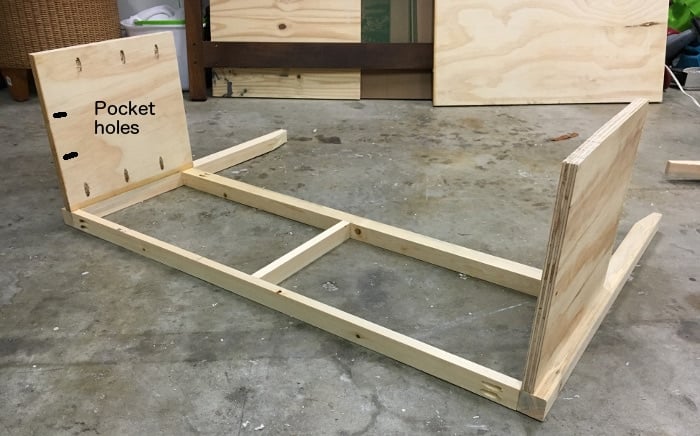
Step 3 – Attach the other frame. Make sure once again all the joints are identical.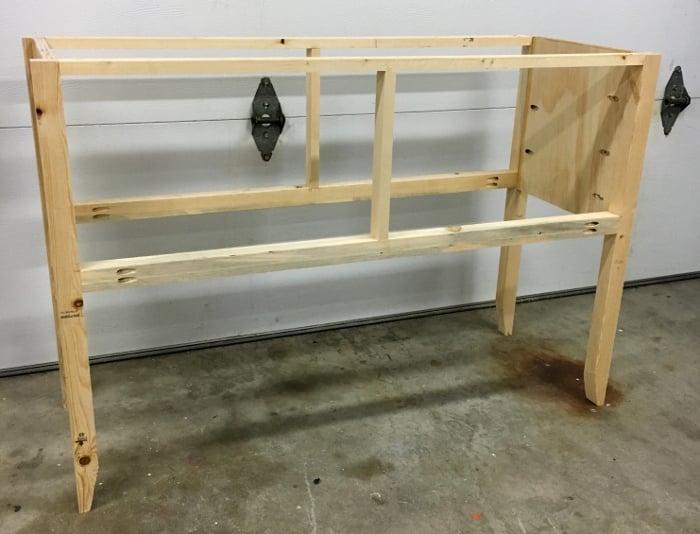
Step 4 – If you are using bottom mount sliders like me, attach the 1″ x 3″ board in the middle of the drawer space.

Step 5 – Assemble your table top – start with joining the long boards followed by the short 1″ x 3″ boards for the ends.

Step 6 – Build your drawers. For bottoms of drawers, please use a 1/2″ thick plywood. I initially used hardboard I already had but it was too thin to screw in the drawer sliders. So, I added an extra 1″ x 3″ board on the bottom of the drawers to screw in the drawers. Here are the drawers all assembled and ready for the faces. (this picture is after I attached the table top – but ideally it would be best to attach the table top after you attach the drawer faces – so you have access to the inside of the drawers from above). 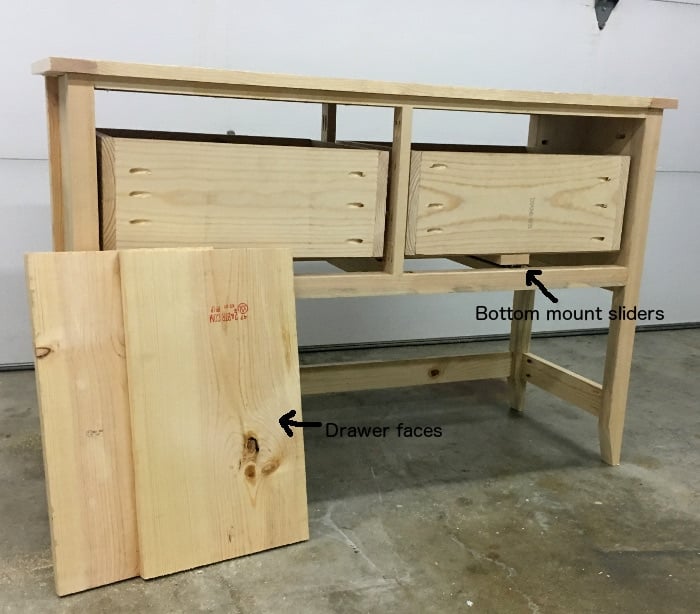
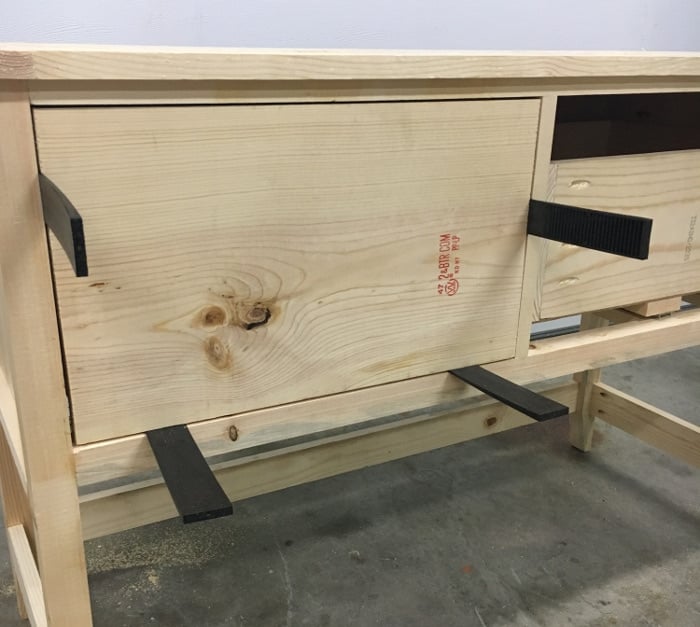
Step 7 – Attach the drawer faces. I used shims to make cure the faces were 1/8″ spaced from the edges. Then I clamped and used 1 1/4″ spax screws. Make sure to countersink them. Also, attach the back of the console at this time.
Step 8 – It is now time to attach the molding. Miter the ends of the molding at 45 degrees and attach them using wood glue and 1 1/4″ finish nails. 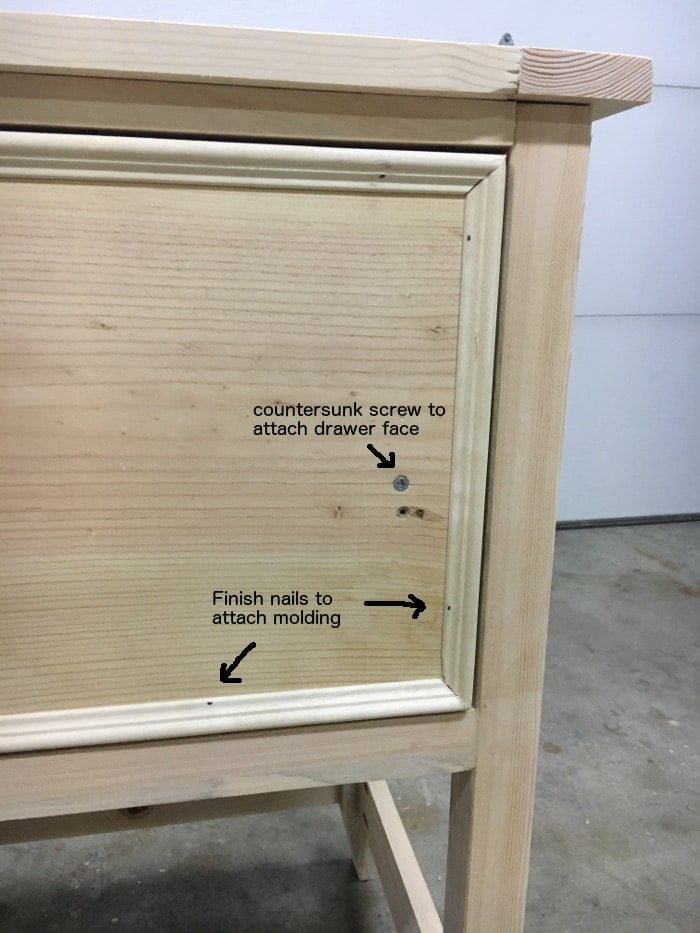
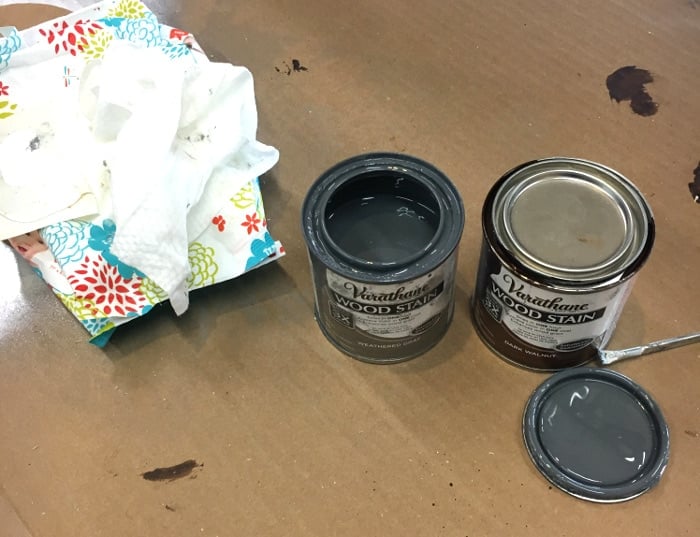
Step 9 – Now, It is time to stain/paint your console. I chose to create a rustic weathered finish inspired by the inspiration piece. For that I used layers of weathered grey stain, dark walnut stain and watered down white paint as white wash. I simply kept layering until I was happy with the look. Oh, and I used my favorite staining cloth – dried out baby wipes 😉 (Read about my love for them here) I also gave it a couple coats of matte polyurethane.
Step 10 – Time for the mirrors! I decided to do the cutting myself since I have cut some things similar to glass in a previous life and I had the scriber at hand already. You could also get it cut by a glass shop if you like. For my mirrors, I used the Ikea mirror I already had which was broken but I had saved it like the hoarder of things that I am! It took me almost a whole day to cut the mirrors because I needed 24 of these with the exact size. I cut all the mirrors at 3″ x 4-3/4″.
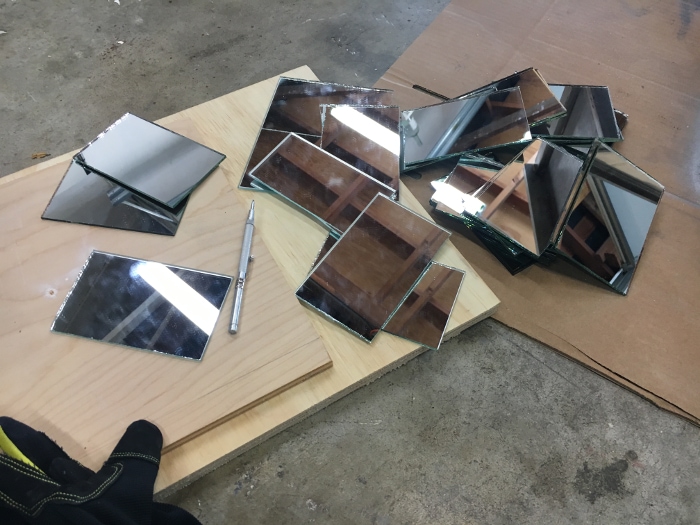
If you would like to give this a try yourself, I made a quick video showing you the whole process –
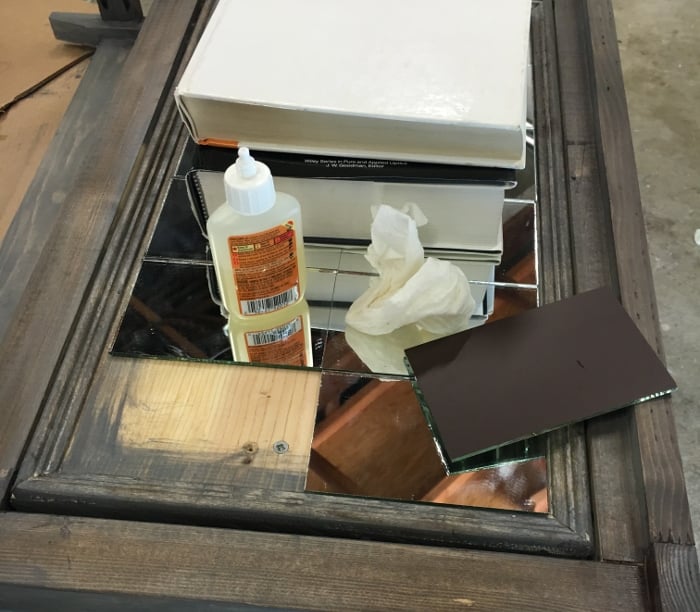
Step 11 – Attach the mirrors to the drawer faces. I used the fast dry white gorilla glue. I love it because it bonds literally anything to anything and is ready in 30 minutes. I put all my heavy books and some cans of windex and windshield fluid to good use to weigh down the mirrors while they dried.
Step 12 – Attach the knobs. To attach the knobs, I used a 1/4″glass bit and drilled slowly through the mirror. The key is to put a little water on the areas you are drilling top keep the bit cool. I found these knobs here. I think they work perfectly with the finish while also letting the mirrors be the star!

That’s it! The mirrored console table is ready! I have to admit, it did turn out better than I had expected!
And because I am so in love with the finish, here is a close up of that!

Thank you for reading! I hope you enjoyed this tutorial! Please do share it with your friends!

Looking for the tools to use for all your project? Take a look at my favorite tools here –
If you liked this DIY mirrored console table, you might also like –
This upholstered X-bench is a great beginner build! 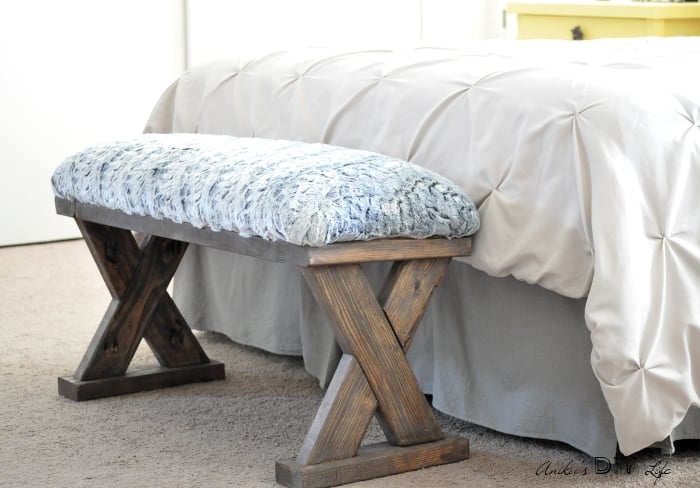
How about this X-leg console table?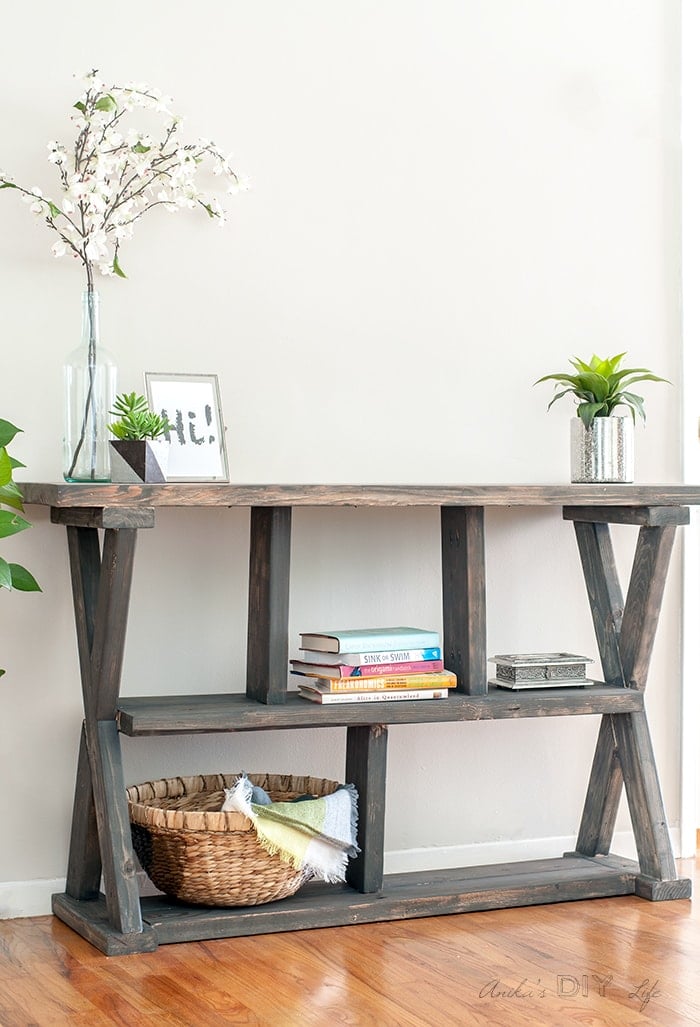
Or you could build a X-base side table. It looks complicated but is super easy and fun!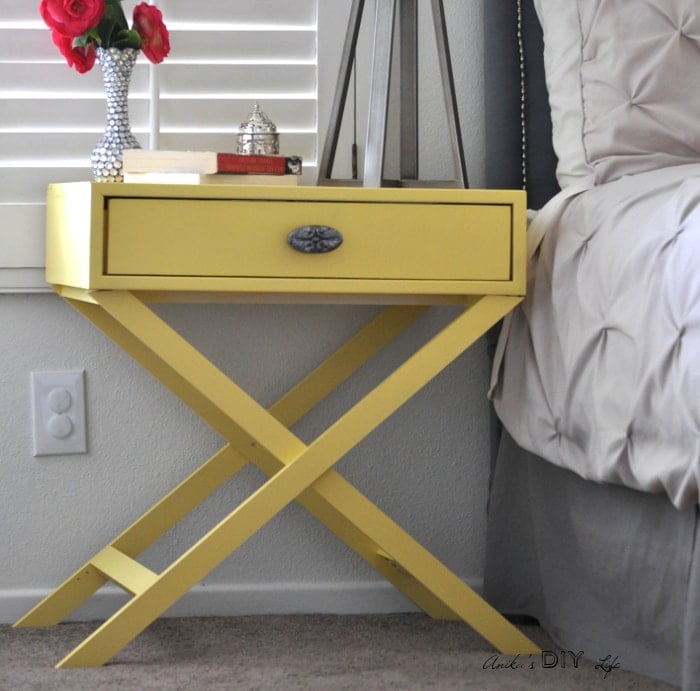
You might also enjoy these articles –
Anika's goal is to inspire and empower beginners with woodworking, DIY, home improvement, and home decor ideas.
She wants everyone to unlock their creative potential and experience the feeling that comes with making something. Nothing feels better better than seeing something and saying "I can make that!"


WOW stunning piece!! Absolutely amazing how it turned out! Thank you for sharing with #OMHGWW, I am so happy to have you featured this week! Pop by and see the post http://fromevijawithlove.com/2016/08/31/craft-room-ideas-wonderful/
Thank you so much Evija!!! I am excited to be at the party today!
So pretty! You are so talented with your building skills. Visiting from DIY Collective party.
Thanks Victoria!! 🙂
Hi! I found this post thru Knock off decor, and I must admit that it’s truly beautiful. Did not know you had your own blog; happy I found it!
Thank you Dina!! I am so glad you found the blog! I love seeing your comments and likes on Instagram!
Wow. amazing console. I love this. It is looking cool. And you have done a great job. I love your blog and may I have the Instagram links?
I much prefer your console over the store’s! I love mirrored furniture!
Thanks Giselle!! Mirrored furniture has such glamor to it 🙂