DIY Upholstered Bench Using 2 X 4 Boards
Learn how to build a simple DIY upholstered bench using 2×4 boards with detailed plans, tutorial, and video. It makes the perfect end of bed bench!

This DIY bench is a quick project – perfect for the weekend!
I have been slowly building furniture for my bedroom and the last remaining piece of the puzzle was an end of the bed bench. With this simple yet cozy bench, the bedroom is complete!

Table of Contents
- Material Needed
- DIY upholstered bench video
- Step by step tutorial
- How to upholster
- Printable plans
- Reader projects
- Pin this to Pinterest
The best part is that this bench is built from only two 2 x 4 boards making it really easy on the budget. It comes in under $10 for the lumber! Can’t beat that!
I decided to upholster the top with faux fur. It is simply so soft and luxurious! But you do not have to make an upholstered top. This bench can easily be modified to be an indoor/outdoor bench. See more about that here.
I know the X-leg features can be intimidating with all the angles for beginners but I have you covered with the plans, a video and lots of tips and tricks below. You will also find the following articles useful in building this bench –
***This post contains affiliate or referral links. It is a way for this site to earn advertising fees by advertising or linking to certain products and/or services. Please read my full disclosure here ***
Material Needed for the Bench
- Lumber per the plans.
- Miter Saw
- Kreg Jig
- 2 1/2″ pocket hole screws
- 2″ Spax screws
- Drill
- Staple gun
- 1″ Foam
- Polyfil – if you want to save money on this, I have a secret for you… read about it in the part where I upholster!
- Batting
- Fabric for upholstery. I used this faux fur from Joann. It is so amazingly soft!!
- 3/8″ staples
- Stain or paint of your choice (I used Weathered Gray and Dark Walnut)
How to Build the Upholstered Bench
I have a full video tutorial showing you exactly how to build this bench.
Click here to subscribe to my YouTube Channel for more great videos!
Step by Step Tutorial
Step 1 – Make the Cuts
- Make the cuts per the cut list in the plans. I would recommend dry-fitting the cuts as you go to get the best possible fit.
- Sand them smooth.

Tip – When cutting angles – leave your miter saw set at the angle you need for all the cuts to get reproducible cuts.
Step 2 – Make Pocket Holes
- Set the Kreg Jig and the drill bit collar at 1½” thickness and make all the pocket holes as shown in the plans. Here is a full tutorial on how to use a Kreg Jig.
Step 3 – Make the X’s for the Legs
- Assemble the 2 side X’s using wood glue and 2 1/2” pocket hole screws.
- Attach each of the X’s to the feet using wood glue and 2 1/2” Pocket hole screws.

IMPORTANT – Make sure you lay out the pieces first before proceeding to join them to make sure all the boards align well.
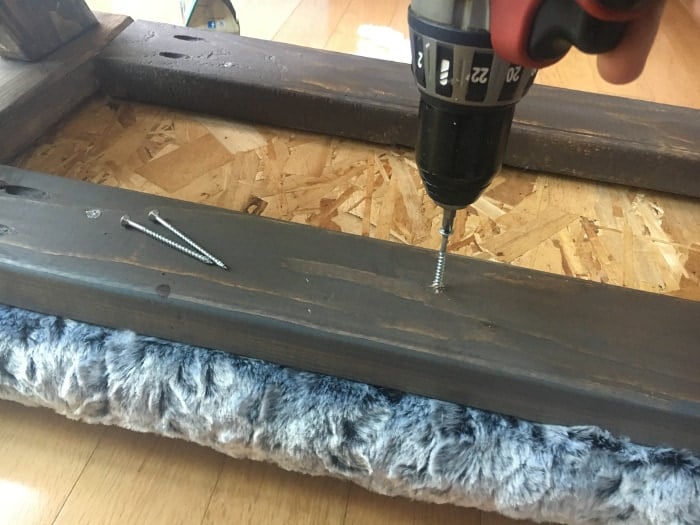
Step 4 – Build the top frame
Build the frame using 2×4 boards using wood glue and 2 1/2” Pocket hole screws.

Step 5 – Assemble the bench
Attach the two X- legs to the frame.

Important – While assembling the legs, make sure the pocket holes are facing inside. You don’t want the pocket holes to be on the outside of the bench.
Step 6- Finishing
- If you would like to use wood filler to fill up the pocket holes, you can. I chose to leave mine alone and just filled them with stain to camouflage them in. They are hardly visible.
- Stain or paint your bench frame. I used weathered gray and dark walnut stains mixed together to create a beautiful effect.

Below is a video showing you exactly how I achieved the finish.
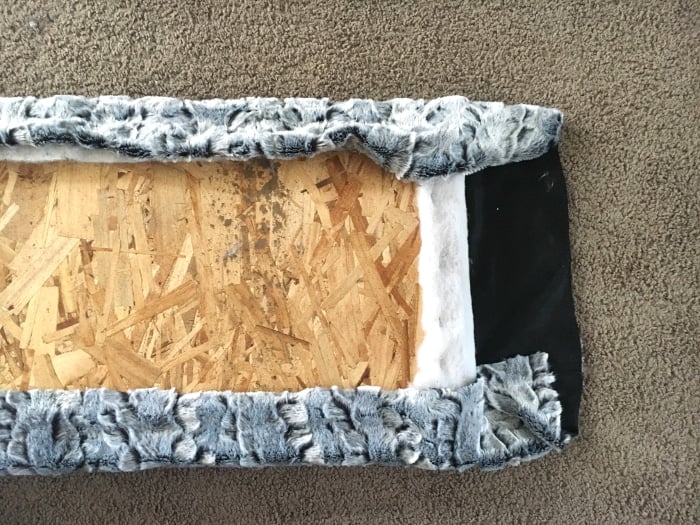
Step 7 – Upholster the Top
I decided to add an upholstered top because I wanted a nice soft seating place in the bedroom. You can totally skip this and opt for a planked top made from 2×4 boards – which I show you in this indoor/outdoor version of this bench.
- Cut out 1″ foam to the size of your plywood. I used a bunch of leftover foam from various projects
- Glue the foam to the plywood using spray adhesive

- Cover the foam with polyfill. Wrap with batting and staple from the back.
Money-saving tip – instead of the polyfill, I used the filling from a couple of pillows – they are about $1.50 at Walmart and much cheaper than buying a bag of polyfill!!
- Cover with the upholstery fabric and staple from the back. I chose this beautiful Faux Fur from Joann’s.
Step 8 – Complete the Bench
Once the benchtop is upholstered, attach the top using 2” screws to the frame built in Step 5.
Printable Plans
Get the Printable plans for this bench here.
You can get the Printable Plans for this Upholstered X-bench!
More Related Projects –
- DIY X-leg console table
- 30 Easy DIY bench ideas you can build today
- DIY 2×4 project ideas
- DIY furniture using X-legs
Reader Projects
Benches built by readers just like you!


Anika's goal is to inspire and empower beginners with woodworking, DIY, home improvement, and home decor ideas.
She wants everyone to unlock their creative potential and experience the feeling that comes with making something. Nothing feels better better than seeing something and saying "I can make that!"


Hi, do you happen to know what size of faux fur you ended up using? I am going to build this but am going to quilt the top.
Hi Codi! I used about 45 x 26 inches. A quilted top sounds like so much fun!! Please do share a picture with me when you make it. I would love to see!
This is gorgeous!! I just got a Kreg Jig and I think this would be a perfect project to test it out. We are snowed in and what better way to occupy my time lol. Quick question though, do you think I could make the top frame with 2x6s and the legs with 2x4s. I have a bunch of scrap wood at home and hoping to use those.
Congratulations on getting the Kreg Jig! Ye,s it is a great beginner project. You can definitely use 2x6s for the top frame. You can even use them for the bottom horizontal feet to make is more symmetrical with the top frame. I would love to see it when you make it! Please share a picture! 🙂 Happy building!
I just started working with wood I’am 58 yrs old I did one small project came out ok.I don’t have any high powered tools.Just the old relibles.Do you have any advice for me.Thank you
Hi Grace! Do you have a drill? If so, there are a lot of projects you can tackle. I would suggest getting lumber cut at the hardware store to your specifications. That is how I started out too. I only had a drill and a kreg jig. You can certainly use regular screws but the kreg jig makes it a lot easier and faster to screw pieces together. You can start with the Kreg R3 Jr. Pocket Hole Jig System if you don’t want to invest in the full version. Let me know if you have any specific questions and I will be happy to help!
This is so nice. You are really talented!!
Thanks you Michelle 🙂
I love this Anika!! I would like to build it in the near future 🙂
Thanks!! It is a fun and easy build! I am sure you will love it!