How to Make Hand-Formed DIY Concrete Pumpkins – No Mold Needed!
With this simple, beginner-friendly, and fun technique, learn how to make DIY concrete pumpkins of any shape using dollar store pumpkins.

With fall around the corner, there is pumpkin everything in the air. Fall decor is all about warm tones and cozy things.
I have been looking forward to trying my hand at a concrete project for a while. I thought concrete pumpkins would be a great way to start off working with concrete.
But to make concrete projects, you first need a mold. And didn’t want to make the usual run-of-the-mill concrete jack o lantern using plastic pumpkins.
Looking through videos of concrete projects, I realized that the consistency of concrete mix depended on the amount of water used. So, you could, in essence, make a putty-type texture and hand-form it.
So, I decided to play with it a little bit and give it a go. I love how they turned out and it only took about an hour to make!

RELATED: Easy 5-minute Fall Wreath
How to Make Cement Pumpkins
Here is a quick video showing you how to make these cement pumpkins. I also have the step by step tutorial listed below.
Click here to subscribe to my YouTube Channel for more great videos!
***This post contains referral or affiliate links. It is a way for this site to earn advertising fees by advertising or linking to certain products and/or services. Please read my full disclosure here ***
Material Needed
- Fast setting Concrete mix (I used this one )
- Faux pumpkins (I got mine at the dollar store)
- Old bucket or container for mixing concrete (I used my kids’ old easter basket)
- Paint stick
- Gloves
- Paint of choice. I used copper, gold, metallic aqua and metallic green.
- Warm water
- Measuring cup and spoon
- Dust mask (very important because you don’t want to be breathing in that concrete dust)
DIY Concrete Pumpkins Tutorial
Step 1 – Mix Concrete
Put on your dust mask and gloves to get started. You don’t want to be breathing in the concrete dust.
- Mix the concrete mix with warm water in the bucket per the directions.
I used the directions for the hand-formed mixture. The concrete consistency should be almost like clay or Play-Doh. It should be easily moldable and not too hard or soft.

Step 2 – Hand-Form Pumpkins
- Slowly form the concrete on top of the faux pumpkin.
- Make sure the layer is not too thick so you can see some of the pumpkin’s ridges on the shape. I also added concrete on the “stems” of the pumpkins.
The great thing about this technique is that you can use any shape/size of pumpkin and hand form over it. No molds are needed!
- Once covered completely, lay the pumpkins on a plastic bag or parchment paper to dry.
- Leave to dry for 24 hours.

Step 3 – Paint
- Paint in your choice of color and pattern.
Once the concrete is dry, you can go to town painting or decorating the pumpkins however you like.

I decided to use a bunch of metallic colors to add some fun patterns. I added a stripe pattern, a gold-dipped effect, and a paint drip effect (which has to be my favorite one!). I also painted the stems with metallic green.
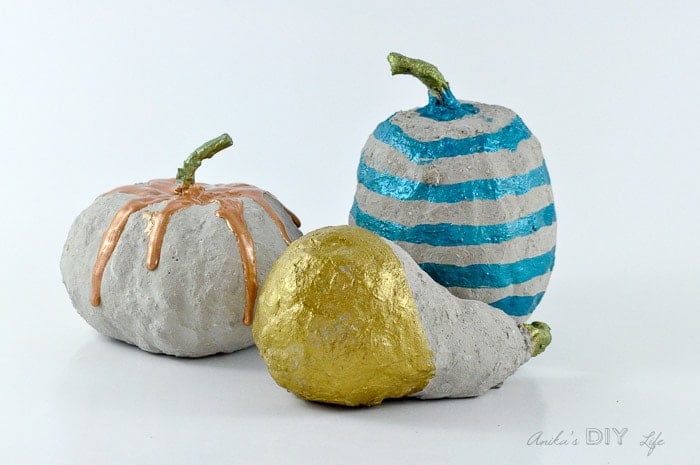
That’s it! Simple 3-step DIY concrete pumpkins!
I really love how they turned out. And it was so easy too! I think hand-forming the shapes opens up a whole new set of possibilities!
No need to worry about molds… now I can turn any shape into concrete! My head is already spinning with all the ideas.
Do you know they also have pigments you can use to color the concrete! There are so many things I could do with them!
You will also love these 33 unique no-carve pumpkin decorating ideas and these 20 fun DIY wood pumpkin ideas
Other Easy DIY Concrete Project Ideas
- DIY concrete flowers – made using a similar technique!
- Easy Concrete and copper planter – because concrete and copper were born to be together!
- DIY Concrete planter with wooden feet – Combining concrete with my favorite component – wood.
Anika's goal is to inspire and empower beginners with woodworking, DIY, home improvement, and home decor ideas.
She wants everyone to unlock their creative potential and experience the feeling that comes with making something. Nothing feels better better than seeing something and saying "I can make that!"


How adorable are these concrete pumpkins. I love how you created them and love that you shared at Dishing it and Digging it link party.
Thank you Venessa!
Cute idea Anika! This is something I haven’t tried, but it looks like fun! Thanks so much for sharing with us at Snickerdoodle Create-Bake-Make Link Party! Have a wonderful week!
Thanks Laurie… Try it out. It is so fun and so easy!
Anika, I love this idea! Just being able to use a little bit of mix to create what looks like a solid little pumpkin is so clever. Thanks for sharing with us at Funtastic Friday!
Thanks Angie!
So cute, they turned out adorable. I just saw them at the dollar store yesterday when I stopped by, I thought of your video and they made me smile 🙂
Thank you Toni 🙂
Fascinating project. You’re very creative!
Thank you Carol!