How to build an X-Leg Accent table – Free Plans
This X-leg accent table is an easy build and this detailed step by step tutorial with free plans will show you how you can build one that looks straight out of the store.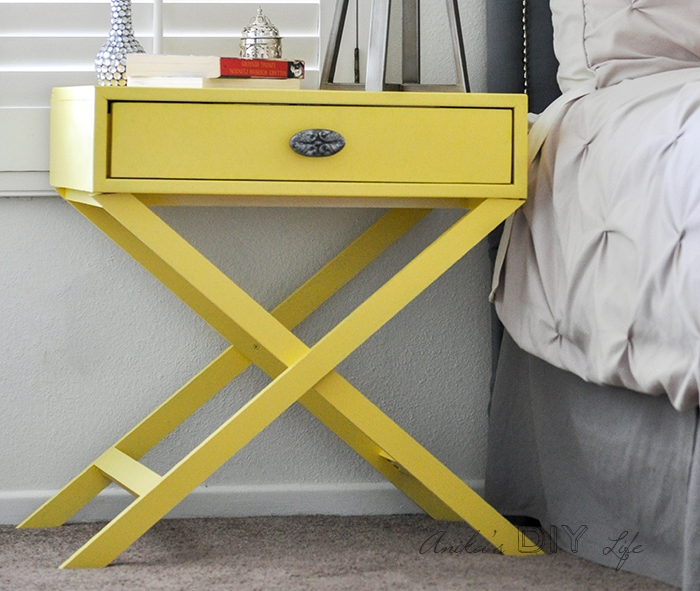
Is there anything more fun than yellow nightstands? I know it might not be for everyone but I love color and decided that the master bedroom needed a dose of whimsical color!
Not into building furniture? Check out 15 affordable nightstands for under $150 for every style!
***This post contains affiliate or referral links. It is a way for this site to earn advertising fees by advertising or linking to certain products and/or services. Please read my full disclosure here ***
A DIY Master Bedroom
2 years ago, we moved across the state and I took the opportunity to sell our matchy-matchy brown bedroom set. After building an upholstered headboard and giving an Ikea Dresser a fabric paneled makeover, it was time to build nightstands.

After tons of hours on the internet, I decided on an x-base accent table for the night stand… I love the clean lines and the whimsy the x-legs bring.
There are so many in the market but my favorite is the Kenton x-base accent table. It is $166 for the yellow which is not bad but I wanted to make it myself.
Guess what – I managed to make it for $40 including paint and knob and it took about 2 hours to build (including the setbacks with the saw blade I will tell you about later)!
I have done my share of woodworking, but never built anything with angles or drawers and this build promised to have both. I reached out to Jamison at Rogue Engineer and he so generously agreed to put together the plans! See the link to download the plans at the bottom of the post!
Materials and tools required –
- Lumber per the plans
- Miter saw
- Kreg Jig
- 1¼” Pocket hole screws
- Circular saw
- 1¼” Spax screws
- Wood glue
- Kreg Right angle clamp
- 1¼” finish nails
- Nail gun or Hammer
- Level
- Drill and drill bits
See the full list of my favorite must have tools here
How to build an X-Leg Accent Table –

Step 1 – Start with the box. Rip plywood and assemble them per plans. Jamison’s plans call for nails but I don’t own a nail gun. I used the Kreg jig instead and made pocket holes as shown below. If you have a nail gun, things will definitely be a lot faster.

Step 2 – Build the base – make the cuts and the pocket holes as below.

Step 3 – Build the 2 sets of legs. One uses the 16-1/2″ support and the other a 15″ support.

Step 4 – Build the frame support with the rails.

Step 5 –Time to make the “X”. Position the legs in the x-configuration and attached the legs to the supports using the pocket holes. Use a scrap piece of 1″x2″ to keep the frame level while you attach.

Step 6 – This is the super important step – make sure the base is level before attaching the screws in the center of the X.

Step 7 – Once the base is level, clamp one “X” and drill and screw the center of the other “X” using countersunk screws. Repeat for the other side.
Step 8 – The drawer was built exactly per the plans. I was super nervous about everything being square but it worked out in the end and the drawer worked smoothly!

I had extremely frustrating blade issues with my circular saw and it splintered the plywood when I ripped it. Thankfully it was going to be the bottom of the drawer. Once I changed the blade, it was smooth sailing. Attach the base of the drawer and the drawer face per the plans.

Step 9 – On the exposed plywood edges, I used screen molding I had leftover from another project but you would also use veneer edging if you like. I simply used my staple gun to attach it with 5/8″ finish nails and then covered them with wood putty.
Step 10 – Attach the box to the x-base. Note that one leg is “behind” the other and so there will be a 3/4″ space on one side (see the arrows in the picture below)

Confession – I spent about half an hour on this super simple task! I spent 20 minutes trying to figure out why the front of my box would not line up with the front of the frame! I couldn’t believe my frame or box was so off-square!!! Then I had a light bulb moment! It’s not supposed to be aligned! (rolls eyes..) DUH!!!

And we are built!!!
How to finish the X-leg accent table –
Fill all visible pocket holes (2 on each side of the box) with wood putty. You can stain it or prime and paint it like I did. I used my Homeright paint sprayer for painting.
Check out my favorite painting tools and tips here.
Paint is Behr Marquis color matched to Glidden’s “Mayflower”. The knob is from hobby lobby. It was originally black and I gave it some silver rub ‘n buff love.

Here it is in its home and all dressed up! It turned out exactly what I had envisioned for the night stand! I am so happy with it and it feels so great to finally have a night stand!
The lamp and lampshade are from Target and the flower on the lampshade is from Hobby Lobby.
Didn’t it turn out gorgeous?! As promised, here is the link to download the plans from Jamison’s site –
Now next is to tackle the other side of the bed… I am going for mismatched nightstands…


UPDATE: I built another yellow nightstand for the other side!


This DIY X-base accent table is just one of the many DIY projects in my master bedroom!

There is another yellow Pottery Barn inspired nightstand on the other side of the bed –
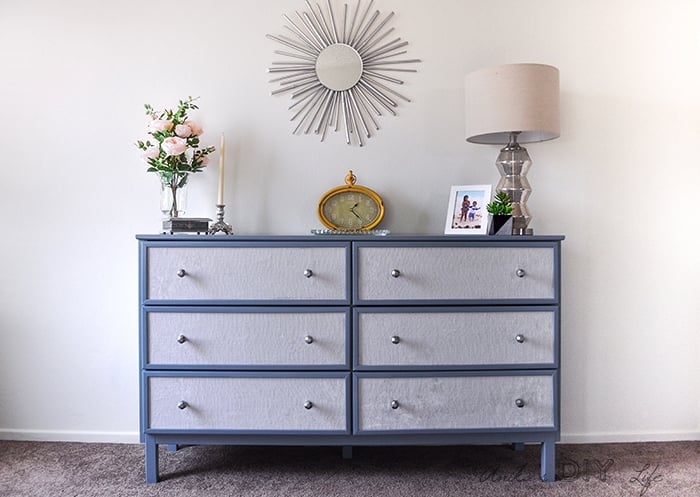
The dresser is an Ikea Tarva hack with fabric paneled drawers
Anika's goal is to inspire and empower beginners with woodworking, DIY, home improvement, and home decor ideas.
She wants everyone to unlock their creative potential and experience the feeling that comes with making something. Nothing feels better better than seeing something and saying "I can make that!"


Beautifully done Anika. I still cannot believe that you did this one from scratch. And I especially love the color you painted it. A showpiece for sure. Pinning and sharing. Thanks for all of the sweet inspiration you give to us.
Thank you for all the love Mary!!
This is awaesome! Love the color too! You are so talented…..thanks for sharing atVIntage Charm! xokathleen
Love this accent table. You make it look so easy to make. You are one of my featured picks for this week. I hope you stop by today. http://www.farmhouse40.com
I love this! You have inspired me to try this!
You did a great job! I love the style and color of the nightstand.