IKEA Duktig Kitchen Hack – Fun and Colorful
Share this post:
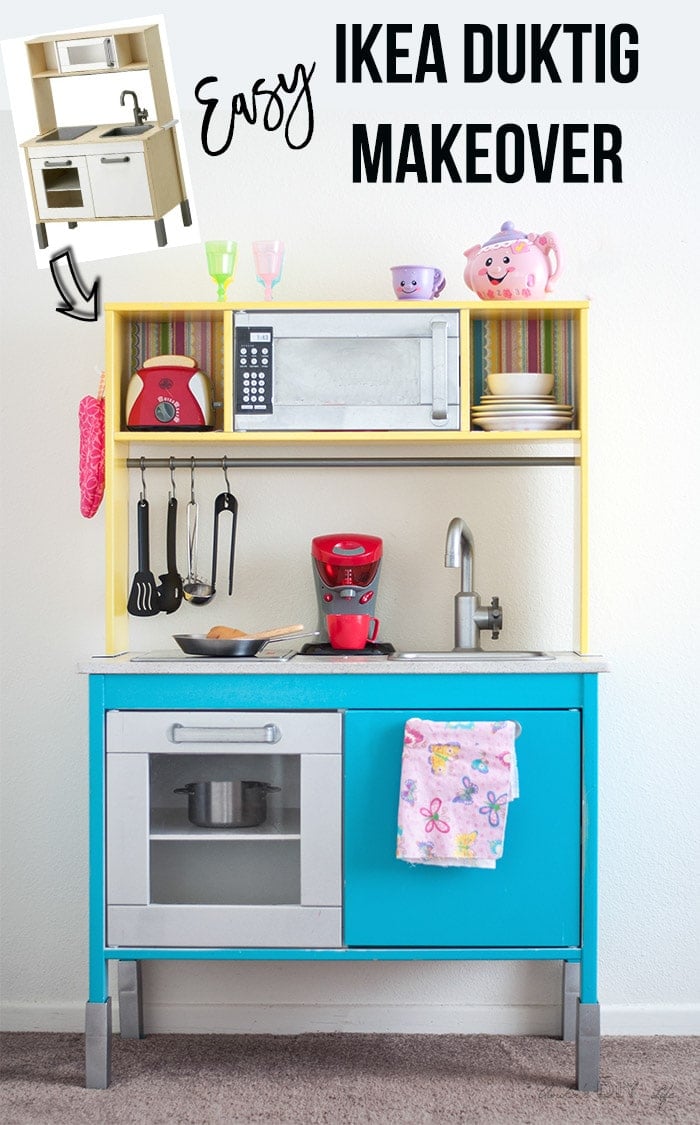
This Ikea Duktig Kitchen hack takes the plain Ikea kitchen and transforms it into a fun and colorful kids play kitchen with just a bit of paint and paper!
IKEA Play Kitchen Makeover
This Ikea Duktig kitchen hack is from my pre-blogging days so I apologize for the lack of in-process pictures but I will try my best to give you a sense of exactly how I did this!
The Duktig kitchen was actually a gift for my daughter’s 4th birthday. I love the functionality and the sturdiness of it, especially for the price. Of course, I couldn’t leave it plain and brown! It needed to be fun and whimsical. So I gave it a fun colorful makeover using paint and scrapbook paper.
Related: Colorful IKEA Latt Children’s Table and Chair Set Hack
***This post contains affiliate or referral links. It is a way for this site to earn advertising fees by advertising or linking to certain products and/or services. Please read my full disclosure here ***
Paint Colors and Materials Used –
- Rustoleum Titanium Silver
- Rustoleum Seaside
- Rustoleum Sun Yellow
- Krylon Make it Stone! in Charcoal Sand
- Clear acrylic
- Mod Podge
- Colorful scrapbook paper
- Spray Shelter (Optional but recommended)
How to Makeover an IKEA Duktig Kitchen-
If you don’t have access to Ikea, the Ikea Duktig play kitchen is also available on Amazon although it is a bit more expensive.
Before assembling the kitchen, the oven door, microwave door, faucet, sink and handles got a brushed stainless steel look. I used Rustoleum’s Titanium Silver for this.
Related: Picking the Perfect Silver Spray Paint

Next, I assemble the base structure leaving out the doors and the countertop. The base structure and the bottom door got a coat of Rustoleum Seaside.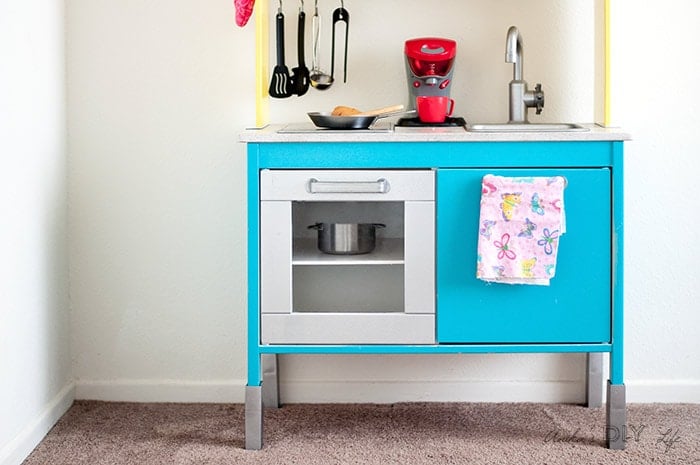
Related: A Colorful IKEA Tarva Makeover
Let’s talk about the hutch – all the parts of the hutch got painted separately before assembling in Rustoleum Sun Yellow. I found the microwave keypad printable here and used mod podge to attach it. 
Before assembling the hutch, I figure out the exact location of the selves and used mod podge and colorful scrapbook paper to add “wallpaper” and shelving paper.
The Counter – I used Krylon Make it Stone! in Charcoal Sand to give it the stone texture. The key to using this stone effect spray paint to achieve a well-distributed texture is to use quick short bursts. I followed it with a few coats of clear acrylic to seal it in.
Yes, I used mostly spray paint because I didn’t own a paint sprayer at that time and with a 6-month-old on my hip, I didn’t have the patience to paint by hand.
I left all the parts out in the backyard to outgas for almost a whole week before bringing them in and assembling everything.
The kids love it and have been using it for almost 4 years now! The paint still looks brand new!
Play kitchen accessories shown –
- Stainless steel cookware and utensil set – find it at Ikea too.
- Coffee machine and toaster – a hand me down – similar set here.
- Plastic play food
- Plates and bowls – find it at Ikea too.
- Laugh and learn tea set
- Kids oven mitts – discontinued – Similar here

Check Out My Favorite Play Kitchen Accessories –
Just click on the picture to go to the retailer.

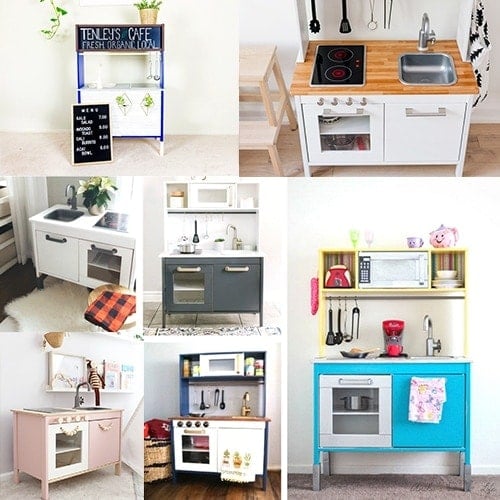
If you enjoyed this IKEA duktig kitchen hack, you might also like –
-
- A Quick Ikea Skoj Wall clock Hack – Take the simple Ikea Skoj wall clock to a new level
- Fabric Paneled dresser – Ikea Tarva Makeover – An Ikea dresser hack
- Ikea Latt Makeover – A flowery makeover of the kids table and chair set.
Anika's goal is to inspire and empower beginners with woodworking, DIY, home improvement, and home decor ideas.
She wants everyone to unlock their creative potential and experience the feeling that comes with making something. Nothing feels better better than seeing something and saying "I can make that!"
- Anika Gandhi
- Anika Gandhi
- Anika Gandhi
- Anika Gandhi
- Anika Gandhi
- Anika Gandhi
- Anika Gandhi
- Anika Gandhi
- Anika Gandhi
- Anika Gandhi
- Anika Gandhi
- Anika Gandhi
- Anika Gandhi
- Anika Gandhi
- Anika Gandhi
- Anika Gandhi
- Anika Gandhi
- Anika Gandhi
- Anika Gandhi
- Anika Gandhi
- Anika Gandhi
- Anika Gandhi
- Anika Gandhi
- Anika Gandhi
- Anika Gandhi
- Anika Gandhi
- Anika Gandhi
- Anika Gandhi
- Anika Gandhi
- Anika Gandhi
- Anika Gandhi
- Anika Gandhi
- Anika Gandhi
- Anika Gandhi
- Anika Gandhi
- Anika Gandhi
- Anika Gandhi
- Anika Gandhi
- Anika Gandhi
- Anika Gandhi
- Anika Gandhi
- Anika Gandhi
- Anika Gandhi
- Anika Gandhi
- Anika Gandhi
- Anika Gandhi
- Anika Gandhi
- Anika Gandhi
- Anika Gandhi
- Anika Gandhi
- Anika Gandhi
- Anika Gandhi
- Anika Gandhi
- Anika Gandhi
- Anika Gandhi
- Anika Gandhi
- Anika Gandhi
- Anika Gandhi
- Anika Gandhi
- Anika Gandhi
- Anika Gandhi
- Anika Gandhi
- Anika Gandhi
- Anika Gandhi
- Anika Gandhi
- Anika Gandhi
- Anika Gandhi
- Anika Gandhi
- Anika Gandhi
- Anika Gandhi
- Anika Gandhi
- Anika Gandhi
- Anika Gandhi
- Anika Gandhi
- Anika Gandhi
- Anika Gandhi
- Anika Gandhi
- Anika Gandhi
- Anika Gandhi
- Anika Gandhi
- Anika Gandhi
- Anika Gandhi
- Anika Gandhi
- Anika Gandhi
- Anika Gandhi
- Anika Gandhi
- Anika Gandhi
- Anika Gandhi
- Anika Gandhi
- Anika Gandhi
- Anika Gandhi
- Anika Gandhi
- Anika Gandhi
- Anika Gandhi
- Anika Gandhi
- Anika Gandhi
- Anika Gandhi
- Anika Gandhi
- Anika Gandhi
- Anika Gandhi
- Anika Gandhi
- Anika Gandhi
- Anika Gandhi
- Anika Gandhi
- Anika Gandhi
- Anika Gandhi
- Anika Gandhi
- Anika Gandhi
- Anika Gandhi
- Anika Gandhi
- Anika Gandhi
- Anika Gandhi
- Anika Gandhi
- Anika Gandhi
- Anika Gandhi
- Anika Gandhi
- Anika Gandhi
- Anika Gandhi
- Anika Gandhi
- Anika Gandhi
- Anika Gandhi
- Anika Gandhi
- Anika Gandhi
- Anika Gandhi
- Anika Gandhi
- Anika Gandhi
- Anika Gandhi
- Anika Gandhi
- Anika Gandhi
- Anika Gandhi
- Anika Gandhi
- Anika Gandhi
- Anika Gandhi
- Anika Gandhi
- Anika Gandhi
- Anika Gandhi
- Anika Gandhi
- Anika Gandhi
- Anika Gandhi
- Anika Gandhi
- Anika Gandhi
- Anika Gandhi
- Anika Gandhi
- Anika Gandhi
- Anika Gandhi
- Anika Gandhi
- Anika Gandhi
- Anika Gandhi
- Anika Gandhi
- Anika Gandhi
- Anika Gandhi
- Anika Gandhi
- Anika Gandhi
- Anika Gandhi
- Anika Gandhi
- Anika Gandhi
- Anika Gandhi
- Anika Gandhi
- Anika Gandhi
- Anika Gandhi
- Anika Gandhi
- Anika Gandhi
- Anika Gandhi
- Anika Gandhi
- Anika Gandhi
- Anika Gandhi
- Anika Gandhi
- Anika Gandhi
- Anika Gandhi
- Anika Gandhi
- Anika Gandhi
- Anika Gandhi
- Anika Gandhi
- Anika Gandhi
- Anika Gandhi
- Anika Gandhi
- Anika Gandhi
- Anika Gandhi
- Anika Gandhi
- Anika Gandhi
- Anika Gandhi
- Anika Gandhi
- Anika Gandhi
- Anika Gandhi
- Anika Gandhi
- Anika Gandhi
- Anika Gandhi
- Anika Gandhi
- Anika Gandhi
- Anika Gandhi
- Anika Gandhi
- Anika Gandhi
- Anika Gandhi
- Anika Gandhi
- Anika Gandhi
- Anika Gandhi
- Anika Gandhi
- Anika Gandhi
- Anika Gandhi
- Anika Gandhi
- Anika Gandhi
- Anika Gandhi
- Anika Gandhi
- Anika Gandhi
- Anika Gandhi
- Anika Gandhi
- Anika Gandhi
- Anika Gandhi
- Anika Gandhi
- Anika Gandhi
- Anika Gandhi
- Anika Gandhi
- Anika Gandhi
- Anika Gandhi
- Anika Gandhi
- Anika Gandhi
- Anika Gandhi
- Anika Gandhi
- Anika Gandhi
- Anika Gandhi
- Anika Gandhi
- Anika Gandhi
- Anika Gandhi
- Anika Gandhi
- Anika Gandhi
- Anika Gandhi
- Anika Gandhi
- Anika Gandhi
- Anika Gandhi
- Anika Gandhi
- Anika Gandhi
- Anika Gandhi
- Anika Gandhi
- Anika Gandhi
- Anika Gandhi
- Anika Gandhi
- Anika Gandhi
- Anika Gandhi
- Anika Gandhi
- Anika Gandhi
- Anika Gandhi
- Anika Gandhi
- Anika Gandhi
- Anika Gandhi
- Anika Gandhi
- Anika Gandhi
- Anika Gandhi
- Anika Gandhi
- Anika Gandhi
- Anika Gandhi
- Anika Gandhi
- Anika Gandhi
- Anika Gandhi
- Anika Gandhi
- Anika Gandhi
- Anika Gandhi
- Anika Gandhi
- Anika Gandhi
- Anika Gandhi
- Anika Gandhi
- Anika Gandhi
- Anika Gandhi
- Anika Gandhi
- Anika Gandhi
- Anika Gandhi
- Anika Gandhi
- Anika Gandhi
- Anika Gandhi
- Anika Gandhi
- Anika Gandhi
- Anika Gandhi
- Anika Gandhi
- Anika Gandhi
- Anika Gandhi
- Anika Gandhi
- Anika Gandhi
- Anika Gandhi
- Anika Gandhi
- Anika Gandhi
- Anika Gandhi
- Anika Gandhi
- Anika Gandhi
- Anika Gandhi
- Anika Gandhi
- Anika Gandhi
- Anika Gandhi
- Anika Gandhi
- Anika Gandhi
- Anika Gandhi
- Anika Gandhi
- Anika Gandhi
- Anika Gandhi
- Anika Gandhi
- Anika Gandhi
- Anika Gandhi
- Anika Gandhi
- Anika Gandhi
- Anika Gandhi
- Anika Gandhi
- Anika Gandhi
- Anika Gandhi
- Anika Gandhi
- Anika Gandhi
- Anika Gandhi
- Anika Gandhi
- Anika Gandhi
- Anika Gandhi
- Anika Gandhi
- Anika Gandhi
- Anika Gandhi
- Anika Gandhi
- Anika Gandhi
- Anika Gandhi
- Anika Gandhi
- Anika Gandhi
- Anika Gandhi
- Anika Gandhi
- Anika Gandhi
- Anika Gandhi
- Anika Gandhi
- Anika Gandhi
- Anika Gandhi
- Anika Gandhi
- Anika Gandhi
- Anika Gandhi
- Anika Gandhi
- Anika Gandhi
- Anika Gandhi
- Anika Gandhi
- Anika Gandhi
- Anika Gandhi
- Anika Gandhi
- Anika Gandhi
- Anika Gandhi
- Anika Gandhi
- Anika Gandhi
- Anika Gandhi
- Anika Gandhi
- Anika Gandhi
- Anika Gandhi
- Anika Gandhi
- Anika Gandhi
- Anika Gandhi
- Anika Gandhi
- Anika Gandhi
- Anika Gandhi
- Anika Gandhi
- Anika Gandhi
- Anika Gandhi


It looks amazing! So crafty:) Thanks so much for sharing with us at Family Joy Link Up!
Thank you Laura!
Anika, You are so talented. This makeover is adorable. Any little girl would love it!
So very adorable!! Great idea! Thank you so much for sharing at my craft party on Thursday! Domenica has chosen this as her favorite! Would love to see your newest posts this week, which starts at 7pm EST.
Did you redo the kitchen after it was assembled or did you buy it with the intention to remodel? My daughter has had this kitchen for about 2 years now and I want to give it a face lift but I’m not sure if it’s going to be really difficult since it’s already assembled.
Hi Tiffany, I bought the kitchen with the intention of redo-ing it. I painted it while it was still separate pieces. Since yours is already assembled you could remove the hutch and paint most of it by hand. For the counter, you could take off the stove, faucet and sink, tape the bottom cabinet and use the textured spray paint. Let me know if it works out for you!
Amazing make over, thanks for sharing, just wondering did you sand any of it down before you sprayed it or did you use a primer etc?
Thanks
Thanks Gemma! I did not sand it down. I did use spray primer before spraying with color.