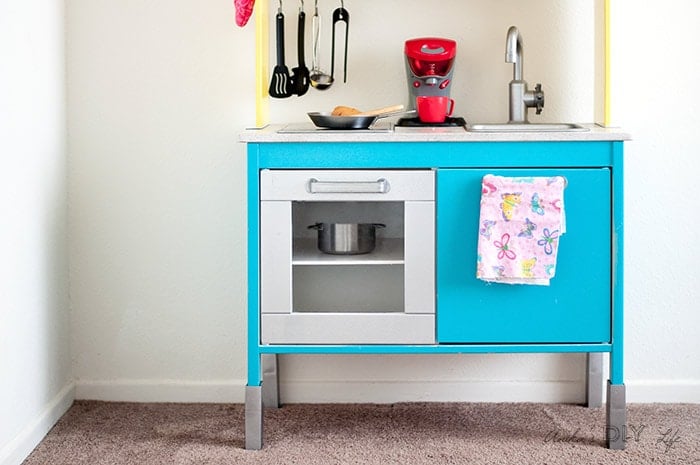
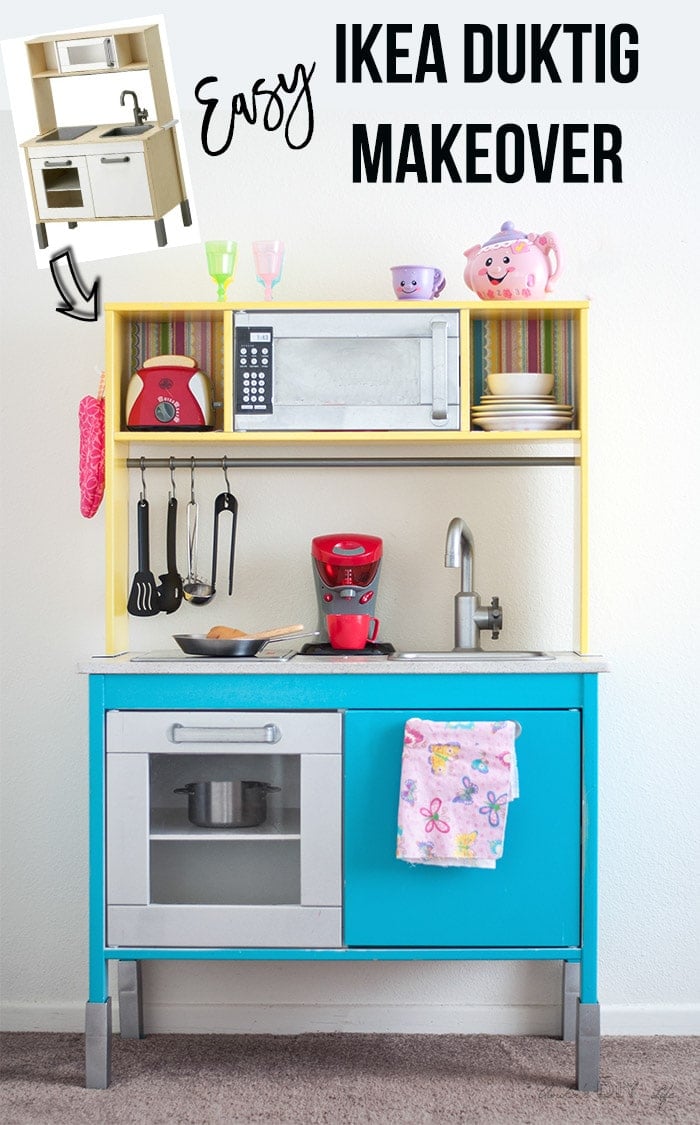
This Ikea Duktig Kitchen hack takes the plain Ikea kitchen and transforms it into a fun and colorful kids play kitchen with just a bit of paint and paper!
IKEA Play Kitchen Makeover
This Ikea Duktig kitchen hack is from my pre-blogging days so I apologize for the lack of in-process pictures but I will try my best to give you a sense of exactly how I did this!
The Duktig kitchen was actually a gift for my daughter’s 4th birthday. I love the functionality and the sturdiness of it, especially for the price. Of course, I couldn’t leave it plain and brown! It needed to be fun and whimsical. So I gave it a fun colorful makeover using paint and scrapbook paper.
***This post contains affiliate or referral links. It is a way for this site to earn advertising fees by advertising or linking to certain products and/or services. Please read my full disclosure here ***
If you don’t have access to Ikea, the Ikea Duktig play kitchen is also available on Amazon although it is a bit more expensive.
Before assembling the kitchen, the oven door, microwave door, faucet, sink and handles got a brushed stainless steel look. I used Rustoleum’s Titanium Silver for this.
Let’s talk about the hutch – all the parts of the hutch got painted separately before assembling in Rustoleum Sun Yellow. I found the microwave keypad printable here and used mod podge to attach it.
Before assembling the hutch, I figure out the exact location of the selves and used mod podge and colorful scrapbook paper to add “wallpaper” and shelving paper.
The Counter – I used Krylon Make it Stone! in Charcoal Sand to give it the stone texture. The key to using this stone effect spray paint to achieve a well-distributed texture is to use quick short bursts. I followed it with a few coats of clear acrylic to seal it in.
Yes, I used mostly spray paint because I didn’t own a paint sprayer at that time and with a 6-month-old on my hip, I didn’t have the patience to paint by hand.
I left all the parts out in the backyard to outgas for almost a whole week before bringing them in and assembling everything.
The kids love it and have been using it for almost 4 years now! The paint still looks brand new!
Anika's goal is to inspire and empower beginners with woodworking, DIY, home improvement, and home decor ideas.
She wants everyone to unlock their creative potential and experience the feeling that comes with making something. Nothing feels better better than seeing something and saying "I can make that!"
Such a fun makeover! Thank you for sharing at the Celebrate Your Story Link Up Party.
I love how you added some color to this play kitchen. Thanks for linking up at Family Joy Blog Link Up Party. So glad you joined us. I hope you come often.
Hi,
Do you think you could put lockable casters on the legs? I don’t have much space so would need to be able to move this around easily.
Thanks
Orla
Hi Orla, Yes, you could add casters on thebottom. You would just not be able to use the height adjusting pieces that come with the kitchen (the ones in silver on the feet)
This looks awesome! I’m thinking about DIY’ing or buying the little guy a play kitchen sometime soon. Thanks so much for the inspiration! Have an awesome week!
This is amazing! I LOVE Ikea, and this is such a cute little makeover!









Such a fun makeover! Thank you for sharing at the Celebrate Your Story Link Up Party.
I love how you added some color to this play kitchen. Thanks for linking up at Family Joy Blog Link Up Party. So glad you joined us. I hope you come often.
Hi,
Do you think you could put lockable casters on the legs? I don’t have much space so would need to be able to move this around easily.
Thanks
Orla
Hi Orla, Yes, you could add casters on thebottom. You would just not be able to use the height adjusting pieces that come with the kitchen (the ones in silver on the feet)
This looks awesome! I’m thinking about DIY’ing or buying the little guy a play kitchen sometime soon. Thanks so much for the inspiration! Have an awesome week!
This is amazing! I LOVE Ikea, and this is such a cute little makeover!