
DIY Kids Bedside Table With Book Storage
A step-by-step tutorial and build plans for a simple DIY kids’ bedside table with a bookshelf that is perfect for storing bedtime books!

Getting the perfect bedside table in a little kid’s room can be a struggle.
They don’t really need a nightstand with drawers because, let’s face it, drawers can quickly turn into bottomless pits.
The Kid’s Bedside Table Idea
This is what the situation looked like in our kid’s room –
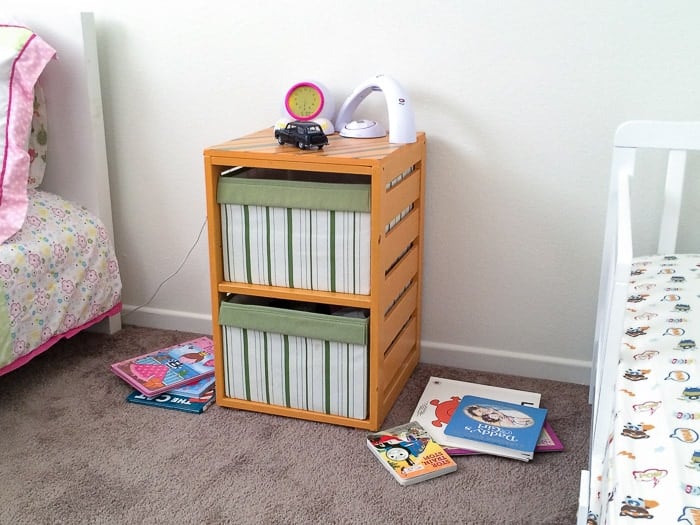
It was an old Ikea shelf (that had been through a few makeovers over the years too) with canvas bins.
I made a list of things we needed in that space and it was pretty short –
- Nightlight/clock
- Some toys
- Books
- Books
- Books
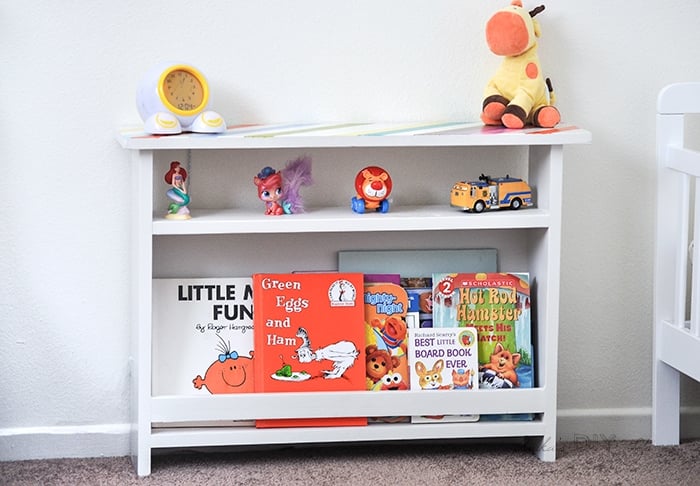
It was pretty obvious, it needed to be a bookshelf of sorts in the form of a nightstand!
This is what we ended up with. And it only cost about $6!!
***This post contains referral or affiliate links. It is a way for this site to earn advertising fees by advertising or linking to certain products and/or services. Please read my full disclosure here ***
Material Needed
- Lumber per plans
- Miter Saw
- Kreg Jig
- 1 1/4″ pocket hole screws
- Brad nailer or 1 1/4″ finish nails and hammer
- Drill/ driver
- Kreg right angle clamp
- Wood glue
- Wood putty
How to Build a Kids’ Nightstand
This is a very simple and easy project, perfect for beginner woodworkers. All you need to know is to make the cuts and then assemble using pocket holes.
Step 1 – Make the Cuts
- Make the cuts per the plans.
- Make pocket holes.
The material is ¾” thick, so the setting on the Kreg Jig will be ¾”.

Step 2 – Build the Frame
- Attach the shelves to the sides using glue and pocket hole screws.
Make sure that the pocket holes for the sides are facing outwards. These need to be accessible to attach the top.

Step 3 – Add Railing
- Attach the front rail using wood glue and pocket hole screws.
This railing supports the books. If you want, you can also attach it using wood glue and finish nails from the sides.

Step 4 – Add Back
- Attach hardboard or ¼” plywood to the back between the two shelves for the book storage area using wood glue and a brad nailer or a hammer and finish nails.

Step 5 – Attach Top
- Attach the top, leaving 1″ overhang on the sides and front.
You don’t want an overhang on the back, so you can put it up against the wall. I initially added an overhang in the back, and toys would keep falling through.

Step 6 – Finish
- Fill all the holes with wood putty, and sand.
- Stain or prime and paint as you like.
If you are painting, be sure to refer to my guide on how to paint unfinished pine to get a lasting finish!

I painted the table white and added colorful stripes to the top using masking tape and my giant hoard of oops paints. Who can pass up a 50-cent paint pot in a color you don’t have?
Step 7 – Install
This is important.
Attach an anti-tip strap the table. Or you can add a couple of screws through the back into the studs.
As the bookshelf fills with books, it can get front-heavy and topple. This is why it is important to anchor it to the wall.
UPDATE – 5 years later – it is still going strong! Here it is, in the kid’s new shared room!

It has totally solved the problem of clutter and the room looks so much neater! It even looks so amazing in the brand new painted kids room!
It took less than 30 minutes and $6 for me to build because I had most of the supplies and scrap wood to use but if you have to buy all the wood, it should still be under $15.
These are my favorite kind of projects – big impact, low cost 🙂
More Project Ideas for Kid’s Rooms –
See 28 more awesome DIY kids room ideas here.

Anika's goal is to inspire and empower beginners with woodworking, DIY, home improvement, and home decor ideas.
She wants everyone to unlock their creative potential and experience the feeling that comes with making something. Nothing feels better better than seeing something and saying "I can make that!"


GREAT job Anika! I am impressed. It looks awesome, and it is so functional for your children’s room! Thank you so much for sharing at The DIY Collective!
Thank you for reading Brooke! I am excited to be a part of the awesome party.
Very cute bedside table. I especially love the book rack. My kids have never done well with drawers, even now that they are getting older. Drawers end up becoming a black hole. Pinning so I can make one when I have time.
Thanks Rebecca, honestly I don’t do well with most drawers either – especially the ones that arr “multi-purpose” ;). Do let me know how it turns out when you make it.
I love that you have a place for all the bedtime books! I usually end up having a stash on the dresser until the pile gets too big and we put them away. Such a cure table.
Thanks Kati! It is that big huge stash around the beds that were the inspiration for this project 🙂
Your new little table looks great and it fits the space much better! i’m sure your girls appreciate having their book close at hand. Great job!
Thank you Pamela!
Anika, you did a fantastic job on this storage/side table! Not only do I love the shape but you the paint is so fun as well on top 🙂 Thank you for linking this up at our Bewitchin’ Projects Block party last week! You are one of my Featured picks tomorrow over at Recreated Designs. Hugs, Lisa